Do you want to install Urdu Fonts in Your WordPress website?
As a website developer in the Sub-continent, we get many requirements to make a website in the Urdu Language. As the Urdu Language started in India, many organizations, including Madaris, and many companies in India, as well as Pakistan, need their website to be in Urdu also.
We searched a lot for WordPress Urdu Websites but we didn’t get the appropriate result for making a WordPress website in the Urdu Language.
We will write in our upcoming Posts -regarding How to Make an Urdu WordPress Website. Here in this post, we are discussing one of the important tools for developing an Urdu WordPress Website and installing Urdu Fonts in WordPress.
How to use Urdu Fonts in WordPress Website Using Plugin
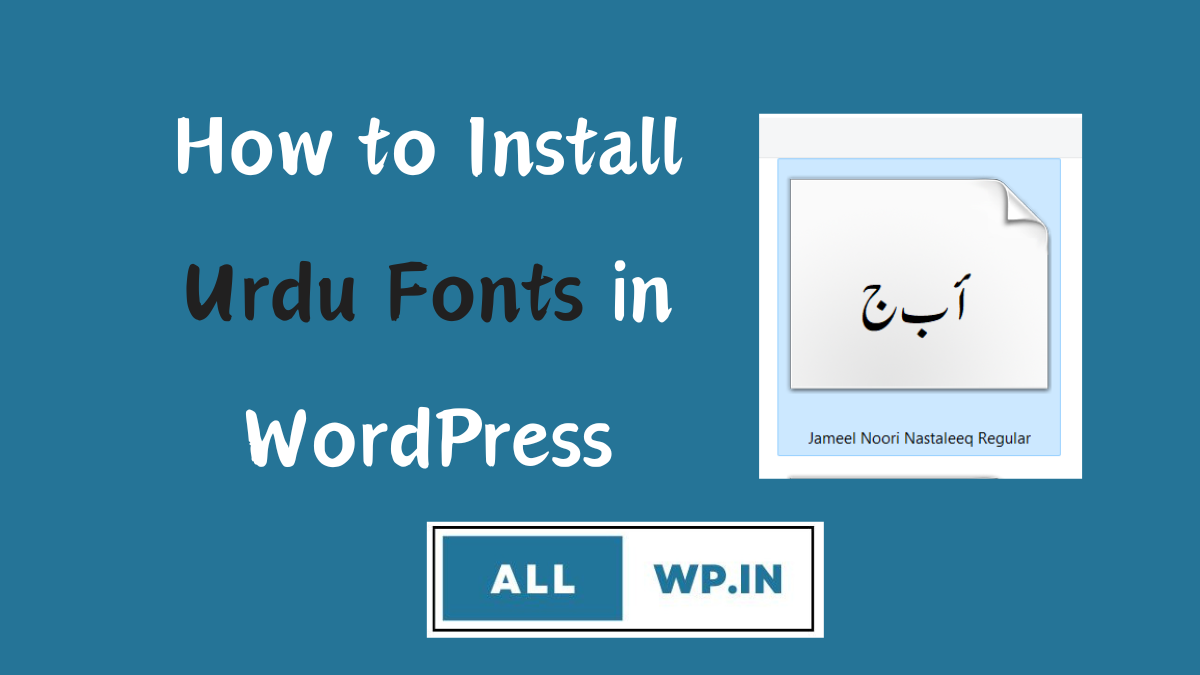
Assign the Jameel Noori Nastaleeq Fonts to Your WordPress Website as per requirement.
How to Upload Urdu Fonts on a WordPress Website
In Use Any Font Settings, Upload Jameel Noori Nastaleeq or any other fonts as per your website requirements.
How to Upload Urdu Fonts in WordPress
How to Assign Urdu Fonts to WordPress Website
After Uploading the Urdu Fonts to Our WordPress website, now we have to Assign Urdu Fonts to our WordPress Website. Just go to Use Any Font Settings, Click on Assign Fonts as shown in the image below and Assign Fonts to the required area of your WordPress Website. You can Assign Urdu Fonts to Site Titles, Site Descriptions, posts, Pages, and categories.
By this, You can make Your WordPress Website’s Fonts Urdu Fonts.
For more information about WordPress Themes, WordPress Plugins and all about WordPress kindly follow us.
The Hostinger WordPress plugin is primarily a setup assistant rather than a traditional plugin that adds new features to your website. It’s mainly installed automatically when you choose Hostinger’s WordPress hosting and helps guide you through the initial website launch process.
Provides step-by-step instructions: The plugin takes you through basic tasks like uploading a logo, editing the website title and description, adding a new page, and previewing your site.
Offers quick access to key tools: It gives you direct links to useful features within your Hostinger control panel, including theme selection, email setup, and website optimization tools.
Simplifies getting started: For beginners, the plugin can help make the initial WordPress setup less overwhelming by streamlining the process.
Hostinger WordPress Plugin
This tool guides you through basic actions to create your website like
Upload Your Logo
Edit Post Description
Upload an Image
Edit Site Title
Add a New Page
Connect Your Domain
Upload Your Logo
The first option displayed in the Hostinger Plugin is Upload Your Logo. It will take you to the Customize page where you can directly add Your logo to Your website. For this, you have to Click “Take me there”. It also gives you the option to Create a logo using the Logo Maker tool.
Almost monthly more than 800 searches has been searched by Beginners regarding Logo (upload,remove,change)
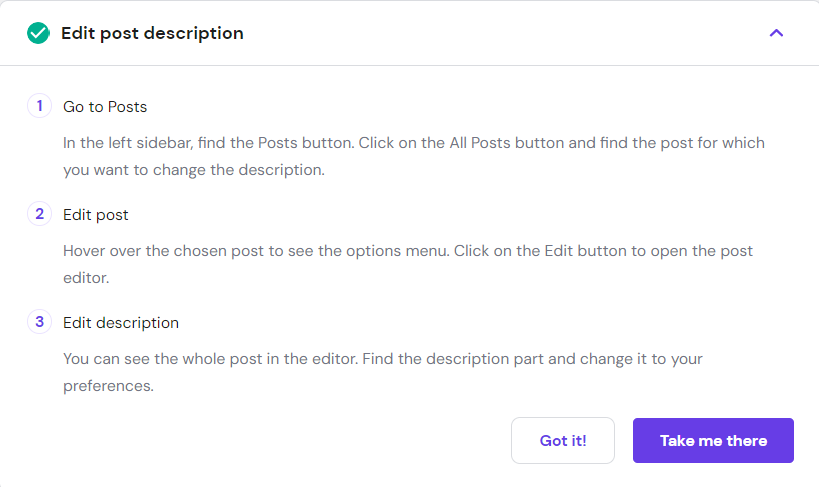
Edit Post Description
The other option is it will take you directly to Edit the Post Description. When you click the “Take me there” button it will redirect you to the Posts page in the WordPress Dashboard.
Similarly, the other options this plugin provides are Uploading an image, Editing the Site Title, adding a new page, and connecting your Domain.
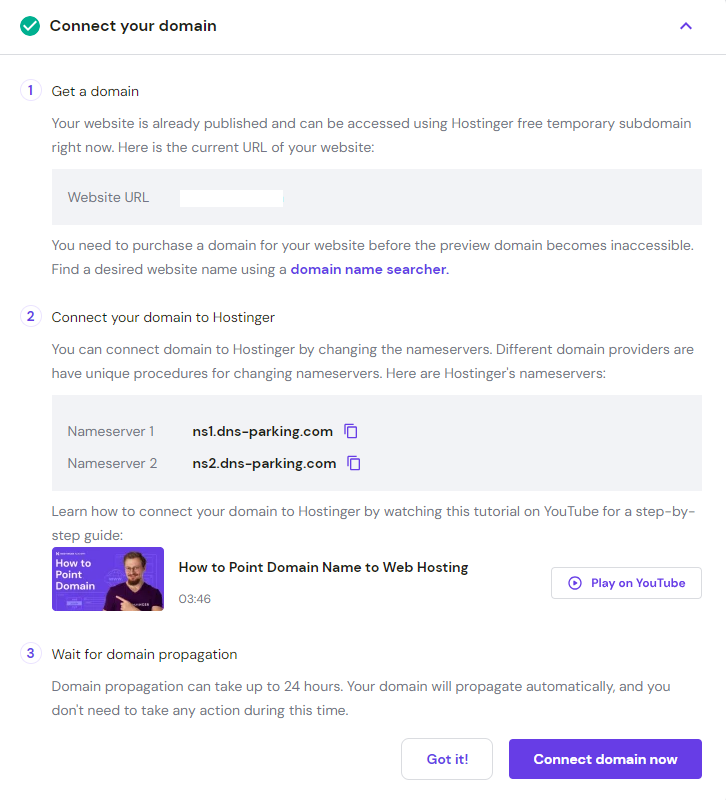
Connect Your Domain
All the other options are easy and you can click and know it easily. This option is important in case your domain is not connected or you are getting issues.
Suppose you have purchased a domain from Godaddy and now you have Hostinger WordPress Hosting. So, you want to connect your domain to the Hostinger Hosting plan. When you click “Connect Domain Now” it will redirect you to Hostinger Website where you will get the option to Connect Your Domain to Hostinger.
You can see a video provided by Hostinger to Connect your domain.
However, it’s important to note that:
Limited functionality: The plugin itself doesn’t add any significant features to your website. Its focus is on guiding you through existing ones.
Not essential: You can launch and manage your WordPress website perfectly fine without this plugin. All the functionalities it offers are accessible through the WordPress dashboard or Hostinger control panel directly.
Pre-installed but optional: While it comes pre-installed on Hostinger’s WordPress plans, you can deactivate it if you don’t find it helpful.
Overall, the Hostinger WordPress plugin can be a useful tool for beginners with its initial setup guidance. However, it’s not essential for experienced users and won’t add any substantial features to your website.
I hope this clarifies the purpose and role of the Hostinger WordPress plugin!
The main issue with the big website is Media files, almost 4 years of media library.
Due to some plugins, and resizing issues, we could not see thumbnails in many of our posts.
On the other hand, our WordPress.Com plan was expiring soon, so we have to do something now, so that if there is an issue with the media library then we should have images on our personal computer, and then we can upload them, whenever and wherever required.
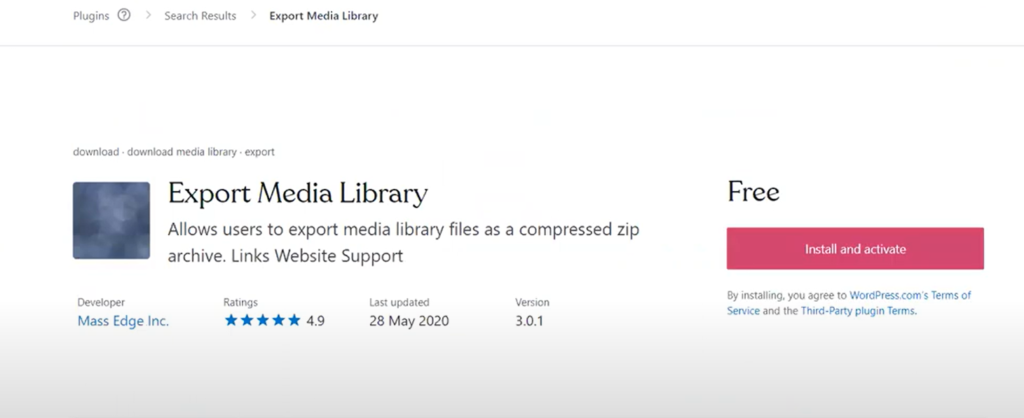
For that, we come across this process. To export(download) the complete WordPress Media Library here is one of the easiest ways.
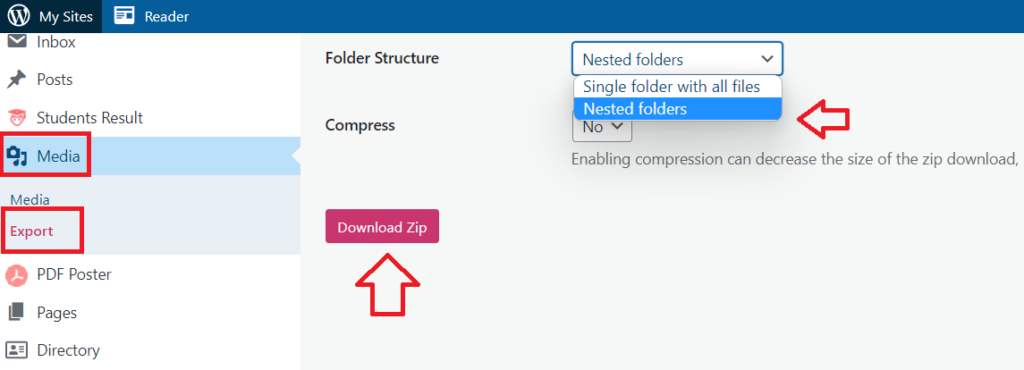
After activating the Export Media Library Plugin, go to Media >> Export in Your WordPress Dashboard.
You will be redirected to the following page. In the Folder Structure: you have a dropdown menu:
1. Single folder with all files which means all your media library will be downloaded to a single folder.
2. Nested Folders: This means your media will be in separate folders based on the time of upload.
Once you have chosen the settings, simply click Download Zip, and the ZIP file will be downloaded to your PC.
Why Nested Folders?
We used Nested Folders because we have 4 years of data, if any one of our images is not loading, simply inspect our browser, and find out which image is lost. Then, we can go to our PC and find out from nested folders, the exact image.
You can use a Single Folder with all files if your website is small.
Unzip WordPress Media:
After downloading WordPress Media to your PC, then simply unzip the files. And You can see all your Media in one place.
Why Export WordPress Media Library?
If you want to have the backup of your media files on your personal computer, then you would want to download WordPress Media. In our case, we have to move WordPress media from one hosting to another hosting account, and for any loss of media, we want WordPress Media on our PC.
Conclusion:
In this article, we learn about how to export all Media files from WordPress websites using a Plugin. It is a nice and simple way, we used it and then wrote this article.
If this article is helpful to you, then kindly Like, and share it with your friends. If you have any feedback kindly comment so that we can improve.
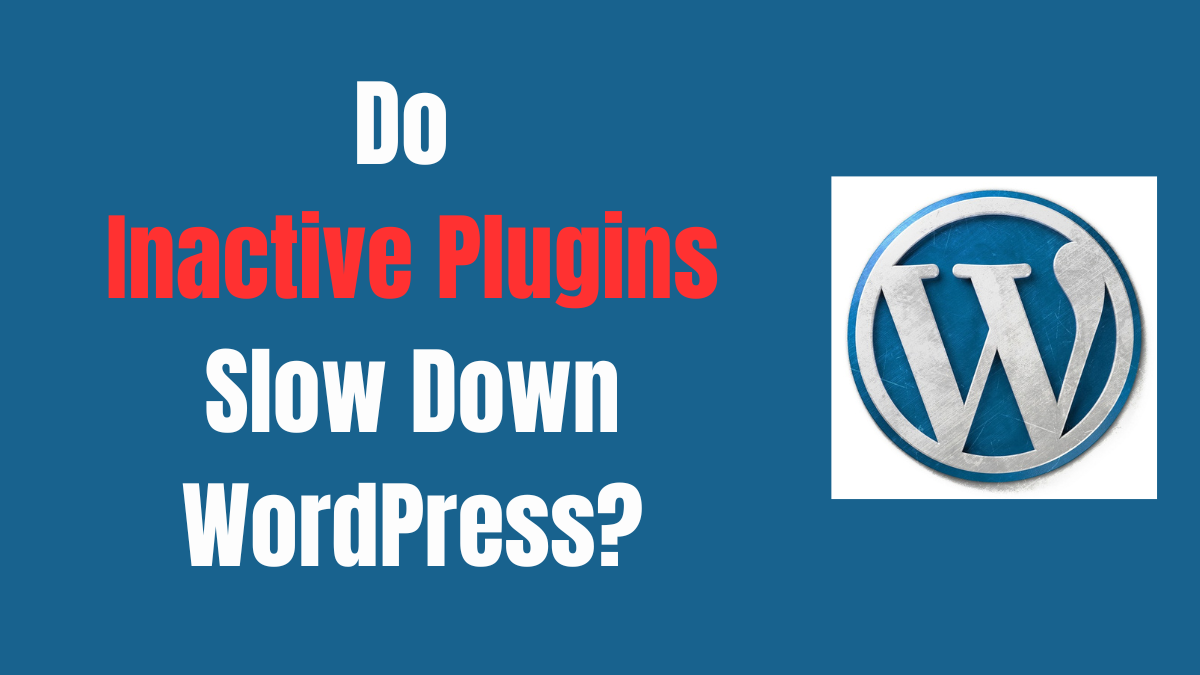
Recently, while analysing my client’s website, I saw many plugins have been deactivated but not deleted. Then one question hits my mind “Do Inactive Plugins Slow Down WordPress?” or “Is there any risk involved in having Inactive Plugins on my WordPress website?”
So, I researched it and came up with a solution, Inactive Plugins won’t Slow down Your website but sometimes they can be harmful. Inactive Plugins files could become compromised in a hacking effort or be used to infect your website with malware.
Let’s dig deep into the topic.
What are Inactive Plugins in WordPress?
In WordPress, we use Plugins to add and extend its functionality.
There are 2 steps involved in using any WordPress Plugins.
Installing Plugin
Activating Plugin
While installing Plugin, when you install a WordPress Plugin, then the file of the Plugin is downloaded to your web hosting server.
To use the plugin on your website, you have to activate that plugin.
Many times, we installed Plugins for testing purposes and after testing we deactivated it temporarily or permanently.
So, if we deactivate a Plugin then it is an inactive plugin. To remove completely you have to delete the plugin after deactivating it.
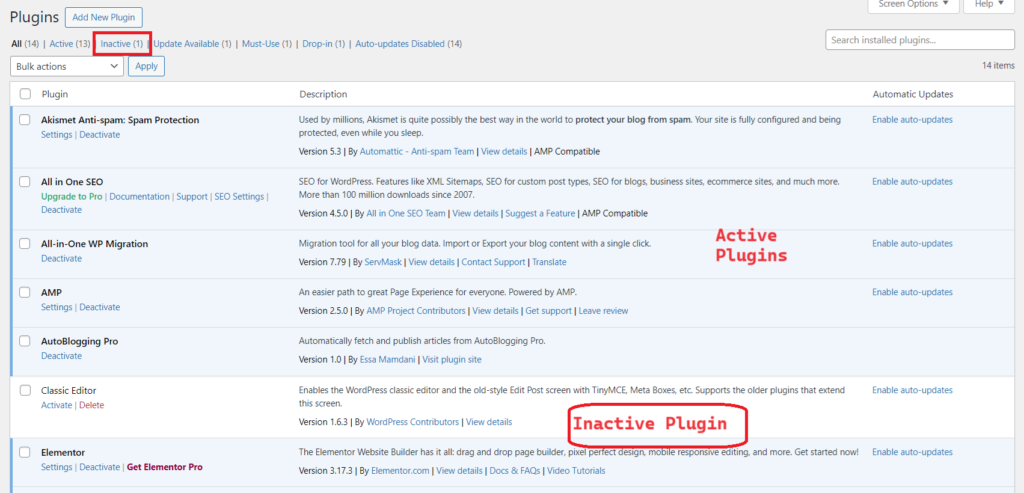
Where to Find Inactive Plugins?
You can find both active plugins and inactive plugins on the Plugins page with active plugins having a light blue background colour and inactive plugins having Delete and Activate buttons.
In the WordPress Plugin page, You have a separate section where all the inactive plugins are shown. It is with a Hyperlink “Inactive”. If you click “Inactive” all the inactive plugins are shown up there.
Do Inactive Plugins Slowdown WordPress website?
No, inactive plugins do not slow down the WordPress website. Inactive Plugins do not impact your website speed anyway. This answer was given on the topic “Removing or keeping inactive plugins?” on WordPress.Org
In a detailed article on the topic, Wpbeginner wrote
“Even if you have dozens of inactive plugins installed on your WordPress website, they won’t affect the performance of your site or make it slow.”
Yes, If you don’t want to use that plugin then there is no reason to keep the plugin around you on your website. Like you remove the waste things from your house and office. You should delete the inactive plugins from Your WordPress website.
If you deactivate it temporarily, then you can keep them inactive, and re-activate them when you want to reuse it.
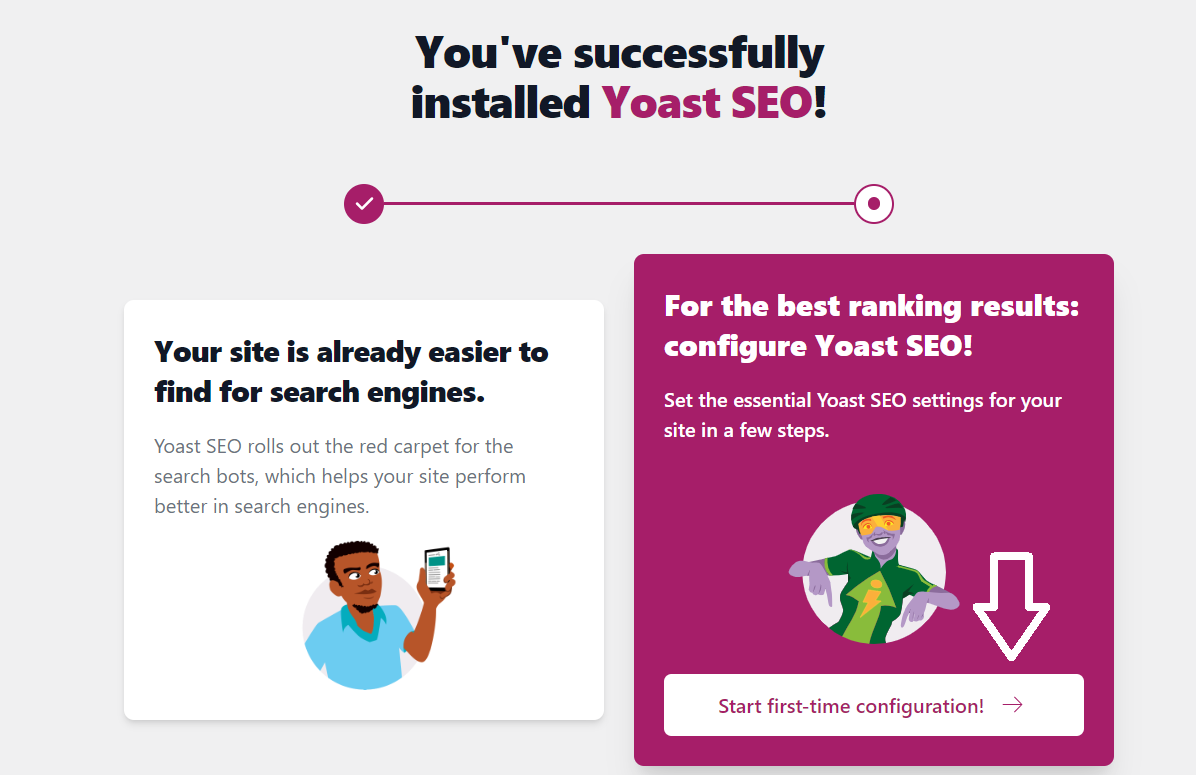
Have you installed the Yoast SEO plugin and want to Configure Yoast for the first time? Then you have to do the First-Time Configuration of the Yoast Plugin.
After installing and activating the Yoast SEO Plugin in WordPress. You will be redirected to the page that displays “You’ve Successfully Installed Yoast SEO”. Now, click on the button “Start First-Time Configuration”
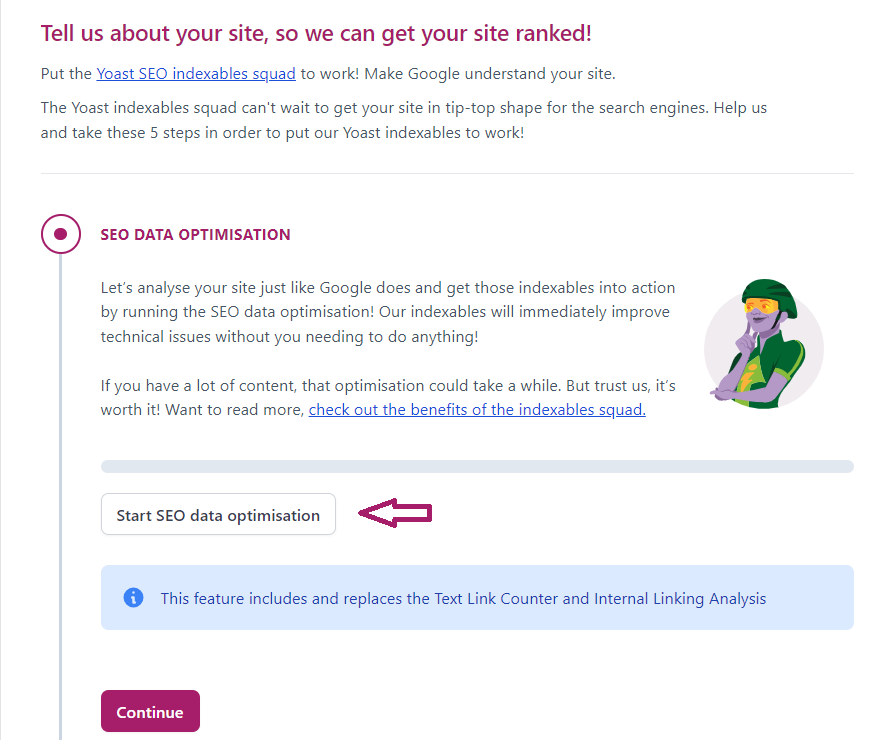
After clicking “Start First-time configuration” you will be redirected to the below page. Here click on “Start SEO data Optimization”. After clicking on the button, Yoast SEO Plugin will optimize your website, and after analysing the website it will display the message “We’ve successfully analysed your site!”. Now click on next to further configure your website for the first time using Yoast.
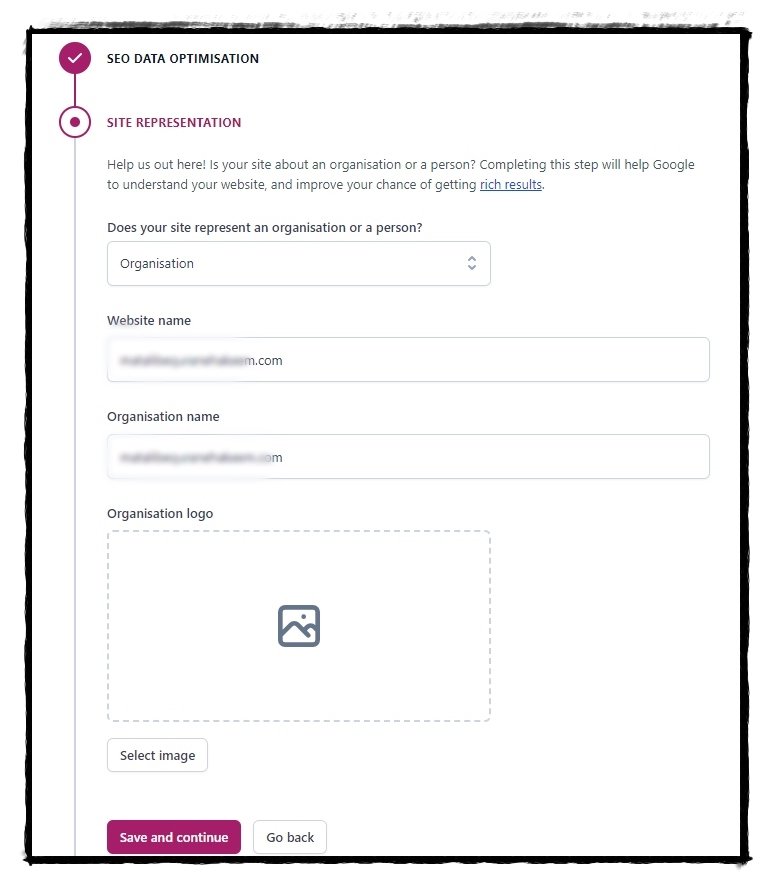
2. Configuring Site Representation:
Now, the second step is configuring your site representation. In this section you will mainly configure your website details like
Organisation or Person
Website Name
Organisation or Person name
Organisation or Person Logo
1. Organisation or Person:
The first question is “Does your site represent an organisation or a person?” You have to select whether the website is of a Person or Organization. Select it from the drop-down menu.
2. Website name:
Enter Your website name in this text box.
3. Organisation name
If you have selected your website as an Organisation, then here you have to write your organisation name.
Select User
If you have selected your website as a person in the first question, then here you have to select a user from the drop-down. If the website is new and only one admin you are having, then you will get only one user in the drop-down.
4. Organisation or Personal Logo:
You have to upload your organisation or personal logo(or avatar). Uploading a logo is quite easy. It is like uploading your photo on WordPress.
After filling in the above details click on “Save and Continue” to further progress on First-time configuration.
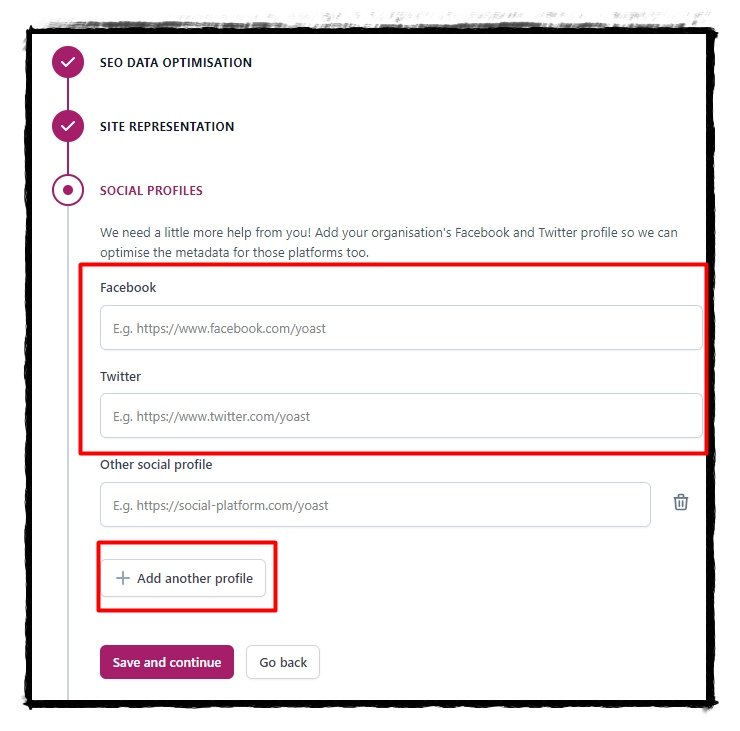
3. Configuring Social Profiles
Social media plays an important role in building trust and boosting traffic.
If you’ve been using SEO to help build trust with your audience and boost your online reputation, social media can be a huge asset. It gives you a chance to humanize your brand, too. You can share what sets you apart and easily engage with those interested in learning more
Yoast SEO plugin helps you in connecting with your social media profiles. By default, you will get 2 Options namely Facebook, and twitter. You can add more social profile by clicking the “Add Another Profile” button.
After adding your social media profiles, click on “save and continue”.
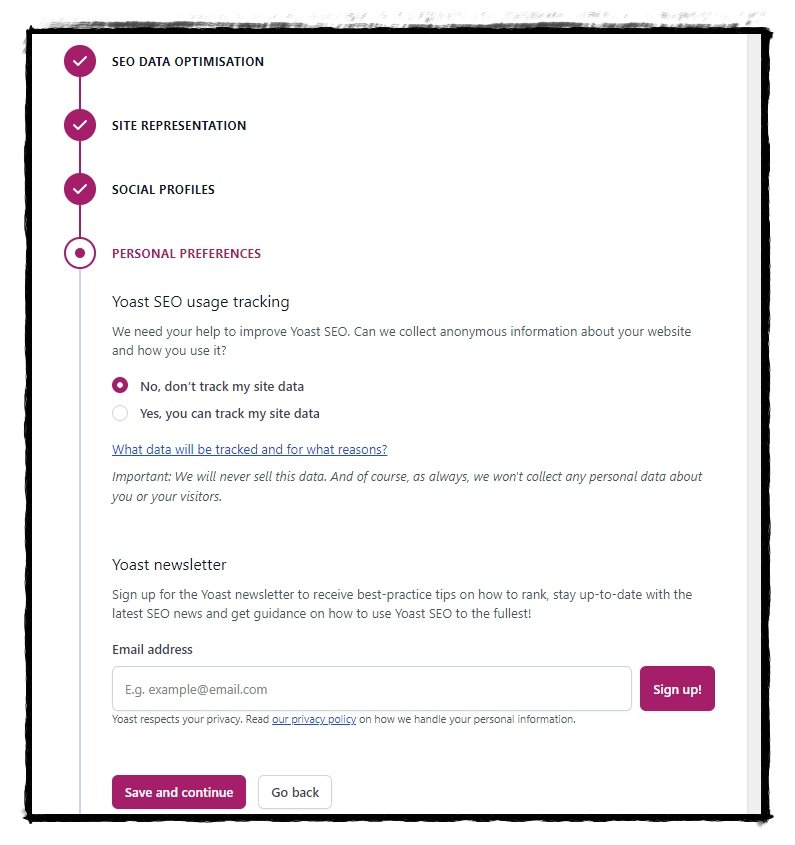
4. Personal Preferences
The last thing you have to configure is Personal Preferences. In this, Yoast will ask your permission to track your data. By default, it is No. But if you want you can give access to Yoast to track your website data to improve its performance. As Yoast makes it clear “Important: We will never sell this data. And of course, as always, we won’t collect any personal data about you or your visitors.“
Whatever you select, do subscribe to the Yoast newsletter by writing your email address as you will get updated news about the plugin and SEO best practices.
After filling in the details, click on Save and Continue
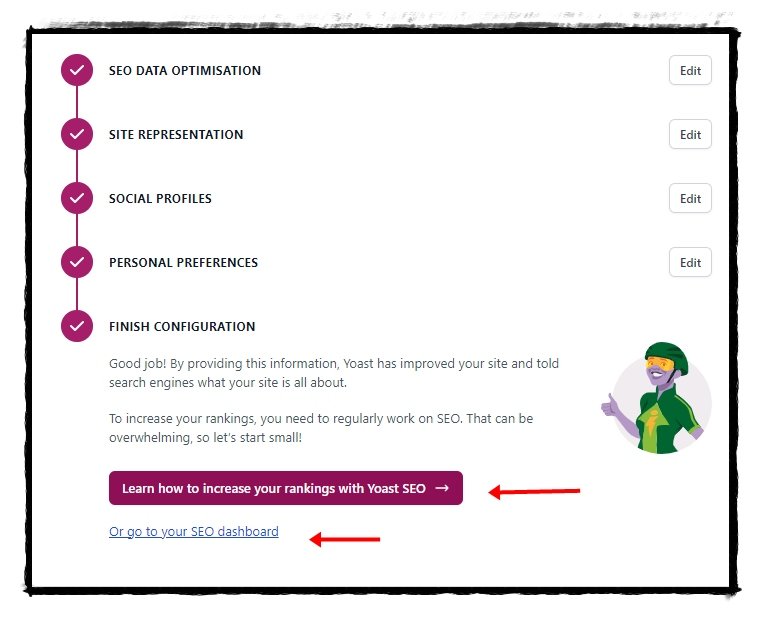
5. Finish Configuration
In this step, Yoast congratulates you and tells you that you have done a great job. Now, Yoast will tell search engines about your website and its category. That will help Search engines in understanding your website. The yoast message will be
Good job! By providing this information, Yoast has improved your site and told search engines what your site is all about.
To increase your rankings, you need to regularly work on SEO. That can be overwhelming, so let’s start small!
Yoast Plugin
Now you will have two options, either go to Yoast dashboard by clicking “or go to your SEO Dashboard” or Yoast website to learn how to Optimize Your website for search engines. There you will get the link to Free webinars, tutorials etc.
Hurray! You have successfully configured the Yoast for the first time. Now you will have to Optimize your website with the Yoast plugin. Learn how can you optimize your website with the Yoast SEO plugin.
Do you want to Bulk Delete WordPress Users? Here in this post, I will discuss the three methods to Delete WordPress Users from your WordPress Website.
Methods of Deleting WordPress Users
Deleting WordPress Users one by one
Deleting WordPress Users in bulk without a plugin
Deleting WordPress Users in bulk using a Plugin.
Now I will discuss all the methods one by one.
Deleting WordPress Users one by One
You can delete WordPress users such as subscribers one by one by going to the user’s page in WordPress Dashboard.
WordPress Dashboard → Users → All Users
Here you can delete your WordPress users one by one, by just hovering on the user name. You get the option to Delete the subscriber. If you want to delete that subscriber, then click on Delete.
WordPress will confirm before Deleting the Subscriber. If you confirm the deletion, then the subscriber will be permanently deleted.
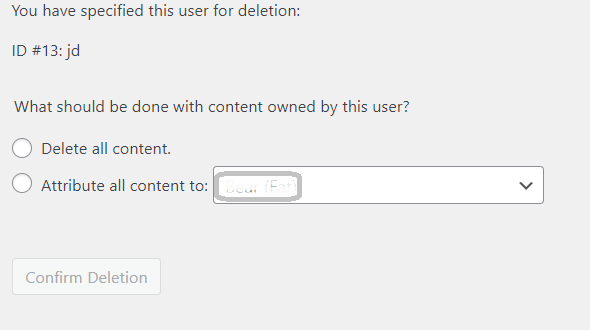
What Happens if the Subscriber has Some Data Assign to his Account?
If the user has some content on your website, like posts, comment then WordPress will ask you to Attribute the content to other users or Delete all his Content.
Here you can do what is necessary. If you want to attribute his/her content to some other users. Then attribute him or if the content is not worthy, then delete all the content.
2. Deleting WordPress Users in Bulk Without a Plugin
Now, if you want to Delete WordPress users in bulk and without using any plugin, you can do it from WordPress User’s page only.
How to Bulk Delete WordPress Users without Plugin?
Now, sometimes you have many unwanted subscribers and want to delete them quickly. Then the one-by-one deleting user procedure will be quite lengthy and time-consuming.
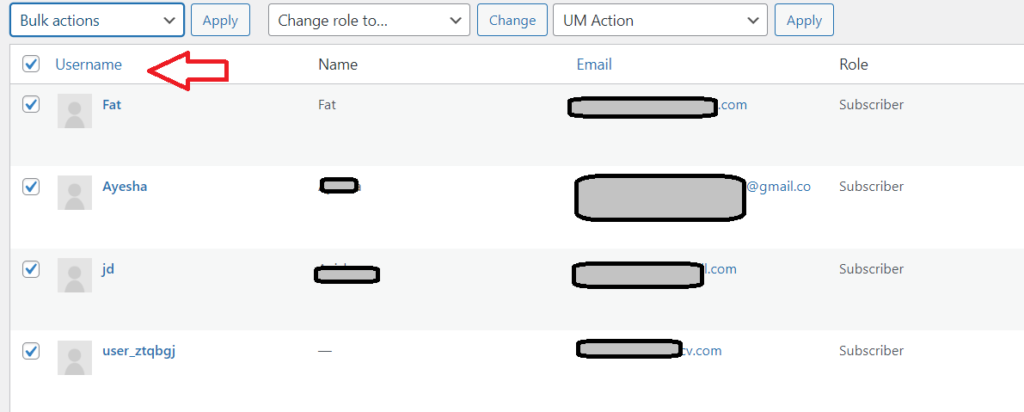
So, the other method to delete the WordPress users in bulk is just to click the Select All checkbox beside the User name Column. By clicking the checkbox it will automatically select 20 users at a time. And from the drop box which is above and it displays Bulk Actions, select Delete from it and Click on Apply.
As discussed above, All the users will be deleted after Confirming.
Suppose, you have 300 users or more to delete, then this method will also consume a lot of time.
For this, just click on the “Screen Option” tab in the top right corner of the screen. It will bring a fly-down menu where you can set the number of items per page up to 999.
Suppose you want to delete the users with subscriber roles and the users are more than 500 or near it. Then we will enter the 999 or 600 number in the number of items per page.
Click on Apply button, and the page will reload and show you the 999 users or the number we entered.
Now, click on the select all button as you did above, and from the bulk, actions select delete and hit the Apply button.
But while applying bulk deletion to this number of users, your website might slow down for a while. If you have an enormous amount of users to delete, then you can use Plugins to Delete the users.
3. Deleting WordPress Users in bulk using a Plugin.
On one of my client’s websites, there were more than 6000 unknown subscribers. Some one tried to hack it because without having the option for subscribing to the website, that website has more than 6000 subscribers. Now, I want to delete those huge numbers. It is possible to do this, but it will take a huge amount of time to do. So, I used a Plugin to Delete those Subscribers.
How to Bulk Delete WordPress users using a Plugin?
As discussed above, following the default, the bulk delete method is time-consuming and not worth it. For this, we can use a plugin to delete all the fake users from our WordPress website.
To Delete bulk users from WordPress I used the WP Bulk Delete by Xylus themes. So, you need to first Install and activate WP Bulk Delete Plugin. For details on installing, see our step-by-step guide on how to install a plugin in WordPress.
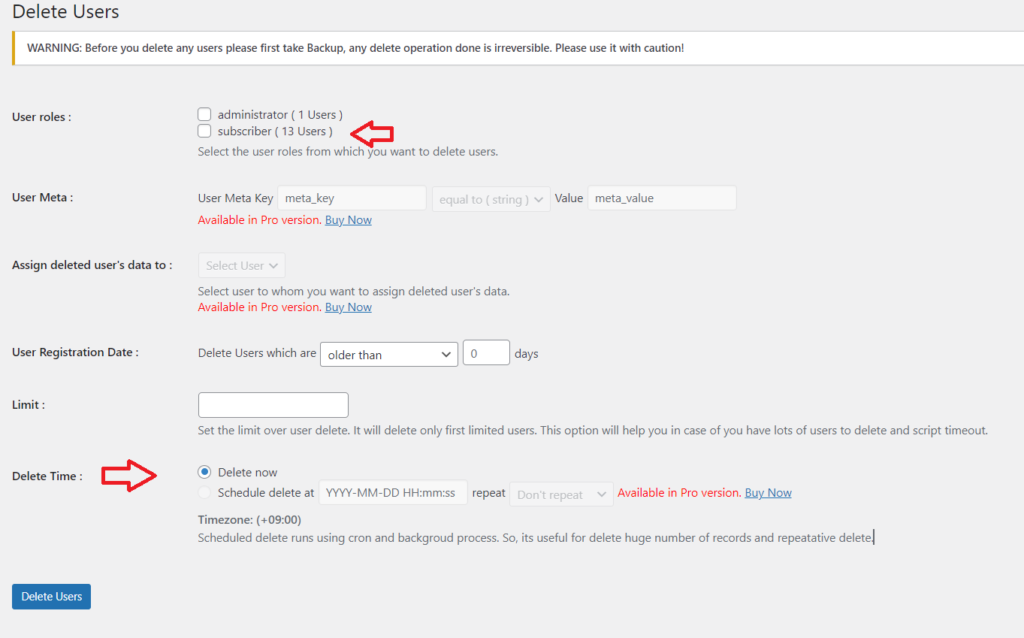
Upon Activation of the plugin, Visit WP Bulk Delete plugin from WordPress Dashboard
Dashboard >> WP Bulk Delete >> Delete Users
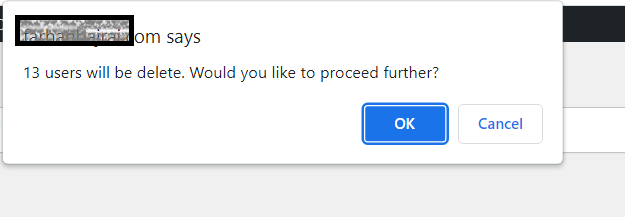
If you want to delete all the subscribers then select the subscribers from user roles. And click Delete users. The Plugin will confirm the Deletion by displaying a dialogue box “X users will be deleted. Would you like to proceed further?”
Click OK to Confirm and all the users will get deleted.
Can I schedule to Delete the WordPress Users?
If you want to schedule the delete, then WP Bulk Delete also has the option to Schedule it.
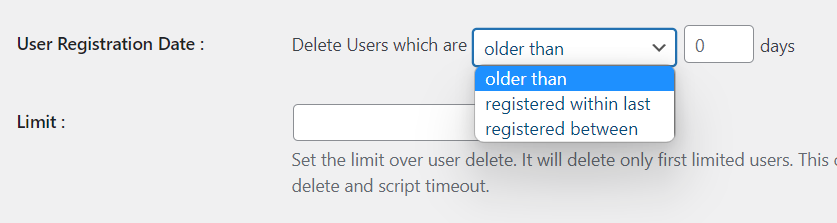
Deleting Users Based on Criteria
Likewise, if you want to Delete users based on criteria like
Delete Users older than X days
Delete Users Registered within X days
Delete Users Registered between the start date and end date
So, for this, you also have the option in the WP Bulk Delete plugin under the User Registration date.
If the user which you are deleting has some data like posts, images etc and you want to assign that data to someone. The WP Bulk Delete plugin also has this option, but this Option is in its PRO version.
Other than Users, WP Bulk Delete Plugin can delete Bulk Posts, Bulk Comments, etc.
Farhan Bajrai is an Entrepreneur, Web Designer as well as a Teacher. He resides in Hyderabad. He is the Founder, Designer, and Director of Bajrai Online Solutions.