Good Readable Content: AIOSEO & Yoast

Good Readable Content: AIOSEO & Yoast

Good Readable Content

How to Write a Good Readable Content

Do you want to know How to Write Good Readable Content on your Website?

If you are using WordPress, then you have plugins like AIOSEO, Yoast, etc that will help you in writing good readable articles.

Remember, We write content for our audience. So, the content should be easily readable to the audience.

For this, both All in One SEO and Yoast have some suggestions for a good Readable Content

As discussed in our recent post on how to write SEO Friendly articles, we discussed some of the topics.

Now

How to write Good Readable Content

Yoast
AIOSEO

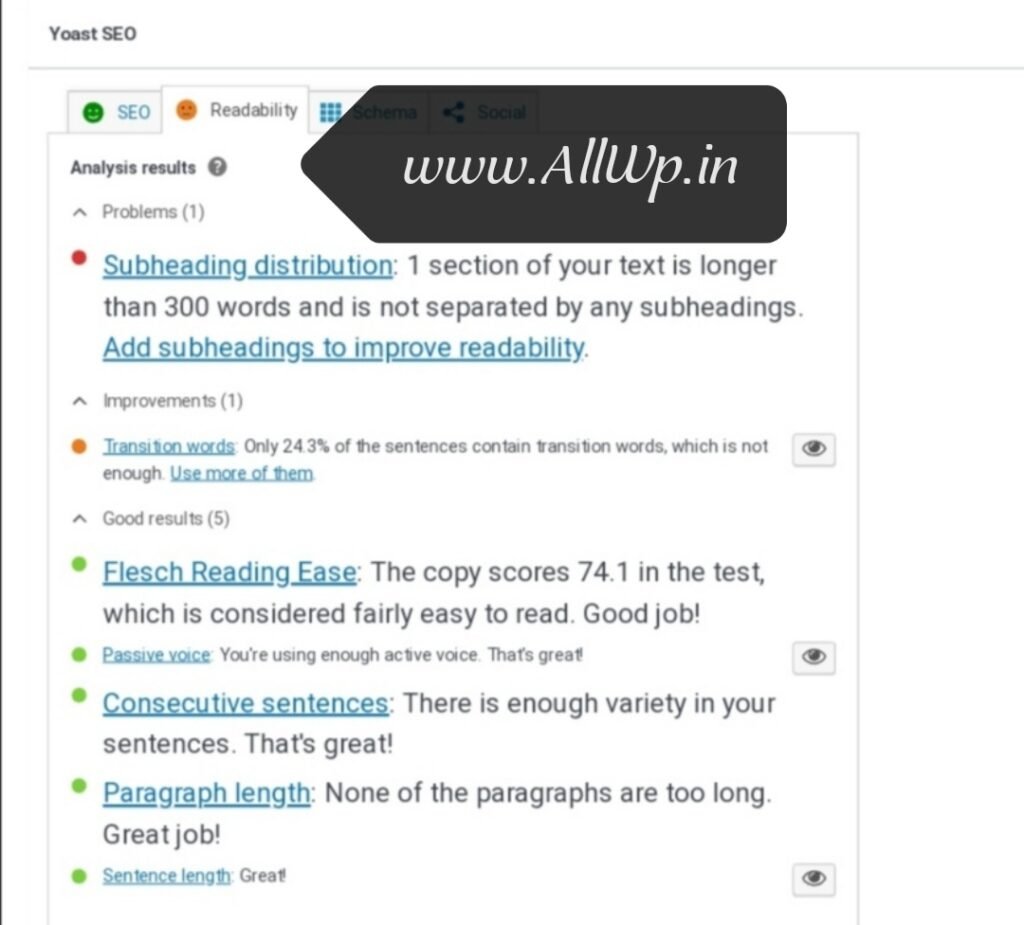
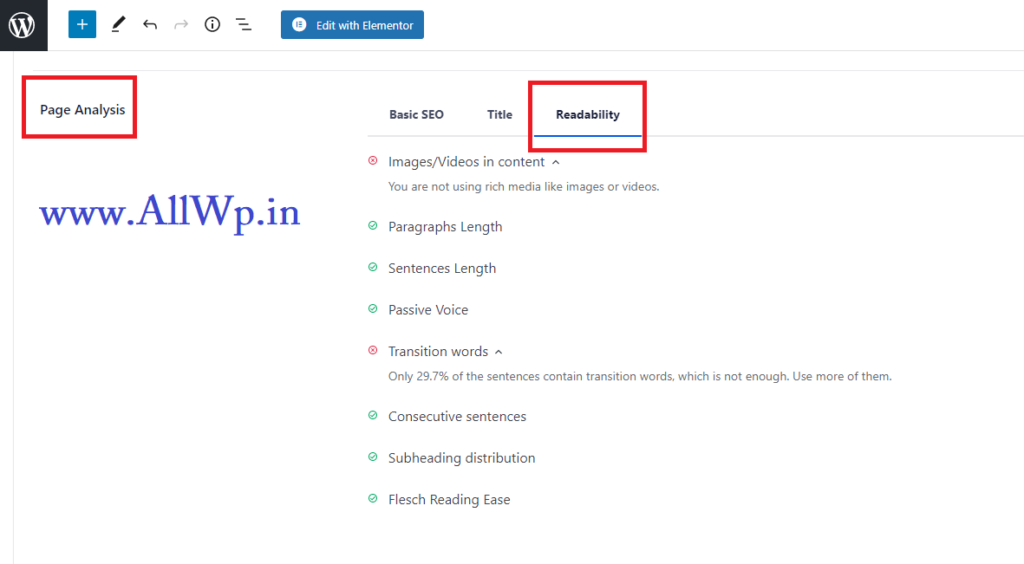
The above screenshots are of Readability of Yoast and All in One SEO.

In this article, we will be completing all of them,

Images or Videos in Content:

The content that contains images or videos gets more visitors and it also improves visitors’ time-on-page.

So, if you want to get more traffic, as well as you, want to increase visitors time on the page then you should use related images or videos in your post.

Paragraph Length :

Paragraphs are very essential in content writing. Whenever a reader land on a page he/she doesn’t go through the whole article, instead they scan your paragraphs, headings, subheadings and if they found it useful they go through the article.

So, you should use smaller paragraphs, a paragraph length should be a minimum of 2 sentences and not more than 200 words.

Sentence Length :

A sentence is a basic unit of language or a group of words in a format.

Longer sentences are difficult to read and understand while shorter sentences are easy to read and understand.

Shorter sentences make it easier to propagate your message.

As readability is important for SEO, and it is achieved by shorter sentences. The sentence recommended length is 20 words by All in One SEO and Yoast. According to Yoast, you shouldn’t have more than 20 words in 25 % of your sentences.

Passive Voice:

 To understand passive voice we can understand easily in contrast with active voice.

 Farhan writes the article.

This is an active voice sentence.

Now the passive voice of  the above sentence is

 The article was written by Farhan.

This is the passive voice of the above sentence.

Active voice conveys a clear-cut message and it is easy to understand.

Whereas Passive voice doesn’t convey a clear message and is weaker.

One of the reasons, we shouldn’t use Passive voice is it is Wordy ie., it uses more words as you have seen.

On the other hand, it is complex also.

Yoast suggests using maximum 10% passive voice.

Transition Words:

Transition Words are the words used to connect sentences and phrases like ‘and’, ‘but’, ‘during’, etc.

While writing an article or essay, your sentences should transition smoothly from one idea to another idea.

The reader can relate next sentence from the previous sentence.

So, it increases the readability of your article and it is good for SEO.

So you should use Transition words in your articles.

Yoast suggests using transition words at least in 30% of the sentences of our content.

Here is a list of Transition words with their usage

Consecutive Sentences:

No one likes repetition of the sentences in content. In Consecutive sentences, AIOSEO and Yoast check whether the content has two or more consecutive sentences starting with the same word.

And they suggest changing the format.

Subheading Distribution:

A good article /content breaks his content into paragraphs, and after 2 or 3 paragraphs you should have headings or subheadings.

As discussed above, when a reader lands on a page he scans its paragraphs and headings subheadings.

AIOSEO looks for the content of more than 300 words and it doesn’t contain H2 or H3 tags.

So, you should use headings or subheadings in 300 words.

Flesch Reading ease:

Flesch reading is a Flesch-Kincaid readability test.

In Flesch reading ease, the higher scores mean the content is easier to read.

If you are using difficult words or sentences, then it is not easy to read to most of the readers.

As content writers, we should make our text easy to read for all.

Here comes Flesch reading ease in play. You can read in detail about Flesch Reading ease at Wikipedia.

KeyPhrase Checks:

As discussed in our previous post, your content should revolve around a topic or phrase which we called KeyPhrase.

AIOSEO and Yoast also check for KeyPhrase in your content. KeyPhrase checks are in the following areas of your content.

KeyPhrase in Meta Description: Your Meta Description should have KeyPhrase in it.

You should use exactly match KeyPhrase in the Meta description

KeyPhrase in Title: A good content writer, use its KeyPhrase in the Title of the webpage.

KeyPhrase in URL: For good SEO, you should use KeyPhrase in your Permalinks or URL also.

KeyPhrase in Introduction: As a good content writer, you should use your KeyPhrase in the first sentence of your Content.

So that, your reader has a clear idea about what they are going to read.

KeyPhrase in Subheadings: AIOSEO and Yoast also check KeyPhrase in subheadings.

But each and every Subheading should not have KeyPhrase. Don’t overuse KeyPhrase in subheadings.

KeyPhrase in image alt-Tag:

AIOSEO also checks KeyPhrase in the alt attribute of the image used in the article.

KeyPhrase in Content: Good content should use focus keywords in the content. But don’t overuse it.

KeyPhrase at the beginning of SEO Title:

AIOSEO checks whether you are using your focused KeyPhrase in the first few words of your SEO title.

KeyPhrase length: KeyPhrase length should not be more than 4 words.

If you want to become a good content writer and you want your  article to drive more traffic. Then, master the SEO tools like basic SEO, Title, and readability those are given by Yoast and All in One SEO.

Understanding All In One SEO Settings

Understanding All In One SEO Settings

understanding All In One SEO settings

Understanding All in One SEO Analysis

Do you want to Understand All in One SEO page analysis? Do you want to write an article that is SEO-friendly? If you are reading this post, we assume that you know about Search Engine Optimization and you are familiar with All in One SEO. If not click the links to know about them.

As you know a good SEO is very important for ranking your post in Search Engine and AIOSEO helps us in writing SEO-friendly articles.

Now, we will know and understand how to write SEO-friendly articles with the help of AIOSEO.

Writing SEO Friendly Content

If you want to write an SEO friendly article then you must follow these steps

Step 1: Write the Appropriate Title to the post. Look, the title of the post is the most important aspect of your content writing. The title should describe to the reader, what the article is about?

Step 2: Body of the Content:

Now the other important step is to add your content to your website.

You should be careful while writing the content and follow the steps we are discussing below.

  1. Keyword or key phrase: While writing content, you should have a key phrase that should be the heart of your content. And your content should be revolving around that key phrase. Keyword or key phrase is most important. You will come to know by the end of this article.
  2. Headings and Sub Headings: You should use headings and subheadings in the article as per requirement. For good SEO-friendly content, some of your Headings and Subheadings should have your Key Phrase in them. Otherwise, the content won’t be SEO-friendly.
  3. Introduction: It is very important how you begin your article. The focus key phrase or keyword should be there in the introduction of your article. The reader should know at the beginning itself what he/she is going to get from the article.
  4. Images: You should use at least one image that describes the content you have written. And the image ALT tag should have the focus keyword in it.
  5. Internal Links and External links: You should use both links in your article. Internal links are the links to your website only. It will increase reader time on your website and that too is important in Website ranking.

External links are the links to the other websites. The content you have written must have quotes of others or images used from other websites. It is recommended that you should thank to the persons or websites from where you have taken these things by linking their website.

  1. Content-Length: A good SEO friendly Content should have minimum of 300 words in it. It is important that the reader should get the solution to his problem or he/she understand what the content is complete. So lengthy articles are good for website ranking.
  2. Paragraphs and Sentences Length: Good content should have small paragraphs in it. Small paragraphs are good for reading. And it should have headings or subheadings at regular intervals.

Look! good Content is Reader centric not Search Engine centric. So you should avoid using difficult words, rather you use easy passages so that Reader get your content easily.


Continue reading
How to create Widget in WordPress?

How to create Widget in WordPress?

How to create Widget in WordPress?

How to create Widget in WordPress?

We Hope, You are following WordPress tutorials for beginners, and you have created a free website, and installed a theme and Plugin. Now the question is how to create Widget in WordPress? But before that:

What is a Widget?

Linguistically a widget is nothing but a small gadget or mechanical device.

In WordPress, a widget is a small block of content that we can add to the sidebars, Footers, and other places of our WordPress website.

The exact location of Widgets depends on the Theme we are using, but mostly we have a widget in the sidebar and footers of the WordPress website.

You will see this written on Your WordPress Widgets

Widget Areas are global parts in your site’s layout that can accept blocks. These vary by theme, but are typically parts like your Sidebar or Footer.” more

How to add Widget in WordPress?

To add a Widget in WordPress is as easy as installing the theme and Plugin that you have learned in our previous posts. Similarly, You can add a Widget in WordPress.

Steps to add Widgets in WordPress

Step 1: Log in to WordPress Admin Dashboard

Step 2: Go to Appearance >> Widgets

Step 3: Add Widgets to Sidebar or Footer

First, You should log in to your WordPress Admin Dashboard.

Then in Appearance go to Widgets.

Now you are in the Widgets area. Basically, you have Sidebar Widget and Footer Widget as shown in the screenshot. There is also an Inactive widget. We will discuss them in detail now.

Note: If you are adding Widget for the first time, then you will see the pop-up by WordPress Welcoming you to WordPress Widgets. You can go through it by clicking next, it may help you in understanding widgets.

How to Add Widget in WordPress Sidebar?

To add a Widget to the sidebar of your WordPress Blog. Go to Widgets as discussed above. Now you will see Sidebar Widget Area written on your screen as shown in the image.

You will see a Big + block below the sidebar Widget area. Click that plus + sign to add the widget to that place.

You will also see a block inserter + mark on the left-hand side as shown in the figure. Click that + to add Block in Your Widget area. Scroll down to add your favorite Widget there.

Hurray, You have successfully added a Widget in Sidebar.

How to Add Widget in WordPress Footer?

To add a Widget in the footer of our WordPress Website, follow the procedure of adding a Widget in the Sidebar, just you have to go to the Footer Widget area instead of Sidebar Widget Area.

Hope you follow the above steps. Congrats, You have added Widget to your WordPress Footer successfully.

What are inactive Widgets?

Inactive widgets, as the name they are the widgets that are not used in your website. So, the blocks inside inactive widgets will not be displayed in WordPress Blog or Website.

How to Add Archives to Sidebar Widgets?

To add Archives to sidebar Widgets, follow the same procedure of adding widgets. When you click block inserter scroll down to Archives or just type archives in the search box of Block inserter. Click on Archives. Yay! You have added archives successfully to your sidebar widget.

After adding, Archives to WordPress Widgets you will see Archive settings on the right-hand side of your screen. You can adjust those settings as per your taste and requirements. You can display the archive as a drop-down or list. If you want to display archive as a drop-down, activate the drop-down setting. And if you also want to show post counts, active the post counts setting there.

Same Procedure again you have to follow to add Categories, latest posts, Top Posts and Pages, popular posts etc. to the WordPress widgets.

Note: Just like the header and footer in MS Word, Widgets are also seen on each and every post and page of your WordPress blog.

If our tutorials are helpful to you then kindly share them with your family and friends. If you have some feedback, do comment so that we improve ourselves.

How to Uninstall Plugin in WordPress

How to Uninstall Plugin in WordPress

How to Uninstall Plugin in WordPress

How to uninstall plugins in WordPress?

Do you want to uninstall a plugin that is not in use? And You have installed multiple plugins and now want to uninstall some of them which are not in use? And don’t know how to remove a plugin from the WordPress website?

Plugins are just like your Apps in Your smartphone, they take your Website space and if you keep unwanted plugins or are not in use plugins in your WordPress website, then they might be slowed down your WordPress website.

It is a good practice to remove the not in use Plugins from your WordPress blog. They might be security issues also if you keep the unused plugins in your WordPress blog.

How to remove a plugin completely from WordPress Website?

Follow these steps to completely remove a WordPress Plugin

Step 1: Go to WordPress Dashboard

Step 2: Then Go to Plugins >> installed Plugins

Step 3: Select the Plugin You want to Uninstall

Step 4: Deactivate the Plugin

Step 5: Delete the Plugin

First, log in to your WordPress admin dashboard and go to your installed plugins by clicking Plugins on the left-hand side of your dashboard. Now you are on the plugins page.

Now, select the Plugin you want to deactivate/remove, and click the link written with deactivating as shown in the screenshot.

After Clicking deactivate you have successfully deactivated the plugin but there may be some settings of your plugin still present in your WordPress website as junk files.

Now you have to completely remove the plugin and its data from your website then click the Delete link, below the name of your Deactivated Plugin. WordPress will ask you whether to Completely uninstalled the plugin from your WordPress. Click OK to Delete the Plugin Completely from WordPress Blog.

Now WordPress will prompt a message that the plugin is successfully deleted.

Hurray! You have successfully deleted the Plugin.

We suggest you Delete all those Plugins from your WordPress blog which you don’t want to use because if you don’t delete them your WordPress website slowed down and you may have security issues too.

If you are deactivating the plugin temporarily then you can just only deactivate the plugin and prefer not to delete it.

If you are finding our Tutorials are Worthy for beginners to learn WordPress, then kindly share it with others and if you have any feedback then comment below so that we will improve ourselves.

How to install WordPress Plugin

How to install WordPress Plugin

How to install WordPress plugin

How to Install WordPress Plugin?

After successful installation of WordPress, the first question is how to install WordPress Plugin?

But before that:

What is a WordPress Plugin?

In WordPress, A Plugin is a software that contains a piece of code by which we can extend the functionality of WordPress websites. Simply, the Plugin is nothing but the Applications in WordPress.

Now,

How to Install a Plugin in WordPress?

There are some methods to install Plugin in WordPress. Today, we are showing you the easiest and most used method to install a plugin in WordPress.

Note: Before installing the plugin, you must know that you can’t install a plugin in WordPress.Com website free plan.

Many Beginners got stuck in this, they want to install a plugin in WordPress.com. So for installing a plugin in WordPress.com, you have to purchase their business plan or other plans.

how to install plugin in wordpress.com

You can install plugins in WordPress.org. For this, you need to have a Hosting for your website, in which you have to install WordPress.

We assume that you have a hosted WordPress website. Now, go on…

Likewise, you installed a Theme in WordPress, you have to follow the same procedure to install a plugin.

Log in to WordPress Dashboard, then go to Plugins in your WordPress dashboard, Click on Plugins >> Add New.

Now you are on Plugins Page, here if you know the plugin name like AIO SEO, Yoast, etc. then search that name Search Plugin option. If you don’t know the plugin name and just you want to search by keyword then type that keyword in the search option.

Then select the plugin you want to install and click on install plugin as shown and after installing it click activate to activate the plugin.

After activation, every plugin has its setups and settings, go through its settings and follow the steps.

Hurray! You have successfully installed and activated WordPress Plugin.

The other methods to Install Plugins in WordPress are, you can do it by Uploading plugins from your system. We will look at this in our other posts.