How to Add an Image in WordPress

How to Add an Image in WordPress

How to Add an Image to WordPress website?

How to Add an Image in WordPress

Learn how to Add an Image in WordPress.

For adding images to your WordPress website, first, you have to upload that image or image to WordPress Media Library. If you don’t know how to upload images to WordPress, see the how-to upload images to WordPress Website.

Now, we assume that you have successfully uploaded the required images to your WordPress by following the steps we discussed in the above-mentioned post.

How to Add images to WordPress Post?

For adding an image to a WordPress post, first, you have to create a post, if you want to know the multiple ways to write a post then see the article how to create a post in WordPress

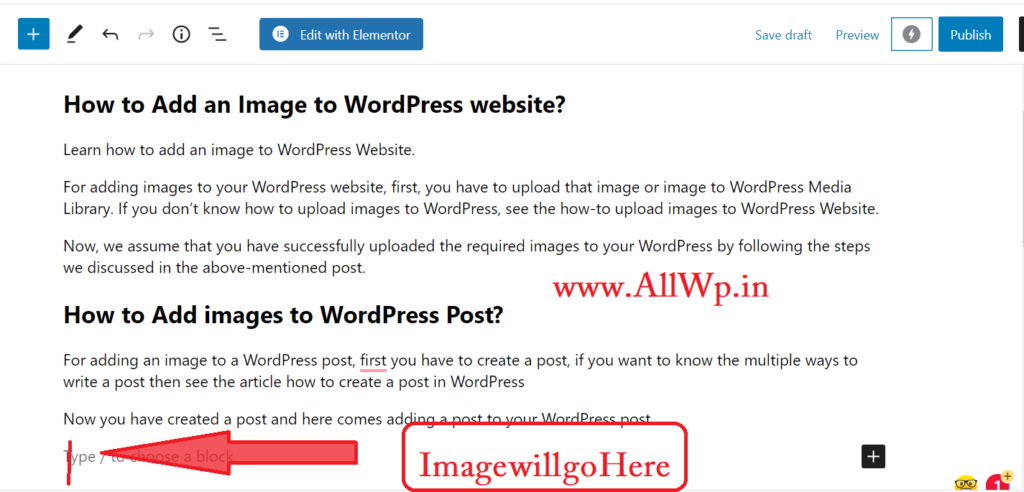
Now you have created a post and here comes adding a post to your WordPress post.

Now,

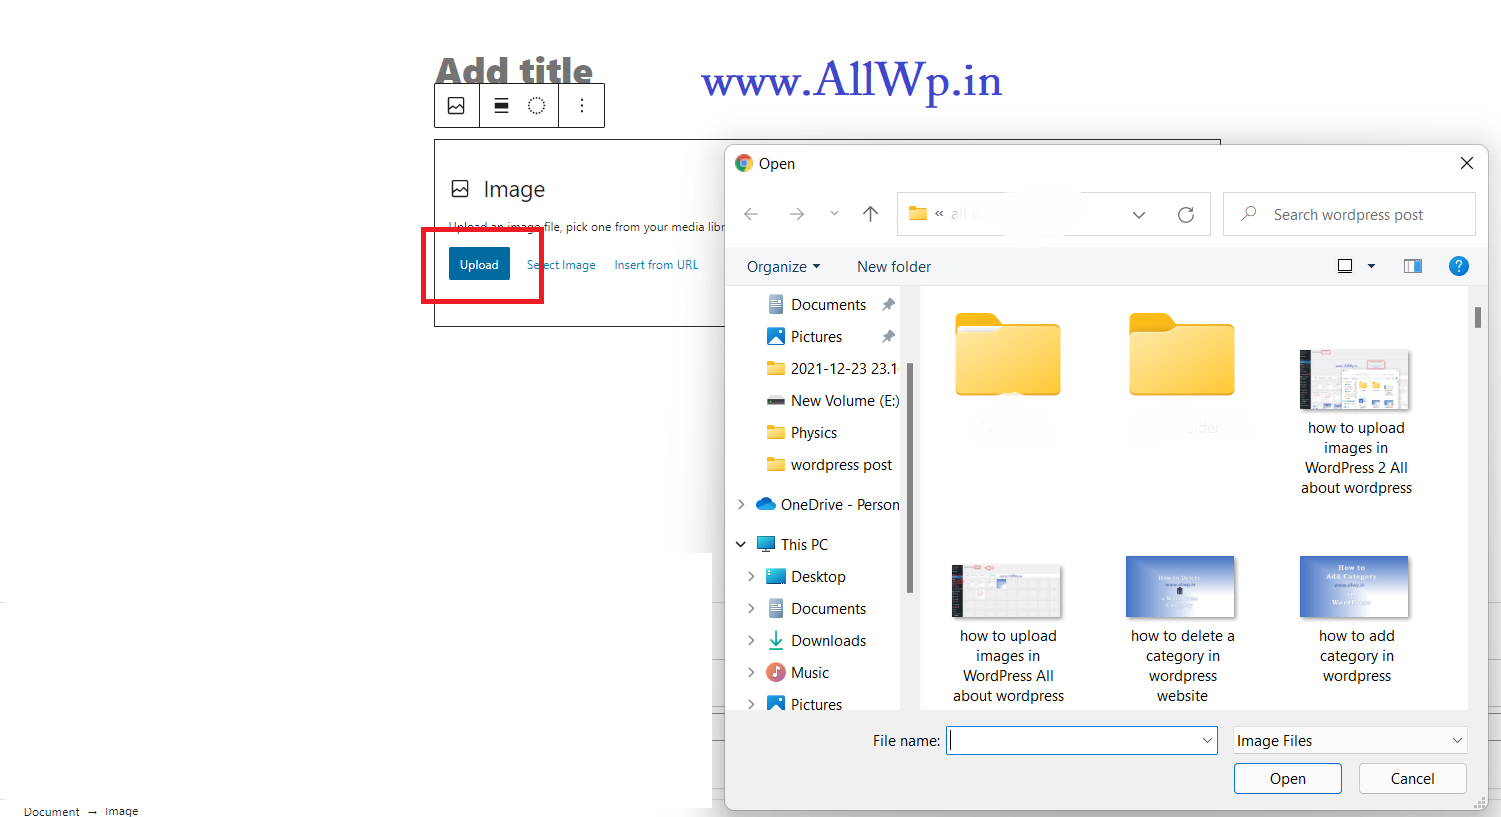
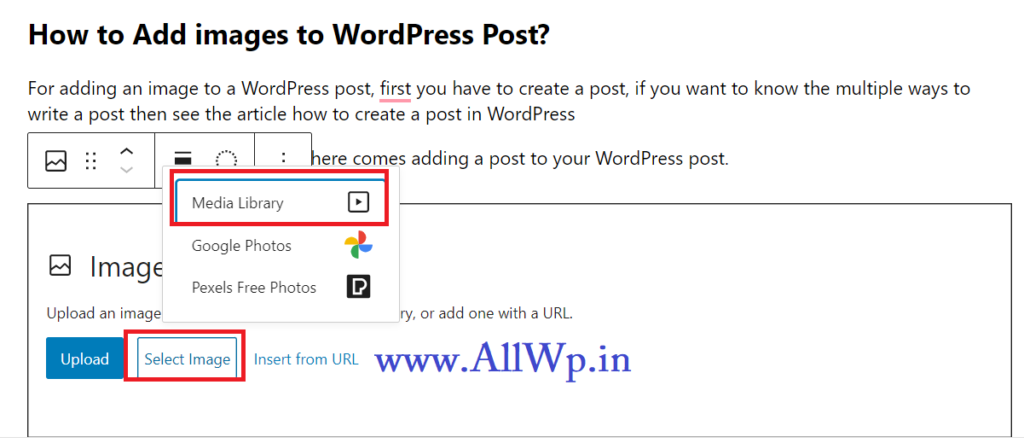
1. Position the cursor where you want to add an image.

2. Click on Block Inserter and Select Image

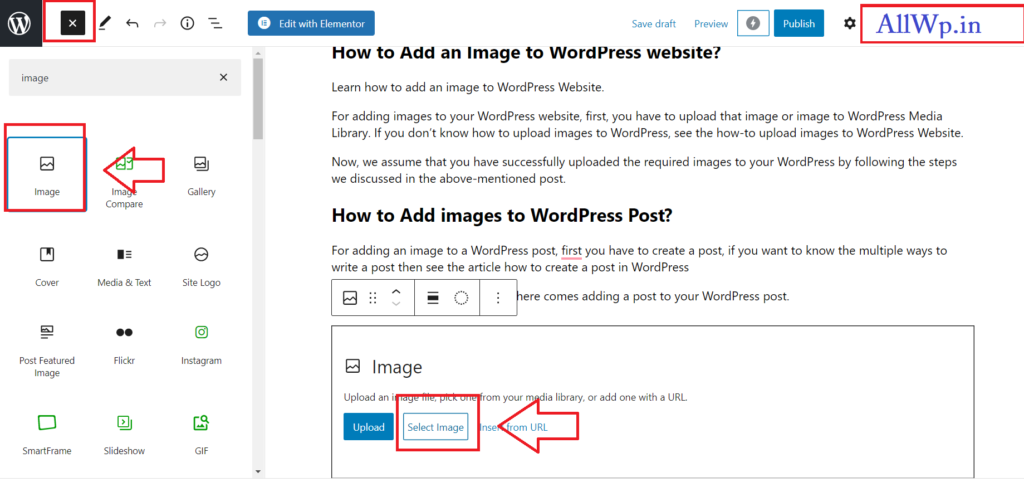
3. Now, Click Select Image, then Click on Media Library

4. Then, In Media Library, select the image you want to add to your WordPress Post,

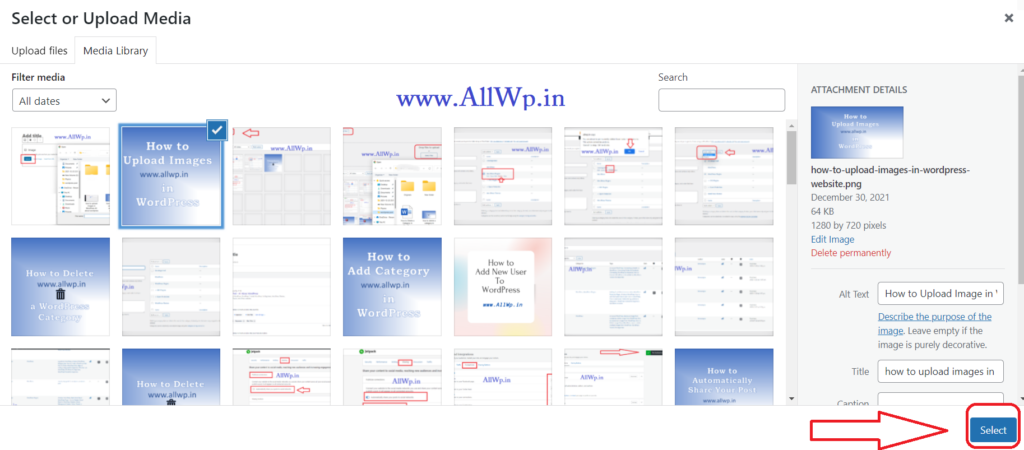
5. After selecting the Image Click on Select Button Below on the Right-hand side

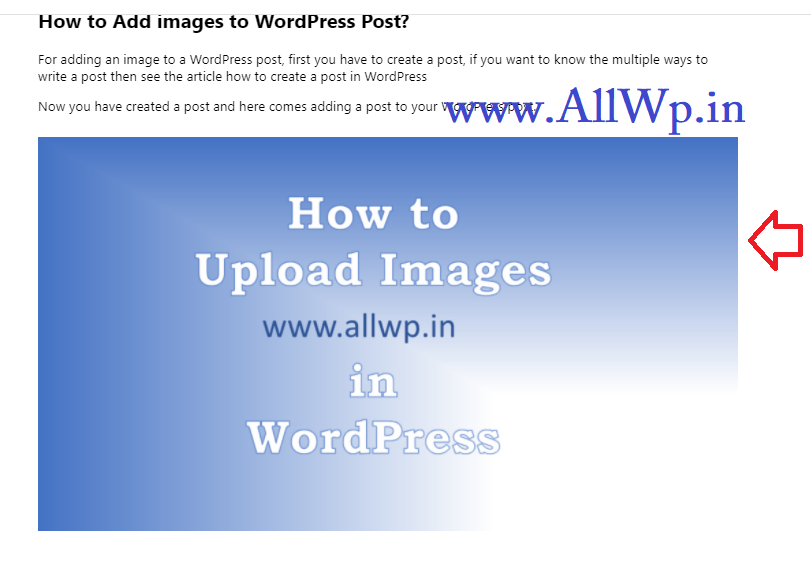
Hurray! Your Image is added to Your WordPress post Successfully.

We hope, this article was helpful to you, and you added images to your WordPress post easily. If it is helpful to you then kindly like and share it. If you have any feedback, then do comment below, so that we can improve.

Easiest Way to Understand What is a Backlink?

What is a Backlink?

Do you want to know What is a Backlink? Many beginners want to know What a Backlink is actually?

It is simple, a Backlink is a link from one website to another website.

For example, Bajrai Online Solutions is a Business directory which lists Hyderabad Businesses.

Here, in the above example, the link to Bajrai Online Solutions serves as a Backlink to that website.

What is a Backlink?

Importance of Backlinks

Backlinks are very important for websites. For ranking a website on Search Engines like Google, Backlinks are one of the important factors. The website which has more Backlinks, search engine rank it high because it understands that many websites are linking to this website.

Conclusion: Backlinks are one of the important aspects of SEO, and SEO plays important role in Digital Marketing.

How to Upload Image in WordPress

How to Upload Image in WordPress

How to Upload Image in WordPress?

Do you want to upload image in WordPress? That means you are a beginner at WordPress. Uploading images in WordPress is very easy.

If you are making a WordPress Blog then you need to add images to each and every post of your Blog.

On the other hand, if you are making a Static Website, then you need not upload images frequently.

Rather, you just have to upload images at a time and use them on different pages of your website.

Uploading Multiple Images in WordPress

As we discussed above, if you want to upload all your images in WordPress at a time, then you have to follow these simple steps:

    1. Go to WordPress Dashboard
    2. Go to Media
    3. Add New

First, you need to log in to your WordPress dashboard, then click on the Media as shown in the image.

Then you will see ADD NEW  button there at 2 places.

One is on the left-hand side below the Media and the other one is at the top beside Media Library as shown in the figure.

Click on Add New, then you will be asked to Drop Files to Upload or Select Files.

Click on Select Files and select the images you want to upload and click the Open button or press Enter.

Hurray! You have successfully uploaded images in WordPress.

How to Upload Image in Blog Post?

As mentioned above, if you are writing a blog then you have to upload images to each and every post of your WordPress Blog.

You can follow the above method from the WordPress dashboard. But it will be quite lengthy.

To upload images in WordPress on the go while writing a post.

Just Click on Block Inserter (To know more about Blog Inserter, read how to write a post in WordPress) and Select an image in it.

Now, you have the option to Upload an image or Select an Image or insert an image from a URL.

As we are learning uploading of the image in WordPress, then click on upload image and select the image from your PC and upload it.

Hurray! You have successfully uploaded the image in the WordPress Blog post.

If you want to use the uploaded image from your media library, then click on the Select Image option. Your Media Library will be opened and Select the Image then upload it.

If you want to use an image from another website then go to that image and copy the image URL and paste it in Insert From URL option.

These are the methods to upload images or any media on the WordPress website.

We hope you find it useful for you. If it is helpful then kindly like the post and share it on your social media handles.

If you find any corrections or you have any feedback, then kindly comment on the post and let us know. So, that we can improve it.

How to Delete a Category in WordPress

How to Delete a Category in WordPress

How to Delete a Category in WordPress?

Do you want to delete a category in WordPress? Whatever reason it may be, but you want to delete a category from your WordPress Website. Then how to delete it?

We assume you followed our previous post on How to add a category in WordPress? If you followed that post then it is dead easy to delete a category from WordPress.

If not, then you can read this post to delete a category from WordPress.

In our previous post, you learned about What Category is in WordPress, what are its uses, and how to add a category to a WordPress website? Now we will discuss how to delete a category?

How to Delete a Category from WordPress?

To delete a category in WordPress, you have to go to Your WordPress Admin Dashboard, then as previously, go to Posts in it and select categories.

Now, you will see Add New Category Heading on your left-hand side and Your Categories on the right-hand side.

To delete a category from your categories, select the category you want to delete or just hover over it. You will see Edit, Quick Edit, Delete and View. Click on Delete to Delete the Category.

Then a Pop up will show which says: “You are about to permanently delete these items from your site. This action cannot be undone. Cancel to stop, OK to delete

If you want to delete it Click OK.

Hurray! You have successfully deleted a Category from your WordPress Blog.

How to Delete Uncategorized Category from WordPress?

You might want to delete that Uncategorized Category and you were unable to delete the uncategorized category. This is because by default uncategorized category is your Default Category.

You cannot Delete  Default Category

To delete the uncategorized Category, first, you have to change the default category.

How to Change the Default Category in WordPress?

To Change the Default Category, You have to go to WordPress Writing settings, there you can change Default Parent Category, as we explained in WordPress Basic settings.

Now, we assume that you have changed the Default Parent Category.

Now come back to categories and here you can delete Uncategorized Category.

Yay! You have successfully deleted Uncategorized the default category.

How to Delete Multiple Categories in WordPress?

Suppose you want to delete categories in bulk i.e., you want to delete multiple categories in a go, then just you have to select categories you want to delete.

How to Delete a Category in WordPress

And click on the drop-down as shown in the screenshot -which displays Bulk Actions. When you click bulk actions, you will see Delete. Select Delete and Click Apply.

Then a Pop up will show which says: “You are about to permanently delete these items from your site. This action cannot be undone. Cancel to stop, OK to delete

If you want to delete it Click OK.

Hurray! You have successfully learned to delete multiple Categories in WordPress.

Do Deleting a Category will Delete All the Posts assigned to that Category?

Now one question arises in our mind that, when we delete a particular category, then do our posts that are assigned to that category will also be deleted?

No, it will not happen. Your posts assigned to deleted category won’t be deleted from your website.

What Happened to Deleted Category posts?

Now the question is then what happened to the posts of deleted category? The answer is simple, those posts will be assigned to your Default Category.

If you are finding our Tutorials helpful, then do like and share them with others. If you have any feedback, do comment. It will help us to improve.


How to add a category in WordPress?

How to add a category in WordPress?

How to add a category in WordPress?

Do you want to add a category in WordPress? Then we need to first look at what actually Category is?

What is a Category?

A category is one of the WordPress taxonomies, and it is used to sort and group WordPress posts into different sections.

So, a category is used for arranging blog posts in different sections. Like librarians, use to set books according to their topics in different racks. Likewise, you can set blog posts according to their topics.

What is the use of Categories in WordPress?

As Discussed above, Categories are used to sort and arrange WordPress Blog posts in different sections. This will be helpful in the readability of WordPress.

A visitor can read the same topic posts in a particular category.

Suppose, a reader wants to read about WordPress Plugins, and you have a category named WordPress Plugins. Then he/she can browse the WordPress Plugin category and read the posts he is interested in. And this will increase the Website’s Session duration and ultimately decrease the Bounce rate of the website. And these factors are important for SEO.

How to add a category in WordPress?

Now, the important question is how can I add Categories to my WordPress website?

Adding Category in WordPress is very easy, basically, you can add Category in WordPress in 2 ways

  1. Adding Category from WordPress dashboard
  2. Adding Category while writing a post

1. Adding Category from WordPress dashboard: Adding Categories from the WordPress dashboard is very easy, if you follow our previous posts like adding posts in WordPressadding users in WordPress, etc., then you will find it really simple to add a category in WordPress.

Log in to WordPress Dashboard and go to Posts, then select Category in Posts as shown in the screenshot.

Now you are on the categories page. Before adding a category using this method. Let us understand some of the textboxes you have to fill here.

Name: This is easy to understand, no need to write about it. Here you have to write the name of your Category.

Slug: The Slug is the URL-friendly name of the category name, and it has lowercase letters, hyphens, and numbers only.

For example, my category name is WordPress Plugins then its slug will be ” https://allwp.in/category/wordpress-plugins/ “

Parent Category: Categories can have a hierarchy in them. To attain this hierarchy, you need to use the parent Category. Let understand it with an example.

Suppose, My Main Category name is WordPress and now I want to add the WordPress Plugins Category inside the WordPress Category.

Then while adding the WordPress Plugins category, you have to Select WordPress Category as Parent Category.

Then, the WordPress Plugins category will be the Child category of the WordPress Category.

If you don’t want to have hierarchy or Parent-child categories then You should set Parent Category as None. And it is the default selection as shown.

Description: As the name suggests, description is the detail about the category you are adding. It is not mandatory to write descriptions of the categories. And not all the themes show the Category description in WordPress. Some themes only show it.

Add New Category Button: After filling all the details, at last click on Add New Category button to add the above category.

So, fill up all the details and Click on Add New Category, and you have successfully added the Category in WordPress.

Hurray! You have added a Category in Your WordPress Website or Blog

By using this method, you can add multiple categories you need to your whole WordPress website.

how to add a category in wordpress

2.Adding Category While Writing Post:

The other method is to write a category while writing or publishing your post. In this method, while writing a WordPress posts. Click on the Settings button on the top beside Publish button as shown in the screenshot.

Then, scroll down you will see the category, in that if you don’t have the category related to the post. Then, Click on Add New Category as shown in the screenshot.

Hurray, You have successfully added New Category live.

How to Select Category in WordPress Post?

To select the category for your WordPress post, then you have to follow the above method.

Write your post, then click on setting, In settings scroll down, you will see the category name and Select the Appropriate Category for your post.

How to Delete a Category in WordPress?

We will discuss it in our upcoming posts. Stay tuned.

We hope this post is helpful to you in understanding WordPress Category, and how to add a category in WordPress. If it is helpful to you kindly like and share it on social media. If you have any feedback, do comment. It will help us to improve.