The Hostinger WordPress plugin is primarily a setup assistant rather than a traditional plugin that adds new features to your website. It’s mainly installed automatically when you choose Hostinger’s WordPress hosting and helps guide you through the initial website launch process.
Provides step-by-step instructions: The plugin takes you through basic tasks like uploading a logo, editing the website title and description, adding a new page, and previewing your site.
Offers quick access to key tools: It gives you direct links to useful features within your Hostinger control panel, including theme selection, email setup, and website optimization tools.
Simplifies getting started: For beginners, the plugin can help make the initial WordPress setup less overwhelming by streamlining the process.
Hostinger WordPress Plugin
This tool guides you through basic actions to create your website like
Upload Your Logo
Edit Post Description
Upload an Image
Edit Site Title
Add a New Page
Connect Your Domain
Upload Your Logo
The first option displayed in the Hostinger Plugin is Upload Your Logo. It will take you to the Customize page where you can directly add Your logo to Your website. For this, you have to Click “Take me there”. It also gives you the option to Create a logo using the Logo Maker tool.
Almost monthly more than 800 searches has been searched by Beginners regarding Logo (upload,remove,change)
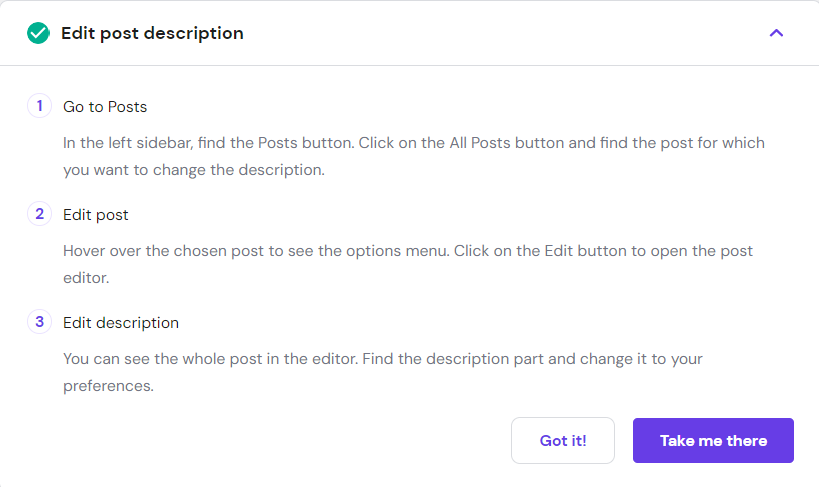
Edit Post Description
The other option is it will take you directly to Edit the Post Description. When you click the “Take me there” button it will redirect you to the Posts page in the WordPress Dashboard.
Similarly, the other options this plugin provides are Uploading an image, Editing the Site Title, adding a new page, and connecting your Domain.
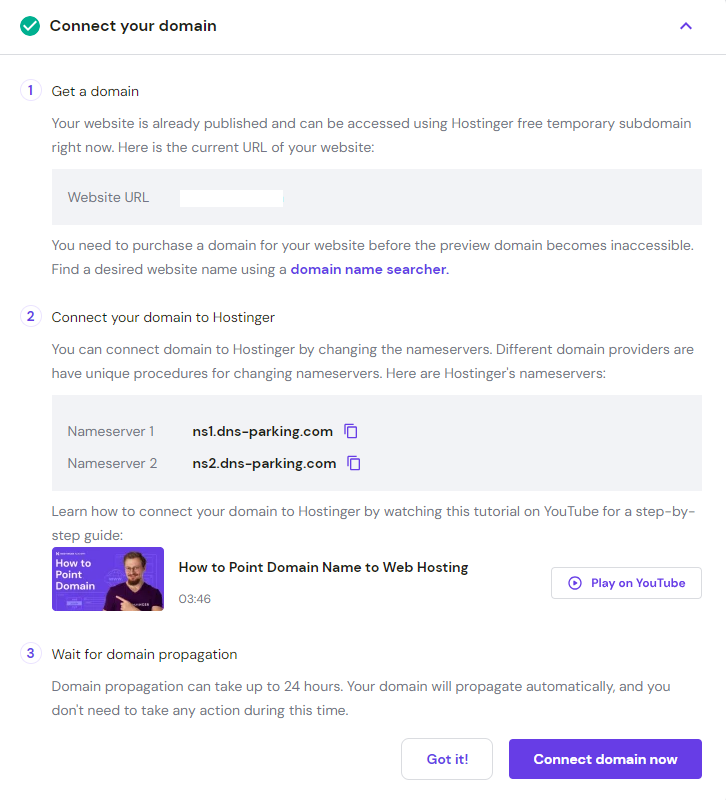
Connect Your Domain
All the other options are easy and you can click and know it easily. This option is important in case your domain is not connected or you are getting issues.
Suppose you have purchased a domain from Godaddy and now you have Hostinger WordPress Hosting. So, you want to connect your domain to the Hostinger Hosting plan. When you click “Connect Domain Now” it will redirect you to Hostinger Website where you will get the option to Connect Your Domain to Hostinger.
You can see a video provided by Hostinger to Connect your domain.
However, it’s important to note that:
Limited functionality: The plugin itself doesn’t add any significant features to your website. Its focus is on guiding you through existing ones.
Not essential: You can launch and manage your WordPress website perfectly fine without this plugin. All the functionalities it offers are accessible through the WordPress dashboard or Hostinger control panel directly.
Pre-installed but optional: While it comes pre-installed on Hostinger’s WordPress plans, you can deactivate it if you don’t find it helpful.
Overall, the Hostinger WordPress plugin can be a useful tool for beginners with its initial setup guidance. However, it’s not essential for experienced users and won’t add any substantial features to your website.
I hope this clarifies the purpose and role of the Hostinger WordPress plugin!
Do you want to change the server location in Hostinger web hosting?
As you know, Hostinger offers 8 server locations for its Web Hosting plans i.e., USA, United Kingdom, France, India, Singapore, Brazil, Lithuania, and the Netherlands
Why do we need to change the Server Location?
In general, you will see a slower response time depending on how far away your website is from the server hosting a website. Therefore, it is advised that you select a server location for your hosting package based on how close your users are to it.
Does server location matter?
As discussed above, definitely server location matters, because many times, your website is based in India, and you have selected the server location as India. But you will have traffic from the USA or UK. So, your website’s users and your website server are at a long distance. And it will impact the loading time of the website. So, you should change the servers to the Country (or nearby Country) from where you are getting more traffic.
Thankfully, Hostinger has the Option to Change server locations.
You can Change Server Location after 30 Days
How to Change Server Location in Hostinger?
Make sure to consider the following before changing the server location because if you change it once then for a month you can change it to another Server.
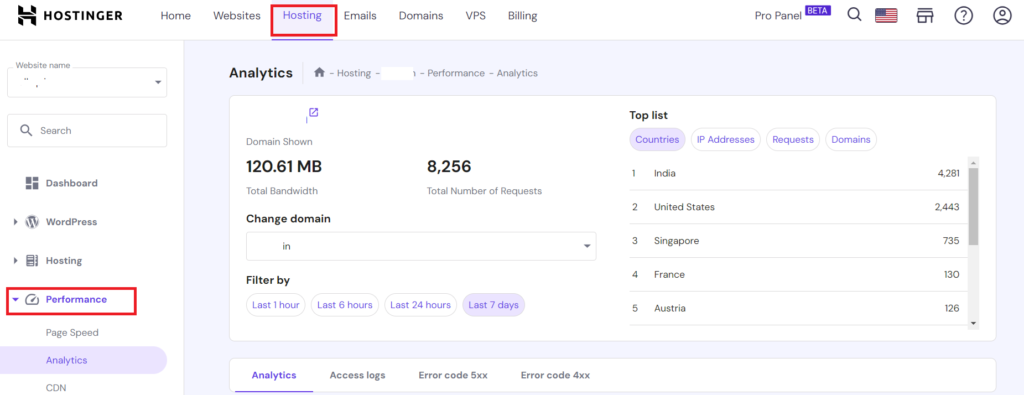
1. Go to the Analytics Page in Hostinger and check from where you are getting traffic to your website. You can check the top countries from where your website is getting traffic.
Hpanel >> Hosting >> Performance >> Analytics
You will find Analytics on the left-hand bar in Hosting (menu) inside performance as shown in the figure
2. If the visitors to your website are from all over the World.
Then CDN is the best option for your website. It will increase the speed of your website regardless of where you are physically located by storing multiple copies of it on proxy servers across the globe. Additionally, this will strengthen SEO and offer more DDoS defence.
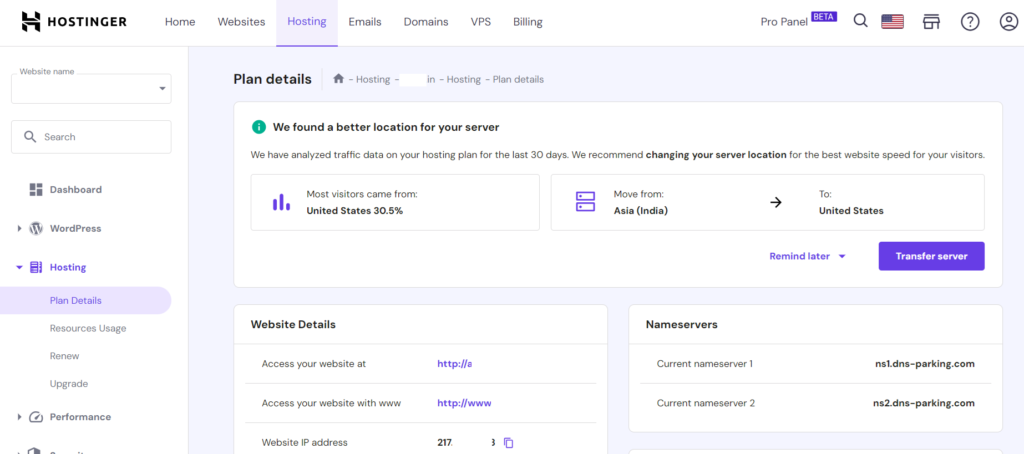
If you want to change your website’s server then navigate to Plan details just above the Performance tab as discussed above.
Hpanel >> Hosting >> Hosting>> Plan Details
You can change the server in 2 ways
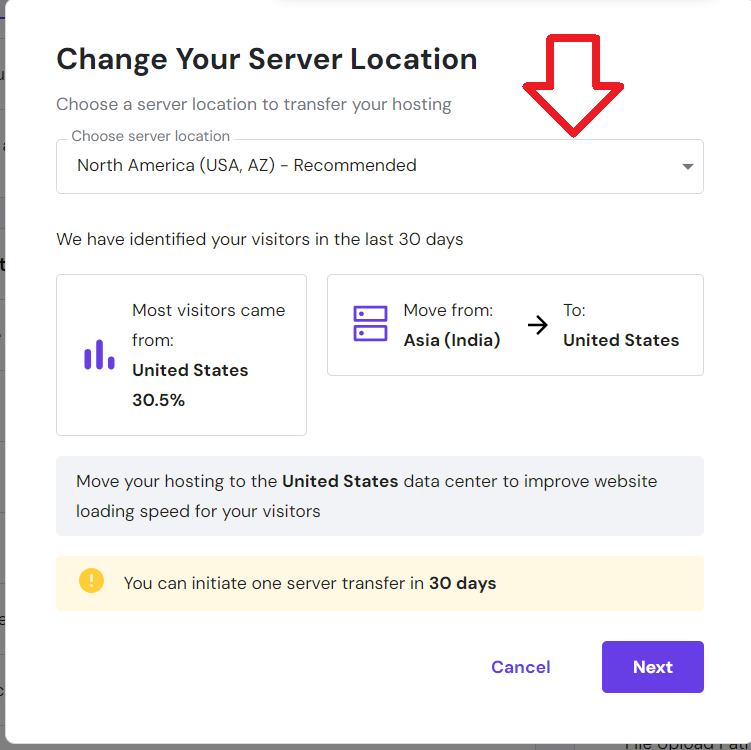
1. Hostinger will suggest you as per your analytics Transfer your Server to a specified location. As in the above case, Hostinger is suggesting us to transfer the server from India to the United States. To do that, Just Click on the Transfer Server button to initiate the Transfer.
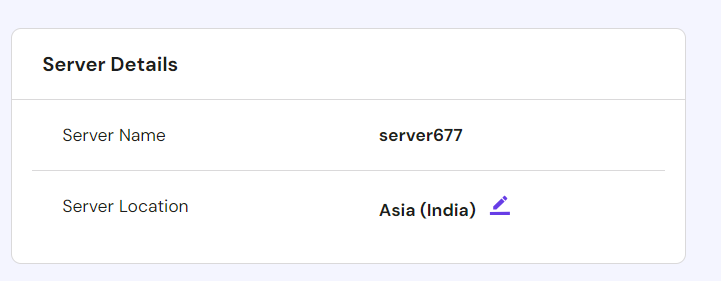
2. The second way to Transfer your Server to other than the suggested Server location. To achieve this you have to scroll down to server details as shown below
Click on the pencil button beside Asia (India) as shown in the above image. Then a pop-up box will appear as shown in the image below
Select the server from the Choose server location drop-down as shown above. Select your desired location and click on next to Change the server location. Then press Start to initiate the transfer process.
How to find the server location of a website?
The above discussion answered this question. In brief:
Hpanel >> Hosting >> Hosting>> Plan Details
Do double check before transfering your server.
If you have multiple websites hosted on shared hosting, then be cautious before taking server change decision by analysing only one website.
Embarking on the journey of creating your website? Fantastic! Let’s demystify the process with a focus on the renowned web hosting provider, Hostinger.
Understanding the Basics
Web hosting, a crucial service, breathes life into your website or web application, making it accessible to the world. But before diving into hosting plans, it’s wise to identify the type of web host that aligns with your unique needs. If you’re a fan of WordPress, exploring WordPress web hosting options is a game-changer, offering tailor-made solutions for CMS-centric sites.
Finding the perfect web host involves a bit of reflection:
Cost: Web hosts vary in pricing. Ensure it fits into your budget comfortably.
Features: Consider bandwidth and storage – crucial factors for supporting your website’s files and expected traffic.
Security: Look for built-in security measures, including automated backups and an SSL certificate.
Support: Round-the-clock support is a lifesaver. Prioritize a web host with reliable 24/7 assistance.
With these considerations in mind, it’s time to discover the ideal host for your website.
Tailoring Plans to Your Vision
Your website’s nature dictates the hosting plan you choose. If you’re dreaming of a WordPress eCommerce store, delve into Hostinger’s WooCommerce plans.
As you explore plans, remember to check for:
Free Domain Name: Hostinger offers plans with a complimentary domain for the first year, easing initial website costs.
Storage: Ensure it accommodates all your files, images, and videos without compromising speed.
Bandwidth: Opt for unlimited bandwidth to gracefully handle varying traffic loads.
For a user-friendly start to a small to medium website, consider Hostinger’s shared web hosting. Their Premium plan, priced at ₹149/month, includes free domain name registration, unlimited bandwidth, and databases. Keep an eye out for regular discounts on Hostinger’s diverse hosting plans.
Advanced Options: Tailoring Your Hosting Experience
Venturing into VPS hosting unlocks a more secure and flexible server. Though it demands a touch of technical know-how, installing a user-friendly control panel like Cyberpanel, powered by LiteSpeed, can ease the journey.
At Hostinger, VPS hosting plans range from ₹449/month to ₹1699/month, boasting a dedicated IP address, 24/7 live chat support, and a 30-day money-back guarantee.
For expansive websites, such as online stores, cloud hosting becomes a beacon of reliability. Hostinger’s Cloud Startup plan, priced at ₹699/month, boasts industry-standard data protection, a free content delivery network (CDN), and daily backups.
Embark on your website-building journey with Hostinger as your trusted companion – where simplicity meets innovation, and your online vision becomes a reality.
The main issue with the big website is Media files, almost 4 years of media library.
Due to some plugins, and resizing issues, we could not see thumbnails in many of our posts.
On the other hand, our WordPress.Com plan was expiring soon, so we have to do something now, so that if there is an issue with the media library then we should have images on our personal computer, and then we can upload them, whenever and wherever required.
For that, we come across this process. To export(download) the complete WordPress Media Library here is one of the easiest ways.
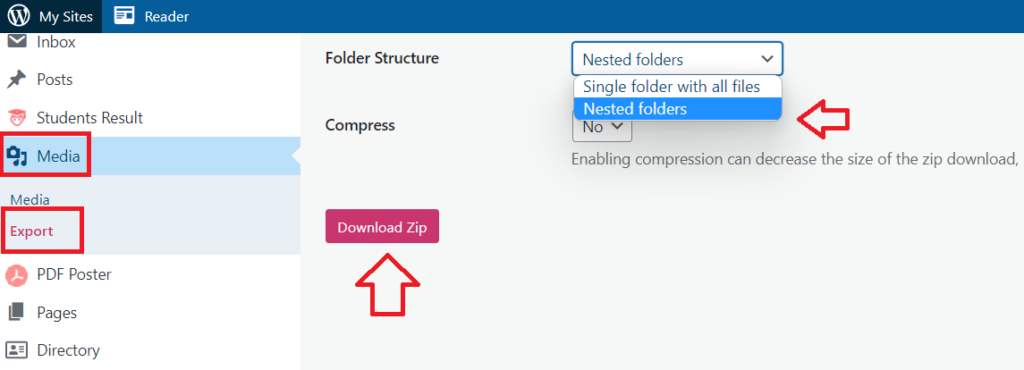
After activating the Export Media Library Plugin, go to Media >> Export in Your WordPress Dashboard.
You will be redirected to the following page. In the Folder Structure: you have a dropdown menu:
1. Single folder with all files which means all your media library will be downloaded to a single folder.
2. Nested Folders: This means your media will be in separate folders based on the time of upload.
Once you have chosen the settings, simply click Download Zip, and the ZIP file will be downloaded to your PC.
Why Nested Folders?
We used Nested Folders because we have 4 years of data, if any one of our images is not loading, simply inspect our browser, and find out which image is lost. Then, we can go to our PC and find out from nested folders, the exact image.
You can use a Single Folder with all files if your website is small.
Unzip WordPress Media:
After downloading WordPress Media to your PC, then simply unzip the files. And You can see all your Media in one place.
Why Export WordPress Media Library?
If you want to have the backup of your media files on your personal computer, then you would want to download WordPress Media. In our case, we have to move WordPress media from one hosting to another hosting account, and for any loss of media, we want WordPress Media on our PC.
Conclusion:
In this article, we learn about how to export all Media files from WordPress websites using a Plugin. It is a nice and simple way, we used it and then wrote this article.
If this article is helpful to you, then kindly Like, and share it with your friends. If you have any feedback kindly comment so that we can improve.
Looking to build a successful online presence? Look no further than WordPress – the magic platform that makes it happen. With its user-friendly interface and powerful features, WordPress has become popular among website owners and bloggers worldwide.
Whether you’re a business owner, a creative professional, or a passionate blogger, WordPress offers endless possibilities to showcase your work and reach your target audience. From customizable themes and intuitive content management to extensive plugin options and seamless integration with social media, WordPress lets you create a completely tailored online experience.
But it’s not just about appearances. WordPress also excels in search engine optimization (SEO), helping your website rank higher on search engine results pages (SERPs). With its clean code structure and built-in SEO features, WordPress provides a solid foundation for your website’s visibility and organic traffic growth.
So, if you’re ready to unlock the magic of WordPress and take your online presence to new heights, join the millions of satisfied users who have already experienced the platform’s success. Get started with WordPress today and let the magic unfold.
Why choose WordPress for your website?
WordPress is the go-to platform for website owners and bloggers alike, and for good reason. One of the main advantages of WordPress is its versatility. Whether you’re a business owner, a creative professional, or a passionate blogger, WordPress offers endless possibilities to showcase your work and reach your target audience.
With WordPress, you have full control over your website’s appearance and functionality. The platform offers a wide range of customizable themes that allow you to create a unique and visually appealing website that reflects your brand or personal style. From sleek and modern designs to more traditional and elegant layouts, WordPress has something for everyone.
But it’s not just about appearances. WordPress excels in search engine optimization (SEO), helping your website rank higher on search engine results pages (SERPs). With its clean code structure and built-in SEO features, WordPress provides a solid foundation for your website’s visibility and organic traffic growth. This means that when someone searches for relevant keywords related to your business or blog, your WordPress website is more likely to appear on the first page of search results, increasing your chances of getting noticed by potential customers or readers.
The benefits of using WordPress for your business
If you’re a business owner, WordPress offers a multitude of benefits that can give your online presence a significant boost. One of the key advantages is the ease of use. Even if you have no technical knowledge or coding skills, you can still create and manage a professional-looking website with WordPress.
WordPress also provides a range of powerful features that are essential for business websites. From e-commerce functionality to customer management systems, WordPress has plugins and tools that can help streamline your business operations and enhance the user experience for your customers. With WordPress, you can easily integrate payment gateways, set up online stores, and manage inventory, making it a perfect platform for online retailers.
Another benefit of using WordPress for your business is the ability to track and analyze your website’s performance. WordPress offers built-in analytics tools that provide valuable insights into your website’s traffic, user behaviour, and conversion rates. This data can help you make informed decisions about your marketing strategies and optimize your website for better results.
Getting started with WordPress: Installation and setup
Getting started with WordPress is quick and straightforward. The first step is to choose a hosting provider and purchase a domain name. Many hosting providers offer one-click WordPress installation, making the setup process a breeze. Once you have your hosting and domain sorted, you can proceed with installing WordPress.
After the installation, you’ll need to set up your WordPress site by choosing a suitable theme and customizing it to fit your brand or personal style. WordPress offers a vast library of free and premium themes, allowing you to find the perfect look for your website. You can customize the theme’s colours, fonts, layouts, and more to create a unique and visually appealing website that captures your audience’s attention.
Choosing and customizing your WordPress theme
Choosing the right WordPress theme is crucial for creating a visually appealing and user-friendly website. With thousands of options available, it’s essential to consider your specific needs and goals when selecting a theme.
When choosing a WordPress theme, consider factors such as responsiveness, speed, and compatibility with plugins. A responsive theme ensures that your website looks great on all devices, from desktops to smartphones. Speed is also crucial for a positive user experience, as slow-loading websites can lead to high bounce rates and lower search engine rankings. Additionally, make sure the theme is compatible with the plugins you plan to use, as some themes may not support certain functionalities.
Once you’ve chosen a theme, it’s time to customize it to match your brand or personal style. WordPress offers a user-friendly customization interface where you can easily make changes to your theme’s colours, fonts, layouts, and more. You can also add your logo, custom headers, and background images to make your website truly unique.
Essential plugins for your WordPress website
Plugins are one of the key features that make WordPress so powerful and versatile. They allow you to add additional functionality to your website without the need for coding or technical skills. With thousands of plugins available, there’s virtually no limit to what you can achieve with WordPress.
When choosing plugins for your WordPress website, it’s important to consider your specific needs and goals. Some essential plugins include:
This plugin helps optimize your website for search engines, improving your chances of ranking higher on search engine results pages.
2. WooCommerce: If you plan to sell products or services online, WooCommerce is a must-have plugin. It provides a comprehensive e-commerce solution, allowing you to set up online stores, manage inventory, and process payments.
3. Contact Form 7: This plugin allows you to create and manage contact forms on your website, making it easy for visitors to get in touch with you.
4. Jetpack: Jetpack is a versatile plugin that offers a range of features, including website security, performance optimization, and social media integration.
Creating and managing content with WordPress
WordPress makes it easy to create and manage content on your website. Whether you’re writing blog posts, uploading images, or adding videos, WordPress provides a user-friendly interface that allows you to do it all.
The built-in content editor, known as the Gutenberg editor, offers a block-based approach to content creation. This means you can easily add, rearrange, and customize different types of content blocks, such as paragraphs, headings, images, videos, and more. The Gutenberg editor also allows you to preview your content and make changes in real time, giving you full control over how your content looks and feels.
In addition to the Gutenberg editor, WordPress also offers a media library where you can store and manage all your images, videos, and other media files. The media library makes it easy to add media to your content and ensures that your website remains organized and clutter-free.
Optimizing your WordPress website for SEO
Search engine optimization (SEO) is essential for improving your website’s visibility and driving organic traffic. Luckily, WordPress provides a solid foundation for SEO, with its clean code structure and built-in SEO features.
One of the key SEO features of WordPress is its ability to generate search engine-friendly URLs. By default, WordPress creates URLs that are clean, concise, and contain relevant keywords. This helps search engines understand the content of your pages and improves your chances of ranking higher on search engine results pages.
Another important aspect of SEO is optimizing your content for keywords. WordPress allows you to easily add meta tags, meta descriptions, and focus keywords to your pages and blog posts, helping search engines understand the relevance of your content and improving your chances of ranking for specific keywords.
Additionally, WordPress offers a wide range of SEO plugins, such as Yoast SEO, that provide advanced SEO functionalities, including XML sitemap generation, social media integration, and content analysis. These plugins can help you optimize your website’s SEO even further and ensure that your content is fully optimized for search engines.
Security and maintenance tips for your WordPress site
Keeping your WordPress website secure and up to date is essential for protecting your data and maintaining its performance. Here are some security and maintenance tips to keep in mind:
1. Keep WordPress and plugins updated:
Regularly updating WordPress and your plugins ensures that you have the latest security patches and bug fixes, keeping your website secure and running smoothly.
2. Use strong passwords:
Choose strong and unique passwords for your WordPress admin account and all other user accounts to prevent unauthorized access.
3. Install a security plugin:
Installing a security plugin, such as Wordfence or Sucuri, can provide an extra layer of protection for your website by scanning for malware, blocking suspicious IP addresses, and monitoring potential security threats.
4. Backup your website regularly:
Regularly backing up your website ensures that you have a copy of your data in case of any unforeseen events or data loss. WordPress offers plugins that automate the backup process, making it easy to schedule regular backups.
Farhan Bajrai is an Entrepreneur, Web Designer as well as a Teacher. He resides in Hyderabad. He is the Founder, Designer, and Director of Bajrai Online Solutions.