
How to install WordPress Plugin
by farhanbajrai | Nov 29, 2021 | WordPress, WordPress Plugins
How to Install WordPress Plugin?
After successful installation of WordPress, the first question is how to install WordPress Plugin?
But before that:
What is a WordPress Plugin?
In WordPress, A Plugin is a software that contains a piece of code by which we can extend the functionality of WordPress websites. Simply, the Plugin is nothing but the Applications in WordPress.
Now,
How to Install a Plugin in WordPress?
There are some methods to install Plugin in WordPress. Today, we are showing you the easiest and most used method to install a plugin in WordPress.
Note: Before installing the plugin, you must know that you can’t install a plugin in WordPress.Com website free plan.
Many Beginners got stuck in this, they want to install a plugin in WordPress.com. So for installing a plugin in WordPress.com, you have to purchase their business plan or other plans.
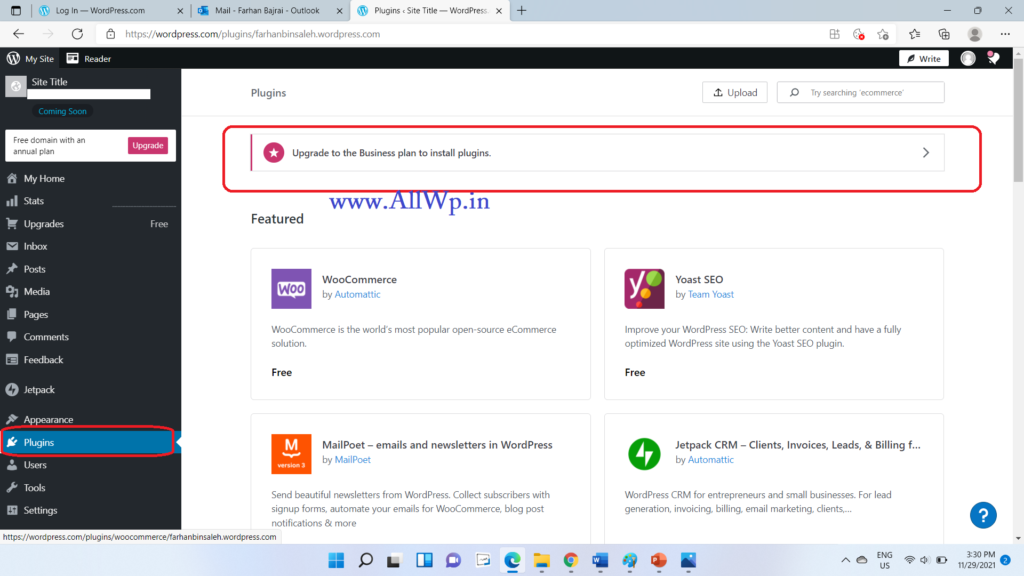
You can install plugins in WordPress.org. For this, you need to have a Hosting for your website, in which you have to install WordPress.
We assume that you have a hosted WordPress website. Now, go on…
Likewise, you installed a Theme in WordPress, you have to follow the same procedure to install a plugin.
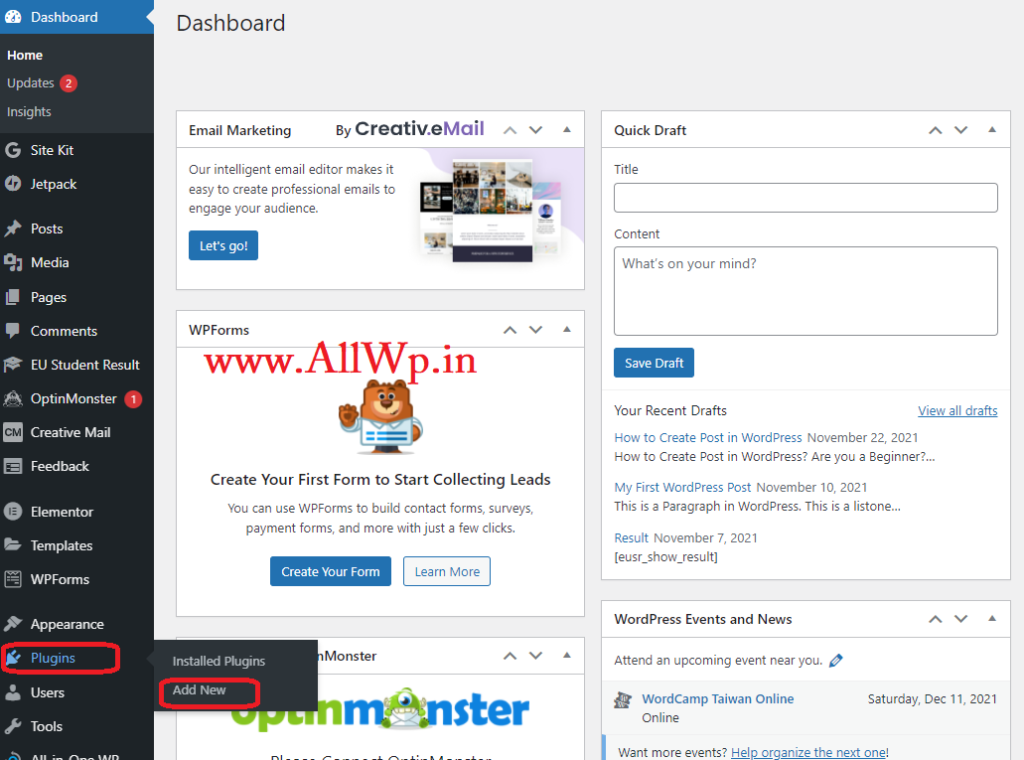
Log in to WordPress Dashboard, then go to Plugins in your WordPress dashboard, Click on Plugins >> Add New.
Now you are on Plugins Page, here if you know the plugin name like AIO SEO, Yoast, etc. then search that name Search Plugin option. If you don’t know the plugin name and just you want to search by keyword then type that keyword in the search option.
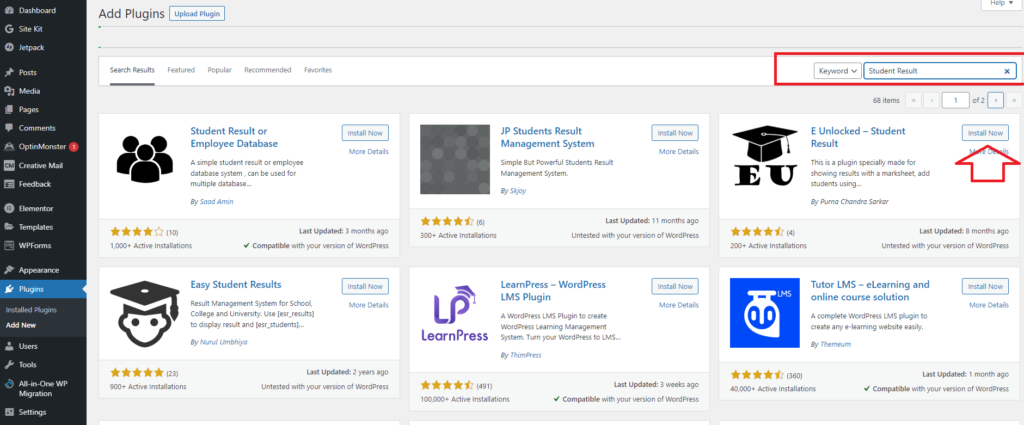
Then select the plugin you want to install and click on install plugin as shown and after installing it click activate to activate the plugin.
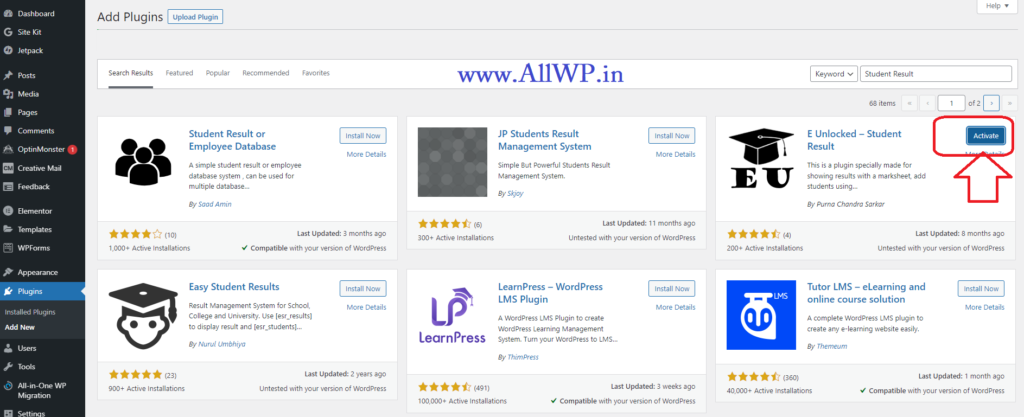
After activation, every plugin has its setups and settings, go through its settings and follow the steps.
Hurray! You have successfully installed and activated WordPress Plugin.
The other methods to Install Plugins in WordPress are, you can do it by Uploading plugins from your system. We will look at this in our other posts.
How to Add Navigation Menu in WordPress Website
by farhanbajrai | Nov 27, 2021 | WordPress
How to Add a Navigation Menu in WordPress?
Have you added a Navigation Menu to Your WordPress Website?
No, that means you want to add a navigation menu to your WordPress website. Yes, you are in the right place. Read on to know the procedures.
What is a Navigation Menu?
The first question that comes to mind is What is a navigation menu? A navigation menu is a list of links that are pointing to some pages or categories or tags or blog posts in a website. Usually, a navigation menu is on the top of the website in a horizontal line.
A navigation menu consists of the important links of pages and posts which you want visitors can access easily. Every website has its important pages as a navigation menu.

Here is the example of a Navigation menu from a website named Bajrai Online Solutions
What can we keep in the WordPress navigation menu?
We can keep any link we want, in the WordPress navigation menu. The most common are Our WordPress pages, Blog Posts, categories, and any other custom links which you want to display.
How to add a navigation menu in WordPress?
WordPress interface has a drag and drop option to add menus to the Website. Here is the detail:
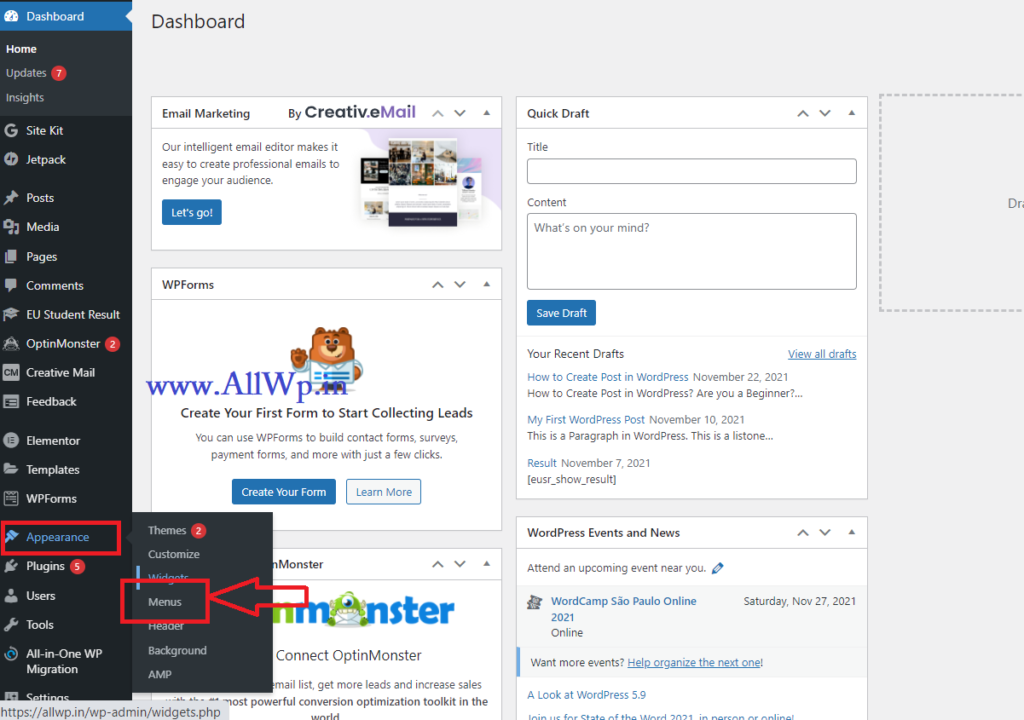
To create a navigation menu in your WordPress website, go to Appearance then Menus in the Dashboard admin panel of your WordPress website.
Give your Menu a Name in the Menu Name section. We have given here, Main Menu.
How to Add Pages in Navigation Menu in WordPress?
Now after giving names to our menu, we have to add pages to our WordPress Menu.
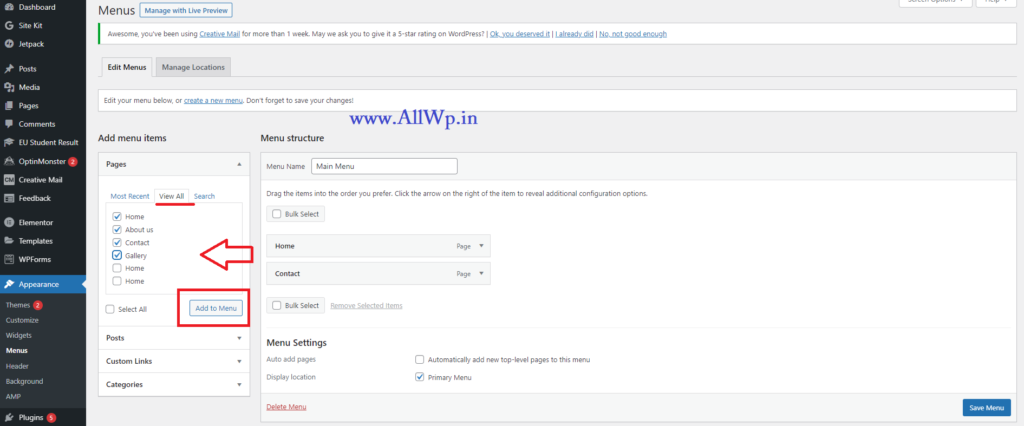
To add pages in WordPress Menus, Click on Pages in Add Menu Items which in the left-hand side of your menu page. To see all available pages on Your WordPress website, click on View All.
Now you can select all the pages by clicking Select All. If you want some specific pages to show in your menu, then click on the check box beside the page name. After selecting your pages, click on Add to Menu as shown in the image.
Congrats! You have added Pages successfully to the WordPress Menu, now don’t forget to Save menu. Click on Save Menu before leaving the page.
How to Add Categories in Navigation Menu of WordPress Website?
A category is a place where you keep your same topic posts in WordPress.
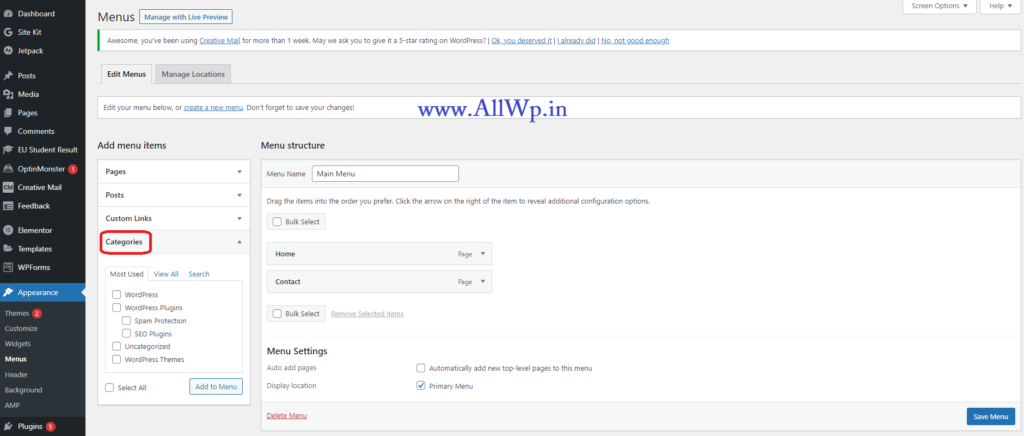
To add categories in WordPress Menus, just click on categories in Add Menu items, as you have done while adding pages in WordPress menus.
Now, click view all in Categories and Select the categories as you have selected pages above.
Don’t forget to save the menu before leaving the page.
How to Add Posts in the WordPress Navigation menu?
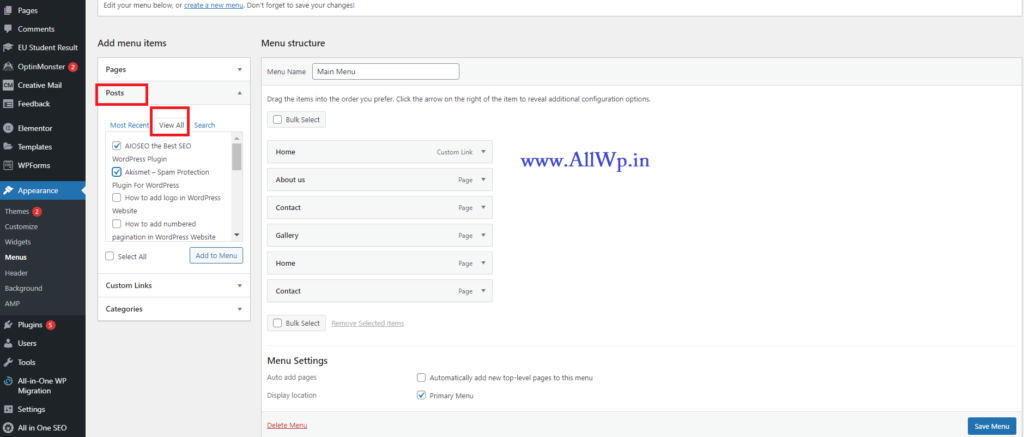
We have successfully added pages and categories, now if you want to add some of your Posts to the navigation menu in WordPress, then click on Posts as done for pages and categories, select the post you want to add and then Add it to the menu.
Hurray! You have successfully added posts to the WordPress menu.
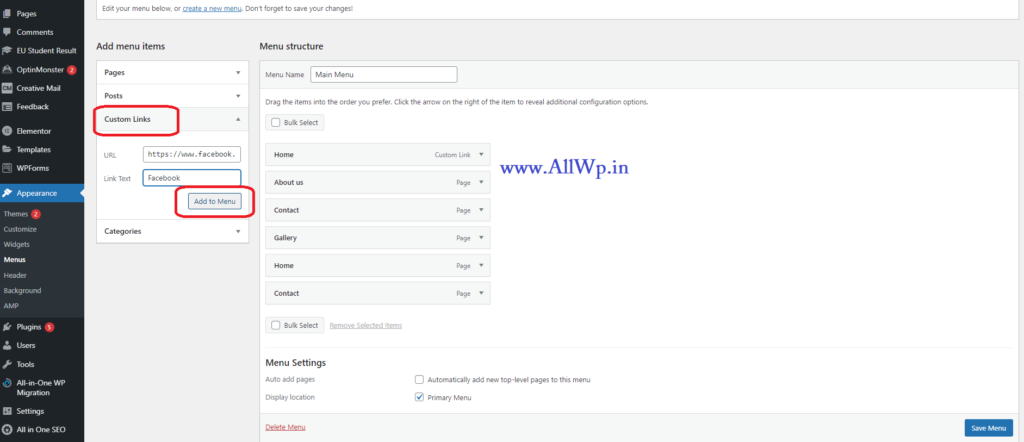
How to Add Custom links in WordPress Menu?
To add custom links to the Navigation menu in WordPress, Click on Custom Links and Add the URL of your choice like Facebook, Twitter, Instagram, or your other website and give Link a Text i.e., name and then click on Add to Menu. After adding it to the menu. Click on the Save menu button.
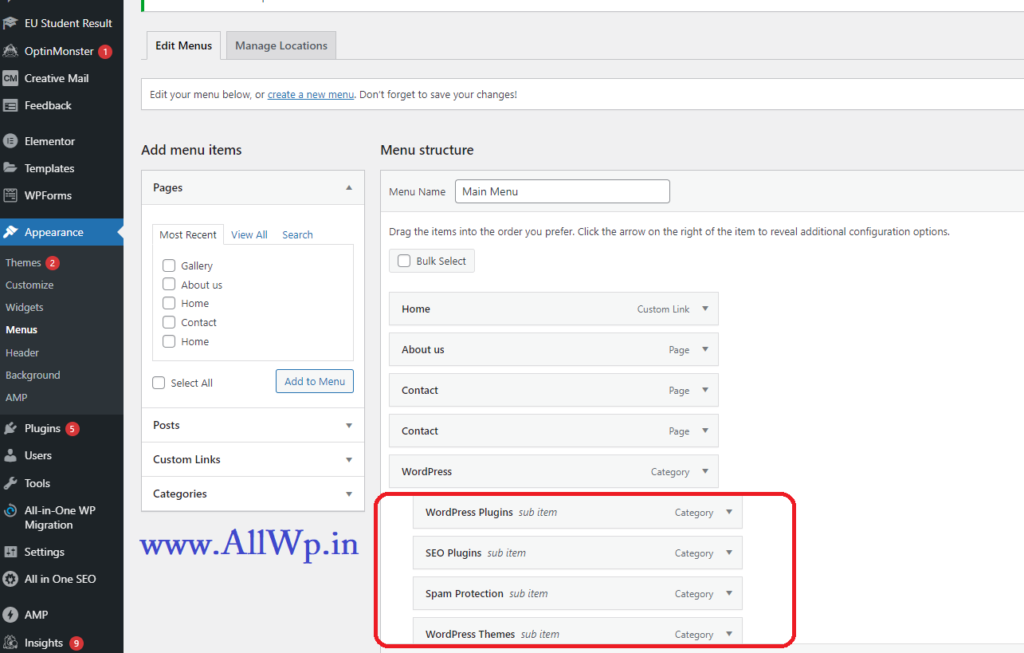
How to Add Sub Menu or Nested Menu in WordPress?
Submenu or Nested menus are the menus under the menus like Parent and Child. When you hover on the Parent Menu the Child menu i.e., submenus will show a drop-down list.
To add a submenu to WordPress Website. Just in Your selected menu section, drag the items of the sub-menu below the parent menu and just move them slightly right to the parent menu as shown in the figure.
In the example shown, We have WordPress as the Parent Menu and WordPress Plugins, SEO Plugins as sub-menus.
Hurray! You have successfully added sub-menus to WordPress Navigation Bar.
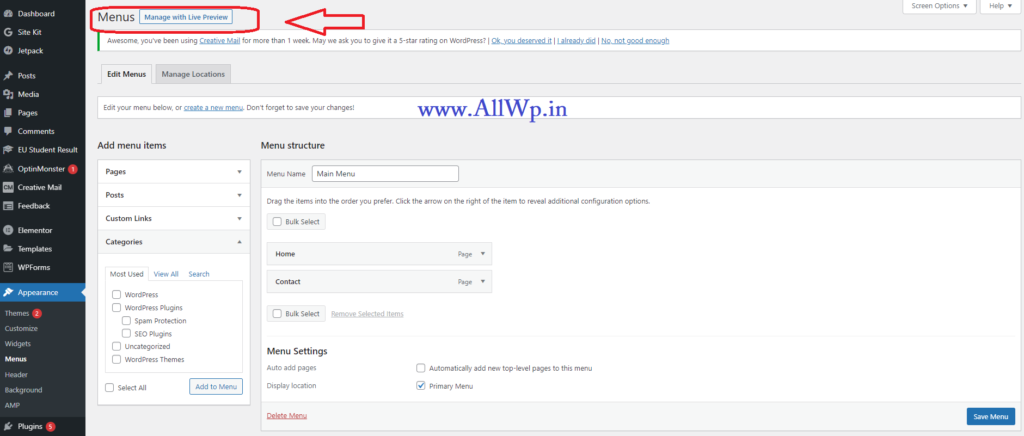
How to Add Menus in Live Mode?
If you want to add menus with live preview then click on the top as shown in the screenshot “Manage With Live Preview” you will redirect to your home page with the Menu editing option. There, You can manipulate your menus as per your requirements.
How to Arrange Menu Items in WordPress?
Now, After adding menu items to Navigation Menu, You may want to re-arrange them as per your taste and requirements. To Arrange The Menu items you can just drag the item and move it up and down easily.
The other method of re-arranging menu items is just to click on the menu item, there you will see options like Up One, down one, to the top, etc., which you can arrange as per your requirement.
Hurray! You have successfully arranged the navigation menus in WordPress.
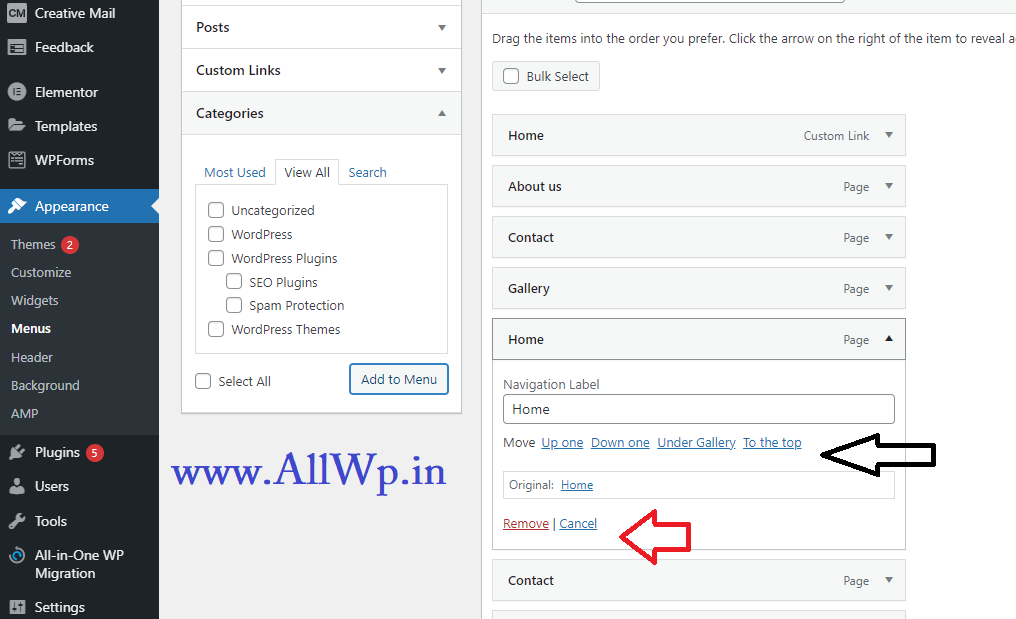
How to Delete a Menu item from WordPress Navigation menus?
To delete any menu item or page, just click on that menu item name and you will see the Delete option as shown in the screenshot. You can delete that item by clicking the delete.
How to Delete Menu from WordPress Navigation Menus?
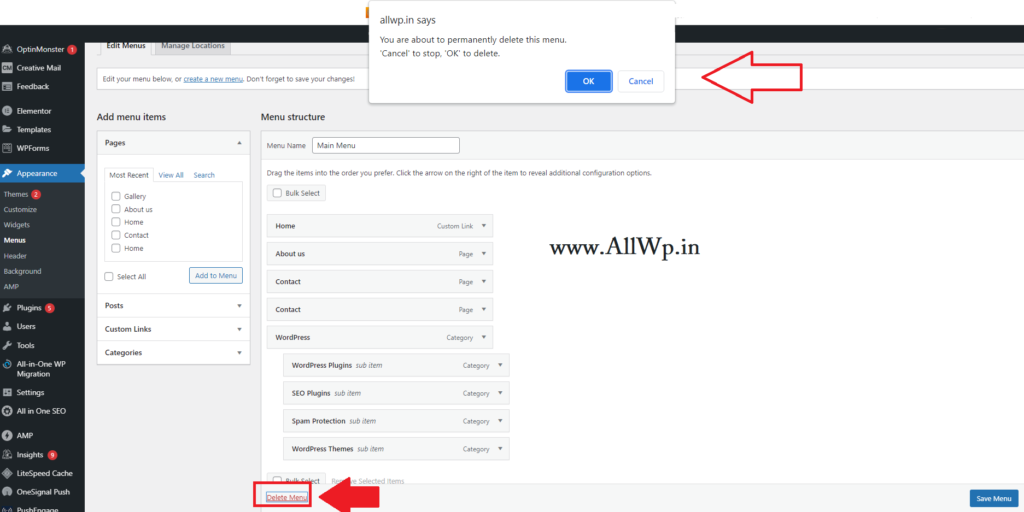
To delete a complete menu from Navigation Menus, Click on Delete Menu which is on the last as shown in the image.
After clicking Delete Menu, a pop-up is shown as “You are about to permanently delete this menu, ‘Cancel’ to stop, ‘OK’ to delete.” Click OK if you really want to delete that menu.
Congrats! You have successfully deleted the menu.
In conclusion, So in this post, you learned how to add pages, categories, posts, custom links, etc in WordPress Navigation menus and you also learned how to add submenus, how to arrange menu items, and how to delete an item from the menu and how to delete a complete menu.
I hope, this post helps you in adding menus to the WordPress website. Kindly share it with your Family and Friends. If you have some feedback, do comment it will help us to become better day by day.

How to add logo in WordPress Website
by farhanbajrai | Nov 23, 2021 | WordPress

How to add logo in WordPress?
Most beginners have this question How to add logo in WordPress website. In our previous post, we discussed how to install a theme in WordPress, there we have discussed customizing the theme. You will get this answer there also. Here first we discuss what the logo is?
What is Logo?
The logo is the combination of text and image which describe a business. A good logo shows about the company (business) and its brand values.
What is the importance of a Logo?
A logo is very important because by logo only customers recognize your brand. Just Look around You will recognize Facebook, Twitter, Instagram by just seeing their logo. When you see Instagram Logo, instantly your mind says that it is Instagram. So, the logo is very important in branding. You should have a good logo for your business, it should describe your brand.
How to add logo in WordPress?
Now we will come to our question. To add a logo to your WordPress website, you need to go to customize your Theme. You can do it in two ways.
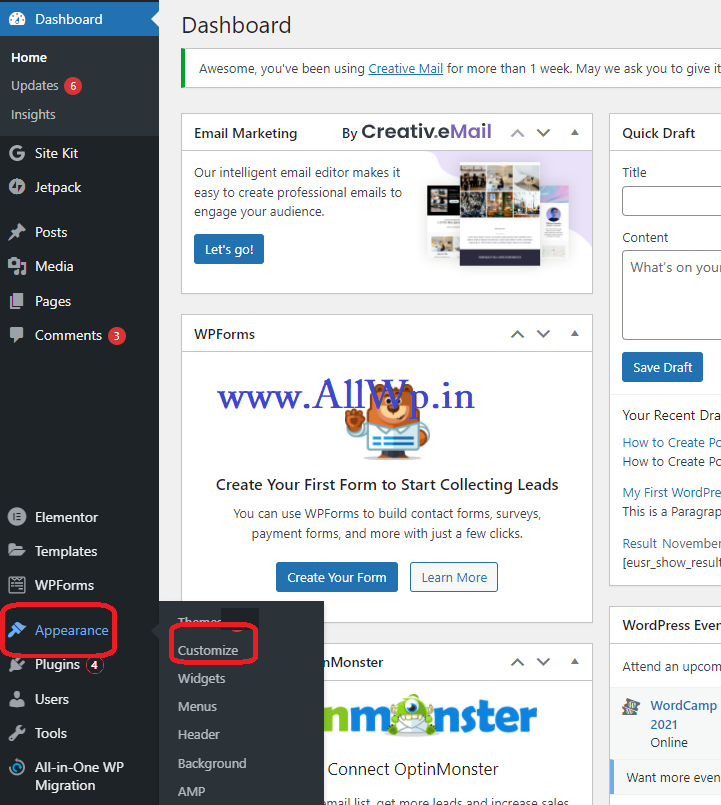
Firstly, Log in to Your WordPress Dashboard, and on the right-hand side hover over Appearance and click on Customize.
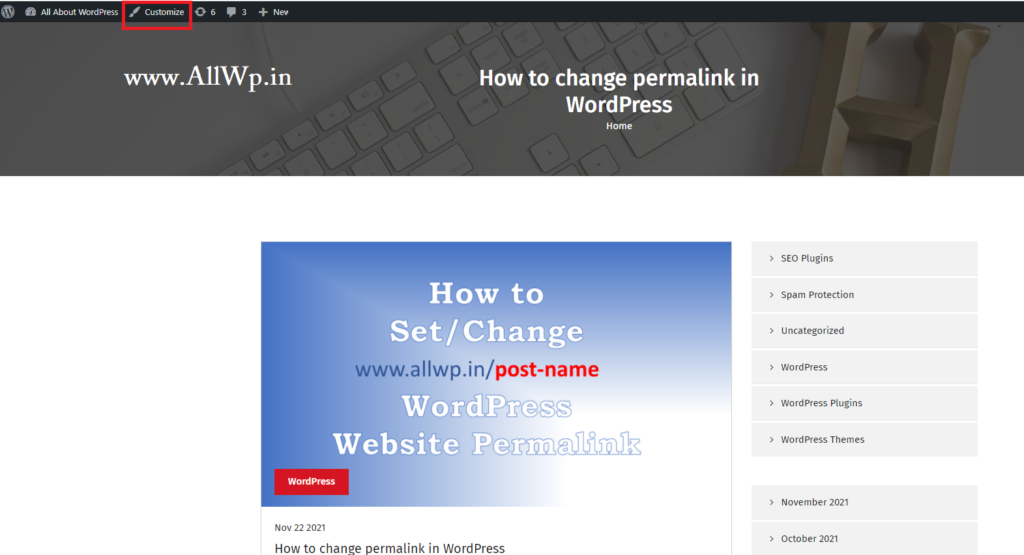
Secondly, Just Click on customize on the top of your website page (this option will be available if you are log in to your WordPress website)
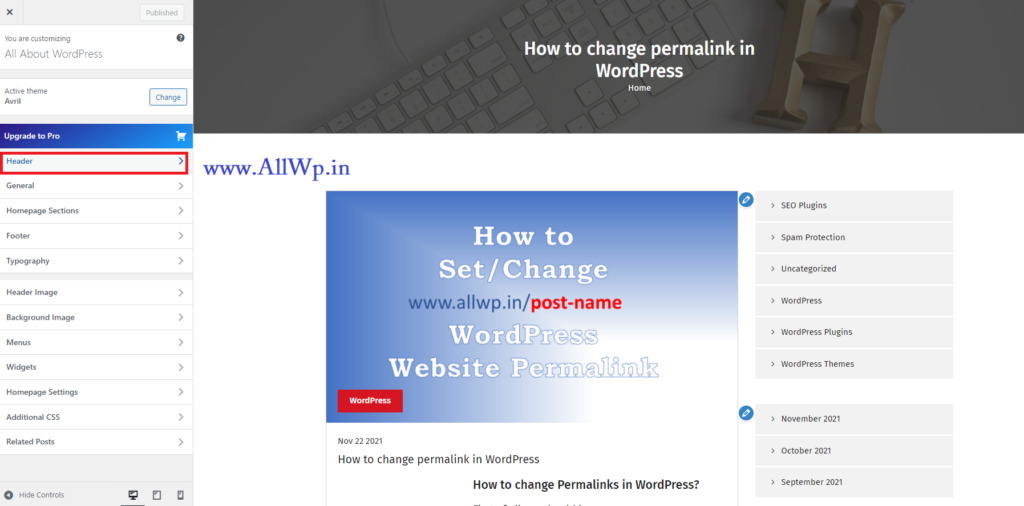
Now, different themes have different headings for going to add the logo in WordPress. But you need to go to Site Title in Your Theme customization. In Twenty Eleven theme you directly have Site Title Option, and in Avril Theme You have Header and in the Header section, You have Site Title.
Here we take examples of two themes.
Firstly Avril theme, Avril Theme is developed by Nayra Themes. It’s a good theme to have and in the Free version also the Avril Theme gives customer support rapidly.
In the Avril theme, when you click on customize, you have to click on Header on the left-hand side and in the Header, you will have the Site title. After clicking Site Title, You will see the Logo there. If you have the new website the logo place will be empty. If your website already has a logo then you will get two options as shown change or remove the logo. From here you can add the logo to the WordPress website.
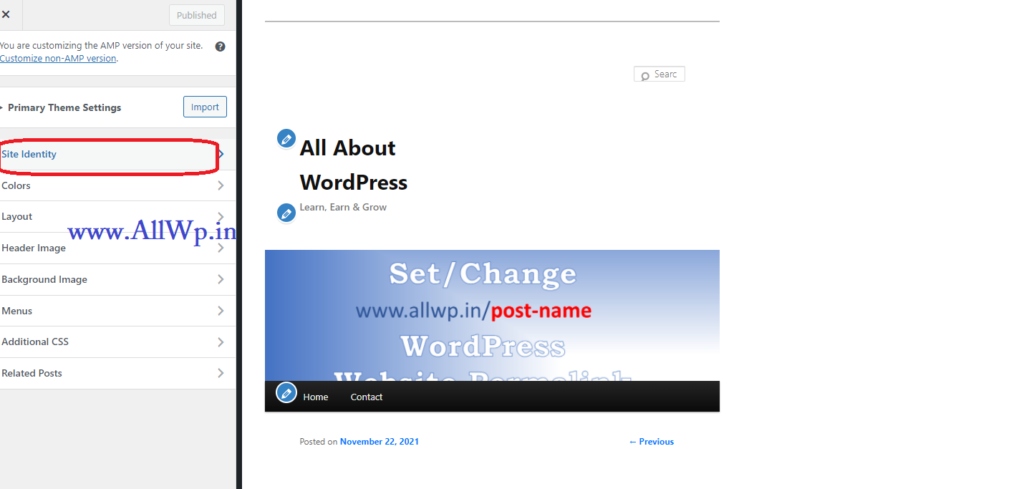
Secondly, The Twenty Eleven theme. In the Twenty Eleven theme, you will have the Site Title option when you click on the customize option. From here you can add logo to your WordPress website.
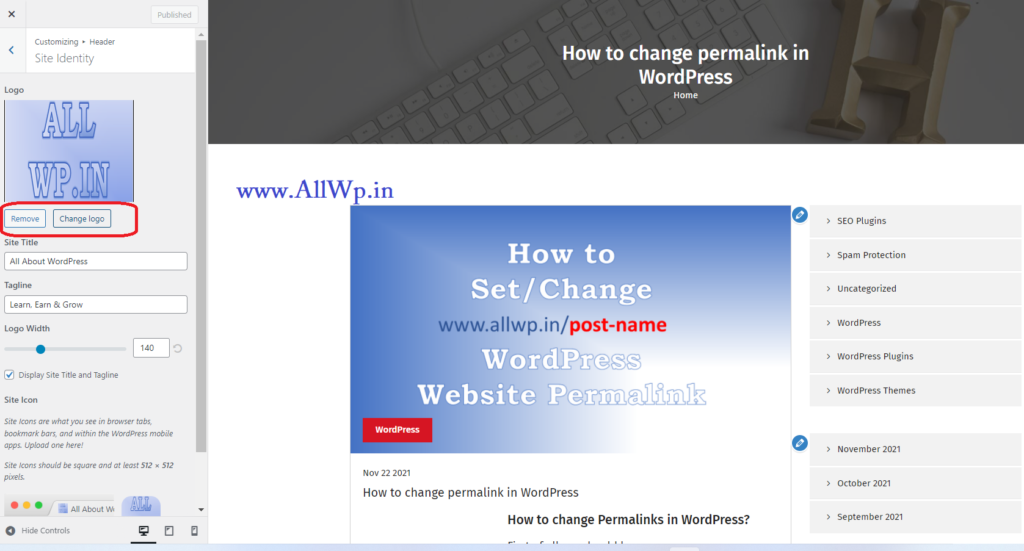
Hurray! You have successfully added a logo to Your WordPress Website.
How to Change Logo in WordPress website?
We think, now after reading the above matter you no need to have this question. To change the logo in WordPress you just need to go to Site Title in Customize Theme option as discussed above. There you can change the logo on the WordPress website.
How to Remove logo from the WordPress website?
If you want to remove the logo from the WordPress website, just you have to go to customize option as discussed in detail above. There you get the Remove logo option in the Site Title which we discussed already.
Hope you find the article useful. Do share with your friends if this is useful, and do comment if you have any feedback.
How to change permalink in WordPress
by farhanbajrai | Nov 22, 2021 | WordPress
How to change Permalinks in WordPress?
First of all, we should know:
what is Permalinks?
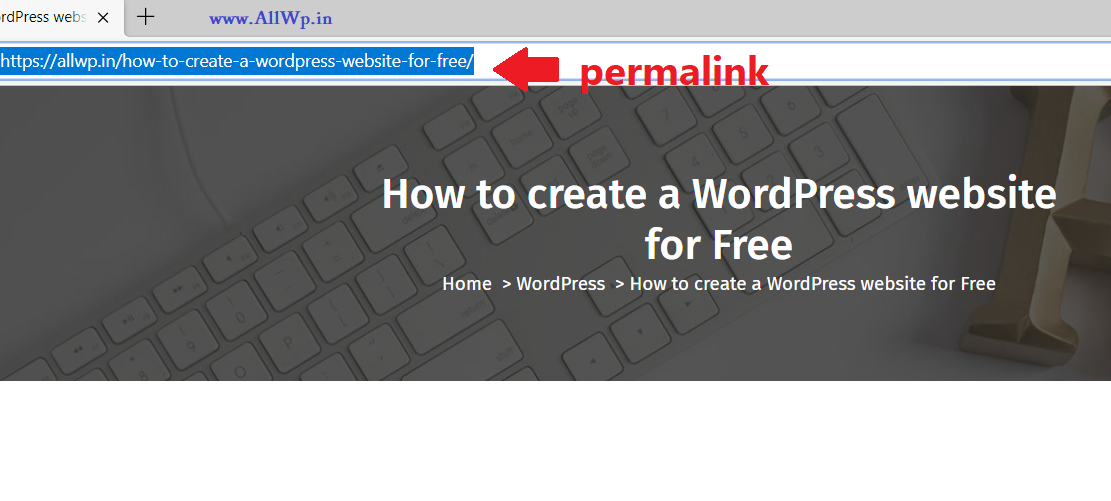
Permalinks are the complete URL we see, copy, and share when we are sharing any post or video on your website.
What is the importance of Permalinks?
Permalinks are nothing but Permanent Links. These are important in two aspects
- SEO: One of them is Search Engine Optimization, Permalinks inform the search engines like Google, Bing etc., about your page i.e., what is your web page is about and it improves your page visibility and ranking. That’s why you should have a good permalink for your website.
- Usability: Permalinks are also important for usability, you can share permalinks to people on social media, and by looking at your Permalink people guess what is the post or page is about and it make the people to click and read the post in detail.
As Permalink are the permanent links. So you should be more cautious while using Permalinks. Don’t try to change the permalinks. If you change the permalinks then the results will be worse. Your website visibility and Ranking will be changed dangerously.
Now,
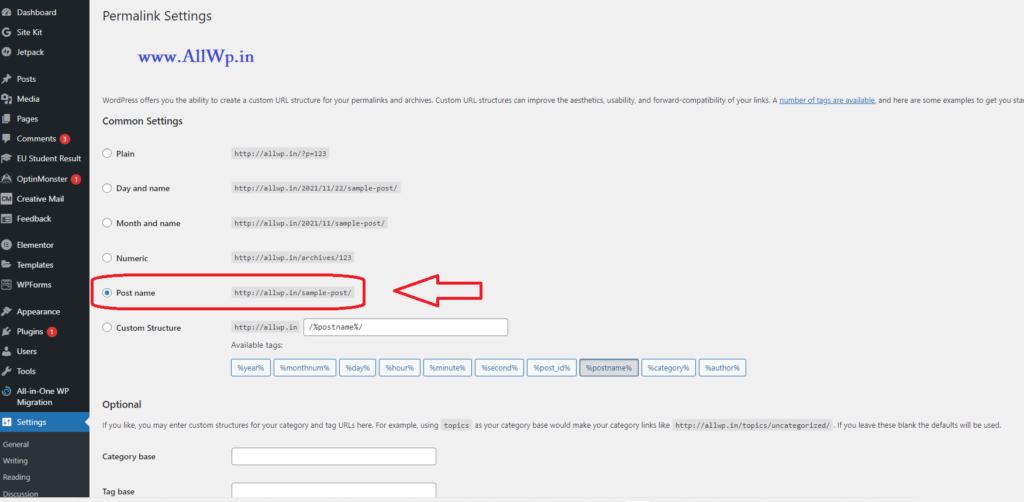
How to change Permalink in WordPress Website?
First Log in to your WordPress Dashboard and go to the settings. In settings, select Permalinks. Now you are on Permalinks Page. In WordPress, you can create custom URL structures as you want. So here you get different URL settings for your WordPress website.
1. Plain Permalink: In Plain Permalink, your permalink will be plain i.e., after your website name you will get p=123 like format.
Note: This Plain Permalink is not good for your website SEO.
2. Day and Name Permalink: The other one is Day and Name Permalink. In this type of permalink, after your website name, it will display the date with month and year then the post name. Some people suggest this type of Permalink but it is not the best way for your website SEO.
3. Month and Name Permalink: This one is same as the above, just you don’t have day in this permalink.
4. Numeric Permalink: Numeric permalink is similar to Plain permalink, the difference is, in the numeric permalink, you will have your website domain name then archives then post number.
This is also not a good practice for your website SEO.
5. Post Name Permalink: Post Name Permalink means you just have your post name after the domain name in your website URL.
This is the best way to keep your website permalink for your website SEO.
6. Custom Structure: WordPress provides you with custom structure also for your website Permalinks. You can play it around the options if you want some unique permalinks types.
Conclusion: So here we completed how to change or set permalinks in WordPress Website. Don’t forget to save after changing your WordPress Permalinks. Our selection is the 5th one i.e., Post Name Permalink is the best way to keep Your website URL.
We hope, this article helps you in editing or changing your Permalink. Do share if it is useful and comment your suggestions.
Search
Recent Posts

Farhan Bajrai
Farhan Bajrai is an Entrepreneur, Web Designer as well as a Teacher. He resides in Hyderabad. He is the Founder, Designer, and Director of Bajrai Online Solutions.

