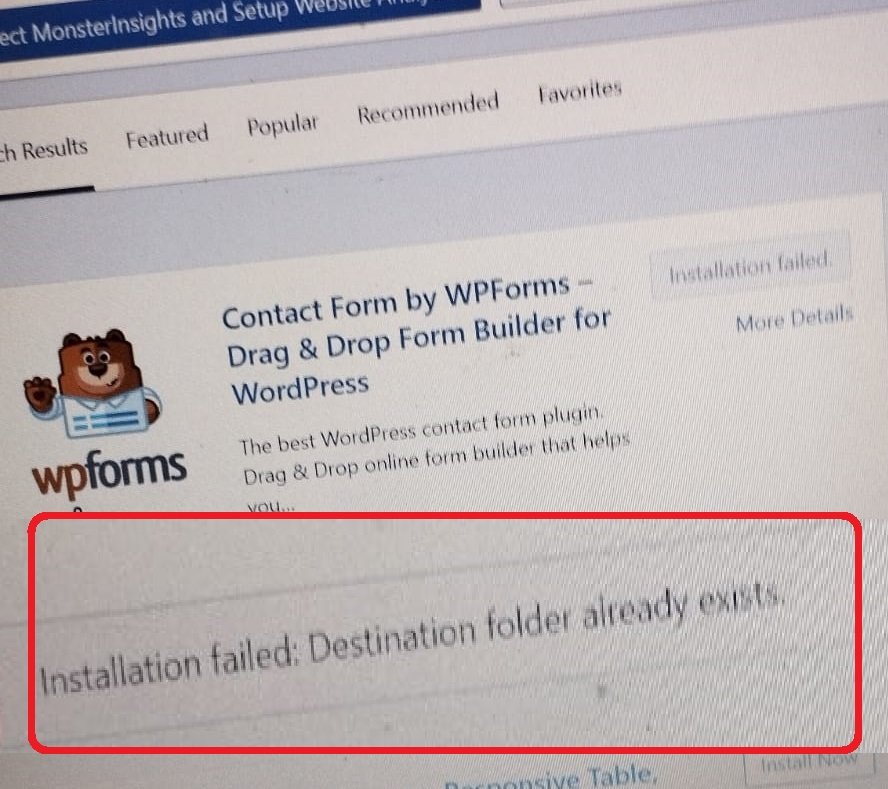
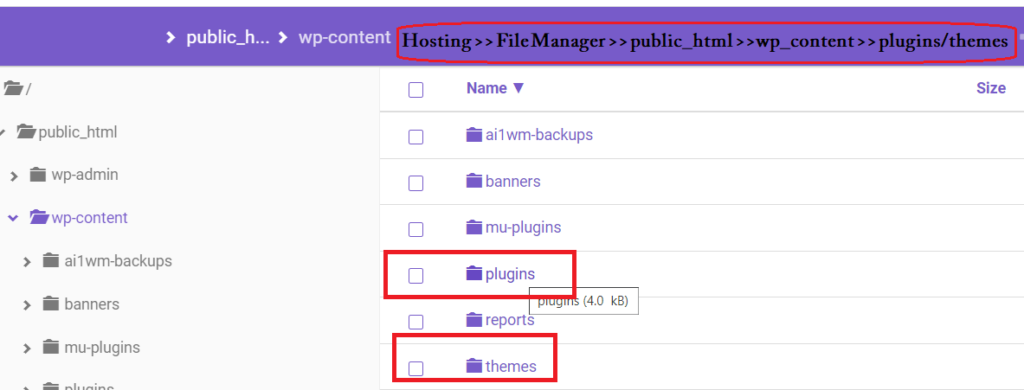
Then find the folder of the plugin or theme that you were installing while getting the “Destination Folder already exists” error, and delete that folder.
Now, go to WordPress Dashboard and install the theme or plugin. Now you can successfully install the theme/plugin.
In my case, my friend was getting this error while installing the wpforms plugin, and when I suggested him this process. He said that he was installed wpforms before. But due to some issues, the plugin has been deleted, and he was installing it again.
So, he has done all the steps I suggested here, and in the end, he successfully installed the wpforms plugin.
We hope this article helped you to solve the destination folder already exists error in WordPress. If so, share it with your Friends and subscribe to our blog.
Do you want to insert an ad inside the content of your WordPress website?
You might have seen advertisements on each and every post on the website. Many beginners wonder whether these sites insert ads in each post they are writing. Or they are curious to know what is the code to insert an ad within each post of the website.
Basically, these ads are after the first paragraph or in the middle of the content or after the content.
In this article, we will show how to insert an ad within each post on your website.
Well, We have been posting ads after the second paragraph, and after the content in Bajrai Online Solutions.
How to Insert an ad inside the content without Writing a Code?
In this article, we will show you how can you insert ads within the posts and pages, and at different locations.
Inserting Ad using Plugin
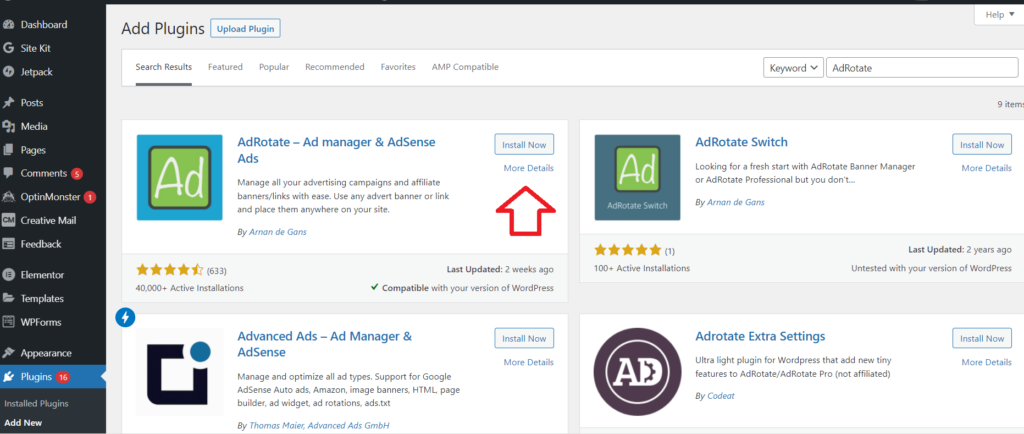
You can insert ads within your content at different places by using a Plugin called AdRotate by Arnan de Gans.
AdRotate Plugin
AdRotate plugin is simple to use but has many powerful features for both beginners and experienced users.
Simply install and activate AdRotate Plugin. If you are not familiar with the installation, here is the guide on how to install plugins in WordPress.
How to Insert Ad in between post video tutorial in Hindi and Urdu
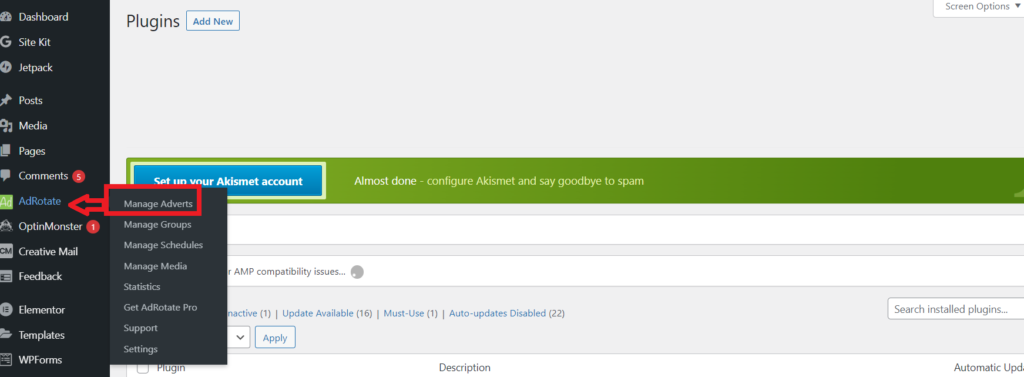
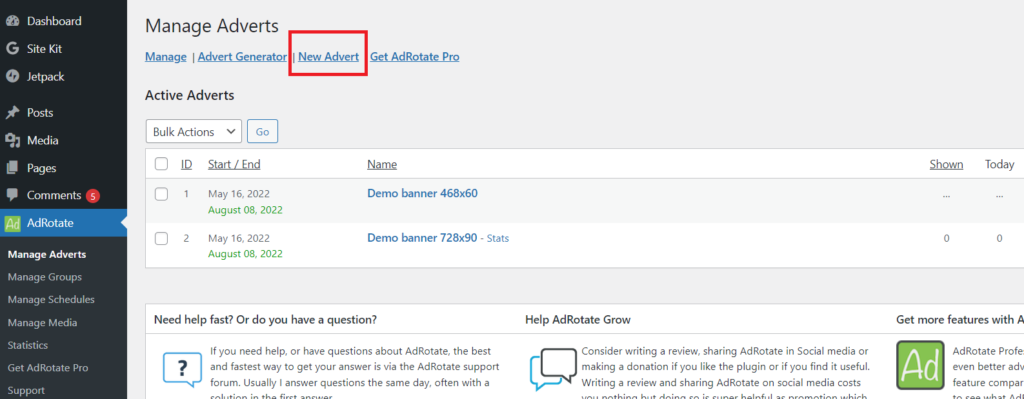
After activating AdRotate Plugin, you will have the AdRotate option in the left-hand sidebar of your WordPress dashboard.
Now, just hover over AdRotate, and then click Manage Adverts.
Now You will be redirected to the Adverts page, here you will get multiple options like Manage, Advert Generator, New Advert, and Get Advert Pro.
As we want to insert Ad, click on New Advert. You will be redirected to New Advert Page.
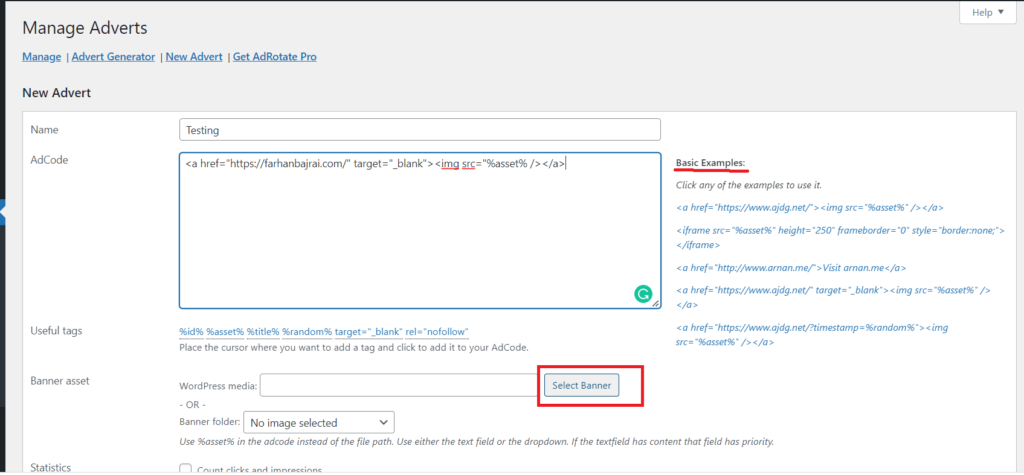
Simply give the name to the advert for identification purposes. And insert the code below.
Wondering how to insert code?
Inserting code is very easy in the AdRotate plugin. You will have sample codes on the right-hand side, just try them and select one of them, as per your requirement.
Adding Code in AdRotate Plugin
In our case, we want to insert an image inside our content after a specific paragraph, and when the user clicks on that image, he/she should be redirected to a specific link or website.
Keep the link or URL you want when users click your ad image after href=, in our case we have https://farhanbajrai.com/
“Target=”_blank” means when the user clicks the ad image, the link will be open in a new tab.
Img src=”%asset% is the code for inserting an image.
How to insert an image in AdRotate?
Now you have to insert an image in your ad copy. Just scroll down, you have Banner Asset, just click on Select Banner, and you will be redirected to your WordPress Media Library. Select or Upload the image you want to use for the specific ad.
How to Show statistics of Ad?
Besides showing advertisements on your website you also want to show statistics of the ad to your client, for this AdRotate has a statistics tab. Just click on the check box Count Clicks and impressions.
How to Schedule ads on a WordPress website?
Now the most important thing is the starting date and ending date of Your ad. How to schedule ads?
Simply, just scroll down and you will see the heading Schedule Your Advert. In this snippet, select the starting and ending date and time.
Now Save the ad by clicking save advert.
Hurray, you have successfully created the ad to show on your website.
Where is my ad showing?
Wait, but neither did we set any place to show the ad, nor the ad is showing on our website. Why?
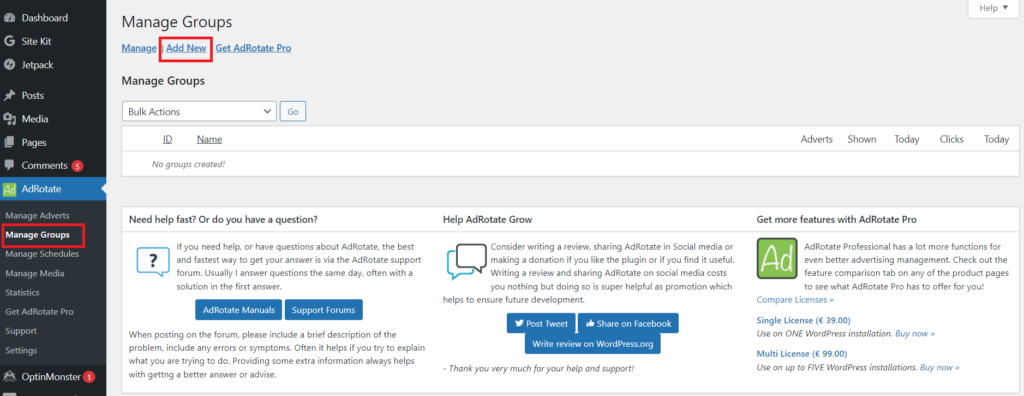
To solve this issue, you have to go to the Manage Groups in AdRotate in the WordPress dashboard.
When you click Manage Ad Groups, you will be redirected to the Ad Group page, like you were redirected to Manage Adverts.
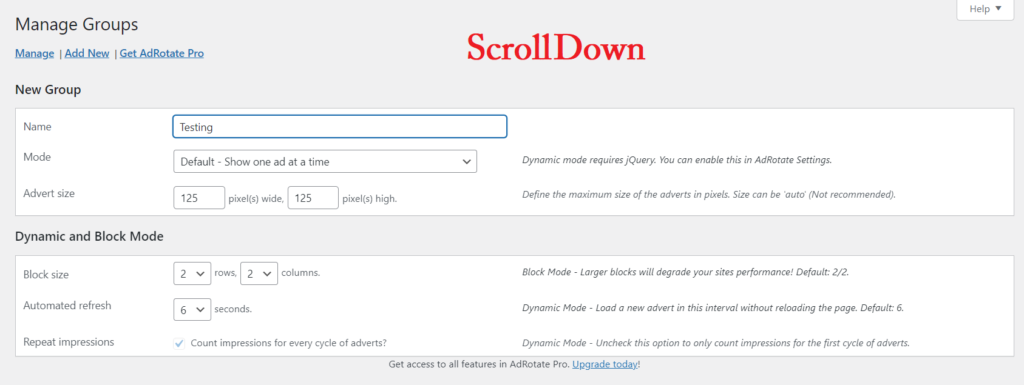
Here in Ad Group, click on Add New. Name the Ad Group for identification purposes. There are many settings, which we will discuss in our other article. Here we want to show our ad in each post. So we will discuss that only.
How can we Insert ads in each post and page of WordPress?
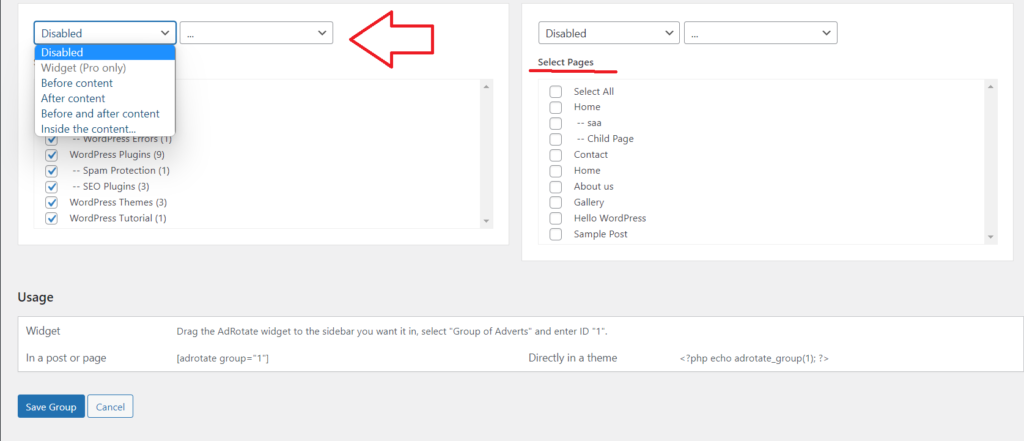
Just scroll down in your ad group. You will see a heading called Post Injection. Inside Post Injection, click on the first drop-down which displays Disabled. When you click on it you will see various options like Widget, Before Content, After Content, and Inside the Content. As we want to insert an ad within our content, then click on Inside the content.
After selecting inside the content, click on the dropdown beside it which display 3 dots ( …) and select the paragraph after which paragraph you want.
How do Insert ads in specific categories?
Now if you want to show the ad to particular categories, then Select those categories. And if you want to show to each and every category, select all.
You can also select pages if you want to show the ad on pages too.
Which Ad to Show in this group?
Now just scroll down and you will see the ads you have created in Manage Adverts. Just select the ad to show and click on Save Group to save.
Yay! You have successfully inserted ads to each and every post on your WordPress website.
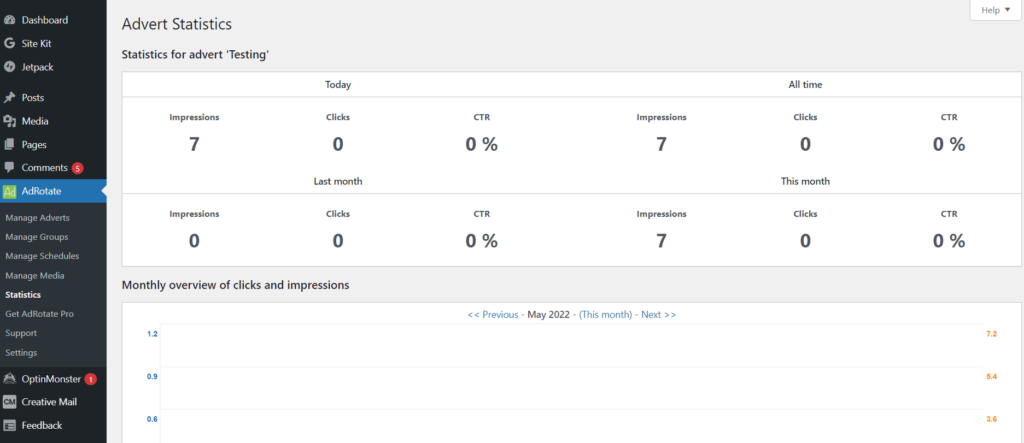
How to see the Statistics of ads in WordPress?
Now, if you want statistics on your Ad. Then again go to Manage Adverts and scroll down to active adverts, you will see stats beside your Ad Name. Click on Stats. You will see the stats like impressions, clicks of today and all-time here.
Conclusion: In this article, we learn how to create and show ads on each post on the WordPress website. Besides inserting the ad, we also learn how to see the statistics of the running ads.
If this article is helpful to you kindly subscribe to our newsletter, and like and share it with your friends. And if you have any doubt, or errors while inserting an ad kindly comment or mail us.
How to Connect WordPress to Social Media Networks?
Do you want to connect WordPress to Social Media networks?
Yes, you are at the right place. Hope you followed Our Previous Tutorial regarding how to add Social Media Buttons below every post.Connecting a Website to Social Media networks is very important for attracting visitors to your website. One of the ultimate goals of bloggers is to drive more traffic to their Blogs. This can be achieved by Sharing posts on Social media.
When we connect our WordPress website to Our Social Media networks like Facebook, Twitter, LinkedIn, etc., then whenever we write a post on our Website, It will be automatically published or shared on the linked Social Media Channels.
Step by Step Guide to Connect WordPress to Social Media Networks
Step 1: Log in to WordPress Dashboard
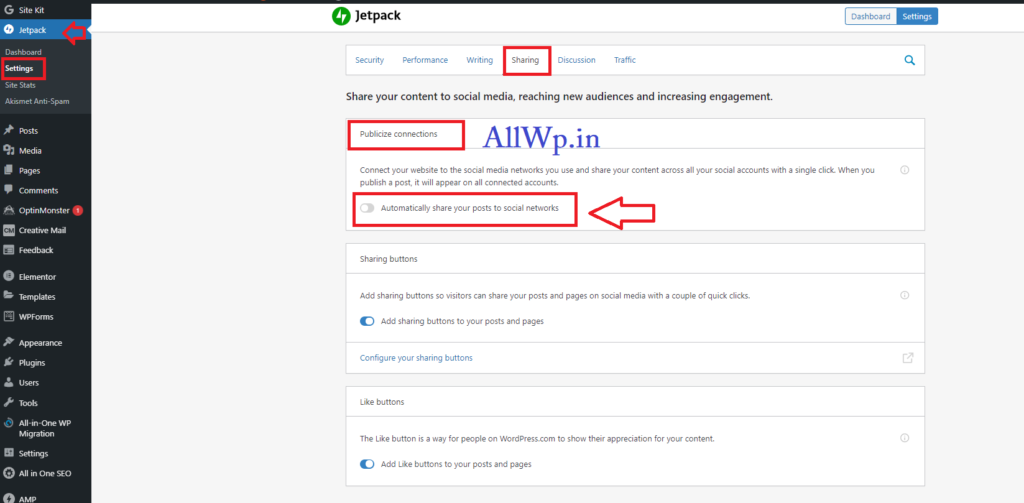
Step 2: Go to Jetpack Settings
Step 3: Click on Sharing Tab in Jetpack Settings
Step 4: Enable Automatically Share posts to Social Networks
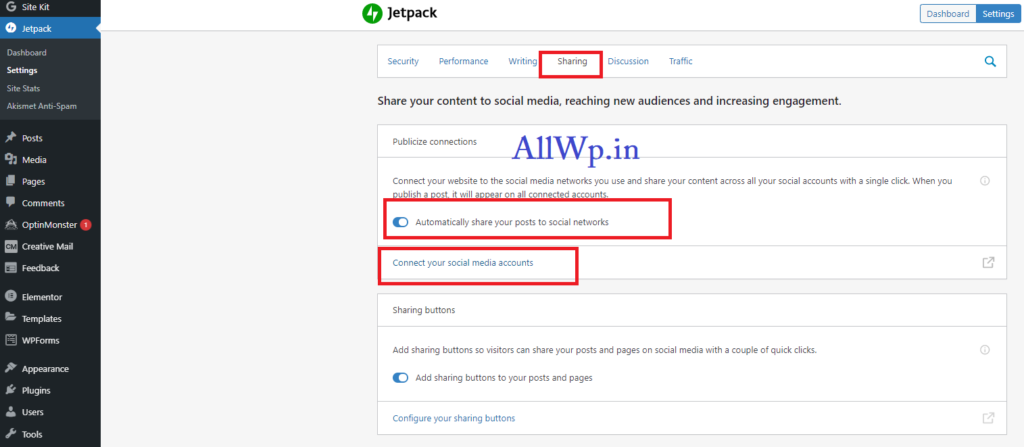
Go to Jetpack Settings in WordPress Admin Dashboard. In Settings, click on the Sharing tab, and EnableAutomatically share your posts to Social Networks, that is the first option in Sharing tab.
After Enabling Automatically sharing option, click on Connect Your Social Media Accounts to Connect WordPress to Your Social Media Accounts.
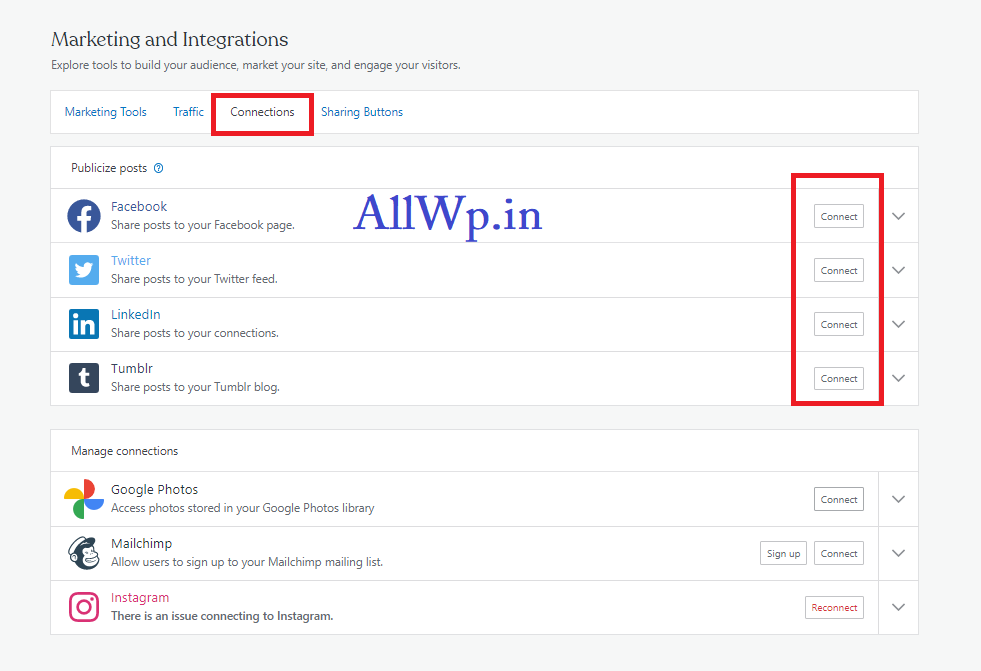
You will be redirected to the Marketing and Integration page’s Connection Tab.
Now, Step by Step Connect Your Social Media Accounts like Facebook, Twitter, and Instagram.
For Example, Click on Connect button (after Facebook), a new window will be opened asking you to log in to your Facebook account (if you are not logged in on your browser).
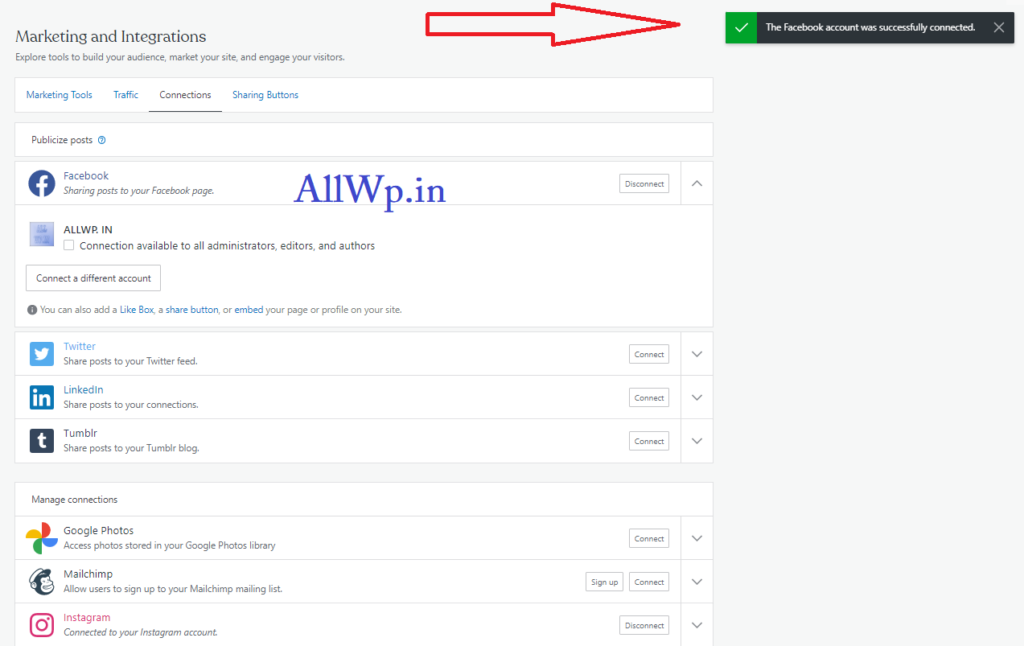
After successfully logging in, now you can Select Your Facebook Profile or Facebook Pages to Connect. Click on Next after selecting your Facebook page. You will be redirected to Your Connections page and a message is shown on the top right-hand corner which displays “The Facebook account successfully connected”
Follow the same steps to connect Your Twitter, LinkedIn, Tumblr accounts.
If you want every post written by You, Other Administrators, Editors, and Authors to publish on the same page the just click the Checkbox below the Facebook Page name that displays: “Connection available to all administrators, Editors, and Authors.”
If you click this, then whoever Writes a post on your blog, all the posts of your blog to your Facebook page. Do it for all your Social Media networks.
What Happen If I Connect My WordPress Website to My Social Media Networks?
If you connect your WordPress to Your Social Media accounts, then whenever you write a blog post. After Publishing that Post Your Post will be automatically Shared to Your Social Media Accounts. You don’t have to again go to Facebook, Twitter, LinkedIn, and Share the Post. This will save a lot of time and effort.
I hope you find this helpful to you, kindly Like, and Share it with Your Family and Friends. If you have suggestions or feedback, do comment below.
How to add Social Media Sharing Buttons to WordPress Blog Posts?
Do you want to add social media sharing buttons to your blog posts in WordPress? So, you are at the right place.
Social Media like Facebook, Twitter, Pinterest, LinkedIn, etc., is very important for bloggers and website owners. If you are writing a blog then definitely, you want to drive traffic to your blog. To achieve this, you have to share and ask readers to share the post on their social media handles.
This can be done by adding sharing buttons after the end of each post.
As you are reading this post, that means you want to add Sharing Buttons to your WordPress blog.
Adding Social media Sharing Buttons to WordPress Blog
To add social media sharing buttons below each post, you have to install Jetpack Plugin. Jetpack is one of the most important and must-have plugins of WordPress.
It is made by WordPress experts to make WordPress sites safer, faster and they also help to grow the website.
One of the facilities provided by Jetpack is what we are discussing here i.e., Adding Social media sharing buttons after each blog post.
Now, we are assuming that you have successfully installed the Jetpack plugin.
Steps for Adding Social Media Sharing Buttons after the post
Step 1: Log in to WordPress Admin Dashboard
Step 2: Go to Jetpack — > Settings
Step 3: Go to Sharing Tab
Step 4: Configure Sharing Buttons
Step 5: Edit Sharing Buttons and
Step 6: Save the settings.
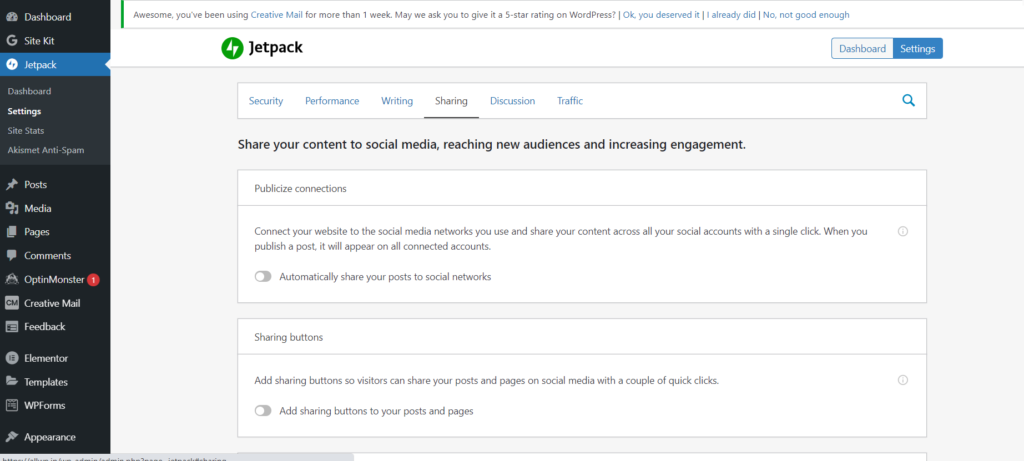
After Successfully installation of Jetpack Plugin, go to the Jetpack Settings. In Jetpack Settings, you will see Tabs on the top like security, performance,…. go to Sharing Tab.
In Sharing, Enable Add Sharing buttons to your posts and pages (you will see Add Sharing buttons so visitors can share your posts and pages on social media for quick clicks.)
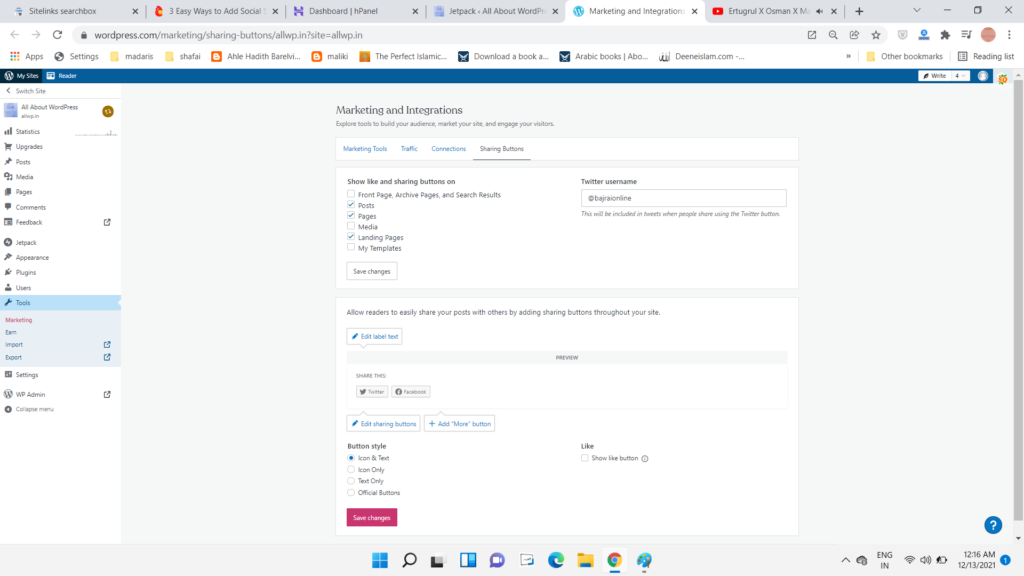
After Enabling Sharing button, Click on Configure your Sharing buttons and you will be redirected to the configuration page.
As shown in the image, Add buttons so that readers can easily share your posts with just 2 clicks.
You can add buttons in the following ways
Icon Only,
Icon and Text
Text Only and
Official Buttons
Select as per your taste and requirements. Add the Social media buttons you want to add.
How to Reorder Social Media Sharing Buttons?
If you want to reorder the social media sharing buttons, you can do it here as shown in the image, click on reorder and just drag and drop the buttons at the appropriate places. Hurray! You have successfully reordered your social media icons.
How to Add Like Button Below Blog Post in WordPress?
As shown in the image, you can add a Like Button below your Blog post in WordPress. Just click on the checkbox that displays Show Like Button.
At last, don’t forget to save settings.
Yay! You have successfully added Social Media Sharing Buttons below each page and post of your website with Like Button.
If this article is helpful to you kindly, share it with your friends, and if you have some kind of suggestion and feedbacks, kindly comment. So, that we can improve.
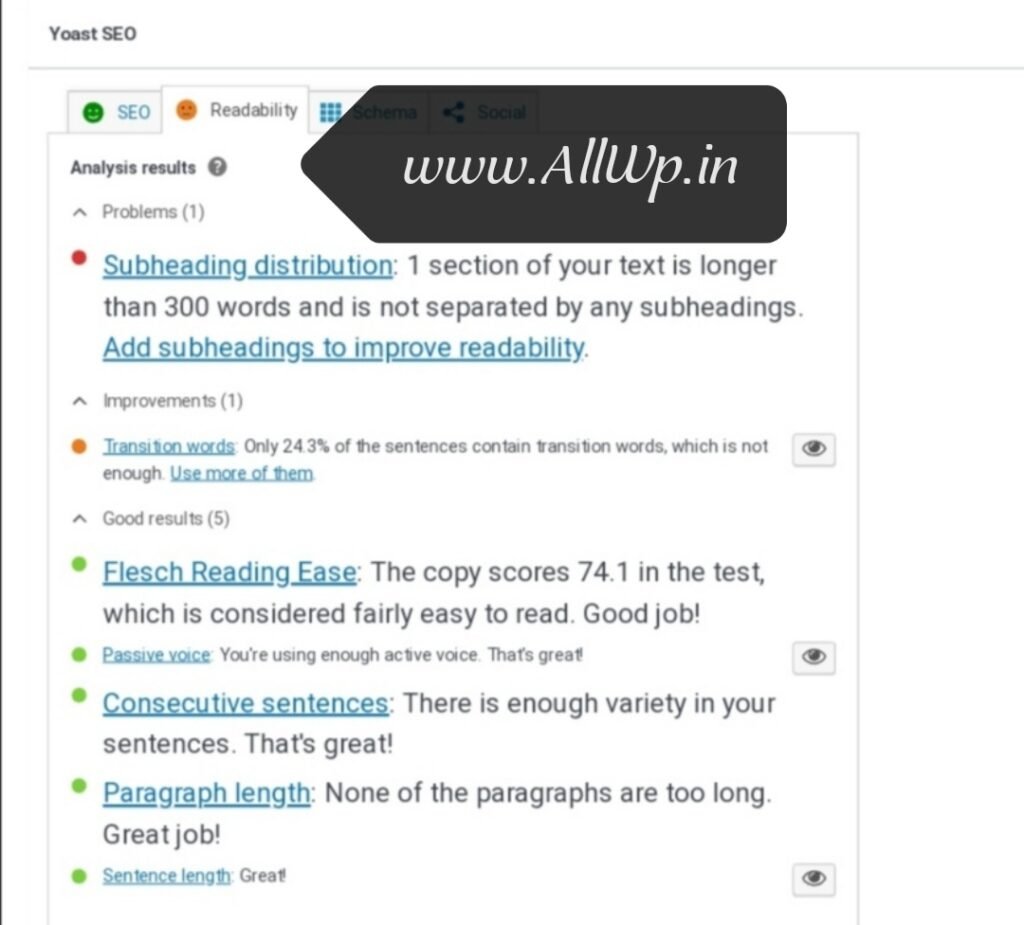
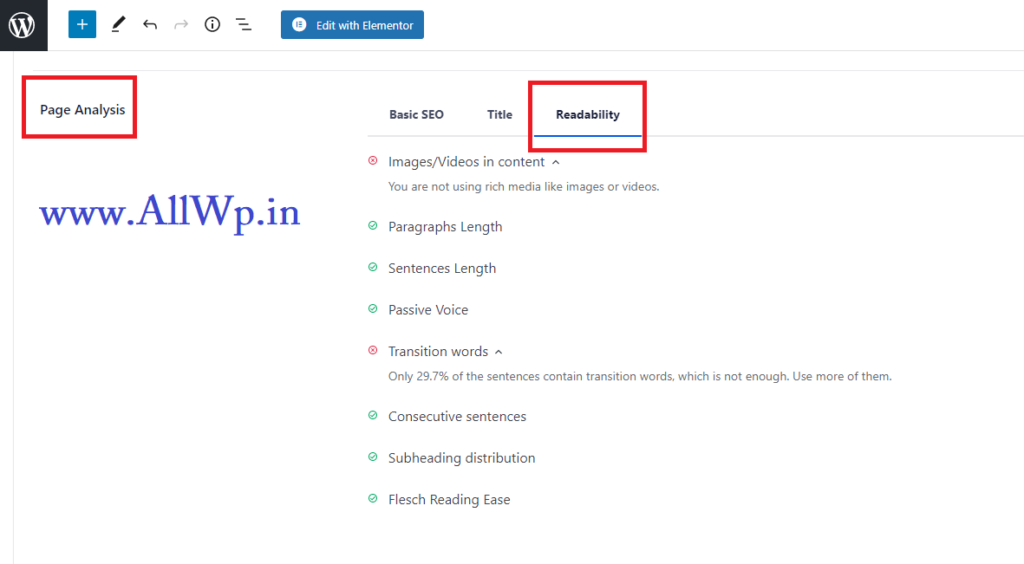
The above screenshots are of Readability of Yoast and All in One SEO.
In this article, we will be completing all of them,
Images or Videos in Content:
The content that contains images or videos gets more visitors and it also improves visitors’ time-on-page.
So, if you want to get more traffic, as well as you, want to increase visitors time on the page then you should use related images or videos in your post.
Paragraph Length :
Paragraphs are very essential in content writing. Whenever a reader land on a page he/she doesn’t go through the whole article, instead they scan your paragraphs, headings, subheadings and if they found it useful they go through the article.
So, you should use smaller paragraphs, a paragraph length should be a minimum of 2 sentences and not more than 200 words.
Sentence Length :
A sentence is a basic unit of language or a group of words in a format.
Longer sentences are difficult to read and understand while shorter sentences are easy to read and understand.
Shorter sentences make it easier to propagate your message.
As readability is important for SEO, and it is achieved by shorter sentences. The sentence recommended length is 20 words by All in One SEO and Yoast. According to Yoast, you shouldn’t have more than 20 words in 25 % of your sentences.
Passive Voice:
To understand passive voice we can understand easily in contrast with active voice.
Farhan writes the article.
This is an active voice sentence.
Now the passive voice of the above sentence is
The article was written by Farhan.
This is the passive voice of the above sentence.
Active voice conveys a clear-cut message and it is easy to understand.
Whereas Passive voice doesn’t convey a clear message and is weaker.
One of the reasons, we shouldn’t use Passive voice is it is Wordy ie., it uses more words as you have seen.
On the other hand, it is complex also.
Yoast suggests using maximum 10% passive voice.
Transition Words:
Transition Words are the words used to connect sentences and phrases like ‘and’, ‘but’, ‘during’, etc.
While writing an article or essay, your sentences should transition smoothly from one idea to another idea.
The reader can relate next sentence from the previous sentence.
So, it increases the readability of your article and it is good for SEO.
So you should use Transition words in your articles.
Yoast suggests using transition words at least in 30% of the sentences of our content.
No one likes repetition of the sentences in content. In Consecutive sentences, AIOSEO and Yoast check whether the content has two or more consecutive sentences starting with the same word.
And they suggest changing the format.
Subheading Distribution:
A good article /content breaks his content into paragraphs, and after 2 or 3 paragraphs you should have headings or subheadings.
As discussed above, when a reader lands on a page he scans its paragraphs and headings subheadings.
AIOSEO looks for the content of more than 300 words and it doesn’t contain H2 or H3 tags.
So, you should use headings or subheadings in 300 words.
Flesch Reading ease:
Flesch reading is a Flesch-Kincaid readability test.
In Flesch reading ease, the higher scores mean the content is easier to read.
If you are using difficult words or sentences, then it is not easy to read to most of the readers.
As content writers, we should make our text easy to read for all.
Here comes Flesch reading ease in play. You can read in detail about Flesch Reading ease at Wikipedia.
KeyPhrase Checks:
As discussed in our previous post, your content should revolve around a topic or phrase which we called KeyPhrase.
AIOSEO and Yoast also check for KeyPhrase in your content. KeyPhrase checks are in the following areas of your content.
KeyPhrase in Meta Description: Your Meta Description should have KeyPhrase in it.
You should use exactly match KeyPhrase in the Meta description
KeyPhrase in Title: A good content writer, use its KeyPhrase in the Title of the webpage.
KeyPhrase in URL: For good SEO, you should use KeyPhrase in your Permalinks or URL also.
KeyPhrase in Introduction: As a good content writer, you should use your KeyPhrase in the first sentence of your Content.
So that, your reader has a clear idea about what they are going to read.
KeyPhrase in Subheadings: AIOSEO and Yoast also check KeyPhrase in subheadings.
But each and every Subheading should not have KeyPhrase. Don’t overuse KeyPhrase in subheadings.
KeyPhrase in image alt-Tag:
AIOSEO also checks KeyPhrase in the alt attribute of the image used in the article.
KeyPhrase in Content: Good content should use focus keywords in the content. But don’t overuse it.
KeyPhrase at the beginning of SEO Title:
AIOSEO checks whether you are using your focused KeyPhrase in the first few words of your SEO title.
KeyPhrase length: KeyPhrase length should not be more than 4 words.
If you want to become a good content writer and you want your article to drive more traffic. Then, master the SEO tools like basic SEO, Title, and readability those are given by Yoast and All in One SEO.
Do you want to Understand All in One SEO page analysis? Do you want to write an article that is SEO-friendly? If you are reading this post, we assume that you know about Search Engine Optimization and you are familiar with All in One SEO. If not click the links to know about them.
As you know a good SEO is very important for ranking your post in Search Engine and AIOSEO helps us in writing SEO-friendly articles.
Now, we will know and understand how to write SEO-friendly articles with the help of AIOSEO.
Writing SEO Friendly Content
If you want to write an SEO friendly article then you must follow these steps
Step 1: Write the Appropriate Title to the post. Look, the title of the post is the most important aspect of your content writing. The title should describe to the reader, what the article is about?
Step 2: Body of the Content:
Now the other important step is to add your content to your website.
You should be careful while writing the content and follow the steps we are discussing below.
Keyword or key phrase: While writing content, you should have a key phrase that should be the heart of your content. And your content should be revolving around that key phrase. Keyword or key phrase is most important. You will come to know by the end of this article.
Headings and Sub Headings: You should use headings and subheadings in the article as per requirement. For good SEO-friendly content, some of your Headings and Subheadings should have your Key Phrase in them. Otherwise, the content won’t be SEO-friendly.
Introduction: It is very important how you begin your article. The focus key phrase or keyword should be there in the introduction of your article. The reader should know at the beginning itself what he/she is going to get from the article.
Images: You should use at least one image that describes the content you have written. And the image ALT tag should have the focus keyword in it.
Internal Links and External links: You should use both links in your article. Internal links are the links to your website only. It will increase reader time on your website and that too is important in Website ranking.
External links are the links to the other websites. The content you have written must have quotes of others or images used from other websites. It is recommended that you should thank to the persons or websites from where you have taken these things by linking their website.
Content-Length: A good SEO friendly Content should have minimum of 300 words in it. It is important that the reader should get the solution to his problem or he/she understand what the content is complete. So lengthy articles are good for website ranking.
Paragraphs and Sentences Length: Good content should have small paragraphs in it. Small paragraphs are good for reading. And it should have headings or subheadings at regular intervals.
Look! good Content is Reader centric not Search Engine centric. So you should avoid using difficult words, rather you use easy passages so that Reader get your content easily.
Farhan Bajrai is an Entrepreneur, Web Designer as well as a Teacher. He resides in Hyderabad. He is the Founder, Designer, and Director of Bajrai Online Solutions.