Do you want to Bulk Delete WordPress Users? Here in this post, I will discuss the three methods to Delete WordPress Users from your WordPress Website.
Methods of Deleting WordPress Users
Deleting WordPress Users one by one
Deleting WordPress Users in bulk without a plugin
Deleting WordPress Users in bulk using a Plugin.
Now I will discuss all the methods one by one.
Deleting WordPress Users one by One
You can delete WordPress users such as subscribers one by one by going to the user’s page in WordPress Dashboard.
WordPress Dashboard → Users → All Users
Here you can delete your WordPress users one by one, by just hovering on the user name. You get the option to Delete the subscriber. If you want to delete that subscriber, then click on Delete.
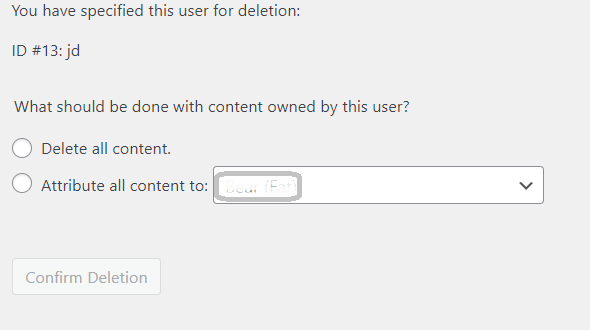
WordPress will confirm before Deleting the Subscriber. If you confirm the deletion, then the subscriber will be permanently deleted.
What Happens if the Subscriber has Some Data Assign to his Account?
If the user has some content on your website, like posts, comment then WordPress will ask you to Attribute the content to other users or Delete all his Content.
Here you can do what is necessary. If you want to attribute his/her content to some other users. Then attribute him or if the content is not worthy, then delete all the content.
2. Deleting WordPress Users in Bulk Without a Plugin
Now, if you want to Delete WordPress users in bulk and without using any plugin, you can do it from WordPress User’s page only.
How to Bulk Delete WordPress Users without Plugin?
Now, sometimes you have many unwanted subscribers and want to delete them quickly. Then the one-by-one deleting user procedure will be quite lengthy and time-consuming.
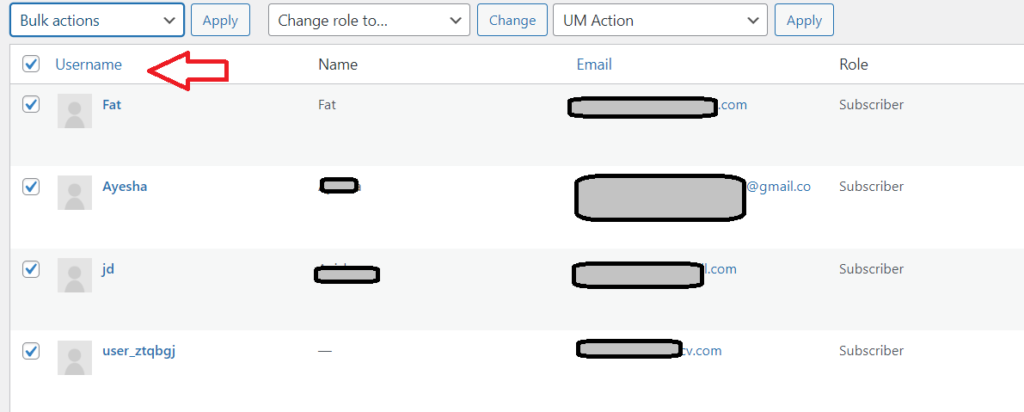
So, the other method to delete the WordPress users in bulk is just to click the Select All checkbox beside the User name Column. By clicking the checkbox it will automatically select 20 users at a time. And from the drop box which is above and it displays Bulk Actions, select Delete from it and Click on Apply.
As discussed above, All the users will be deleted after Confirming.
Suppose, you have 300 users or more to delete, then this method will also consume a lot of time.
For this, just click on the “Screen Option” tab in the top right corner of the screen. It will bring a fly-down menu where you can set the number of items per page up to 999.
Suppose you want to delete the users with subscriber roles and the users are more than 500 or near it. Then we will enter the 999 or 600 number in the number of items per page.
Click on Apply button, and the page will reload and show you the 999 users or the number we entered.
Now, click on the select all button as you did above, and from the bulk, actions select delete and hit the Apply button.
But while applying bulk deletion to this number of users, your website might slow down for a while. If you have an enormous amount of users to delete, then you can use Plugins to Delete the users.
3. Deleting WordPress Users in bulk using a Plugin.
On one of my client’s websites, there were more than 6000 unknown subscribers. Some one tried to hack it because without having the option for subscribing to the website, that website has more than 6000 subscribers. Now, I want to delete those huge numbers. It is possible to do this, but it will take a huge amount of time to do. So, I used a Plugin to Delete those Subscribers.
How to Bulk Delete WordPress users using a Plugin?
As discussed above, following the default, the bulk delete method is time-consuming and not worth it. For this, we can use a plugin to delete all the fake users from our WordPress website.
To Delete bulk users from WordPress I used the WP Bulk Delete by Xylus themes. So, you need to first Install and activate WP Bulk Delete Plugin. For details on installing, see our step-by-step guide on how to install a plugin in WordPress.
Upon Activation of the plugin, Visit WP Bulk Delete plugin from WordPress Dashboard
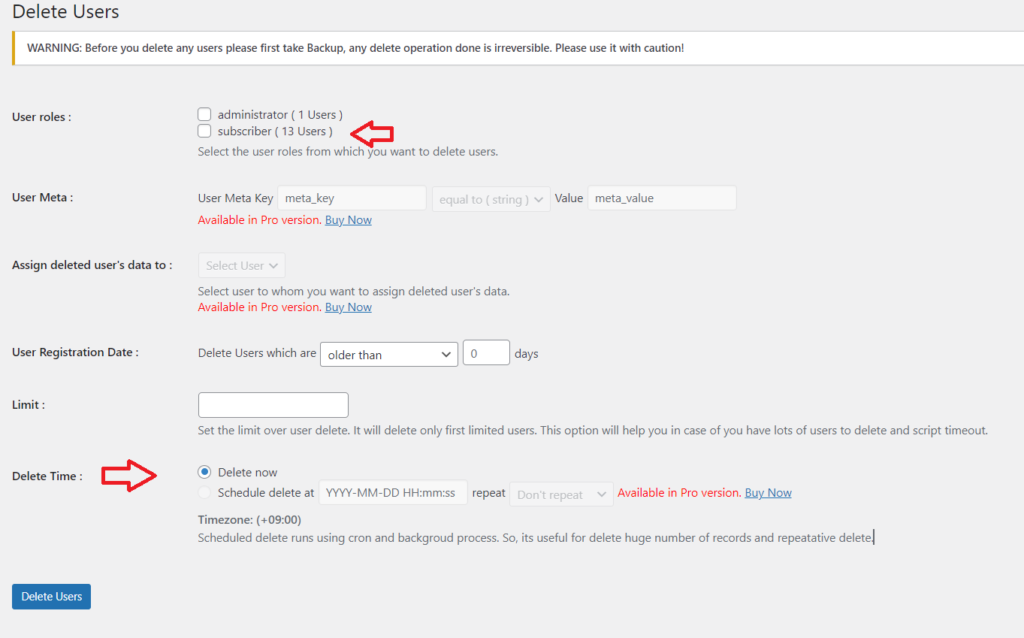
Dashboard >> WP Bulk Delete >> Delete Users
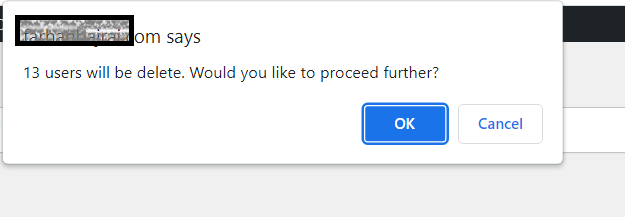
If you want to delete all the subscribers then select the subscribers from user roles. And click Delete users. The Plugin will confirm the Deletion by displaying a dialogue box “X users will be deleted. Would you like to proceed further?”
Click OK to Confirm and all the users will get deleted.
Can I schedule to Delete the WordPress Users?
If you want to schedule the delete, then WP Bulk Delete also has the option to Schedule it.
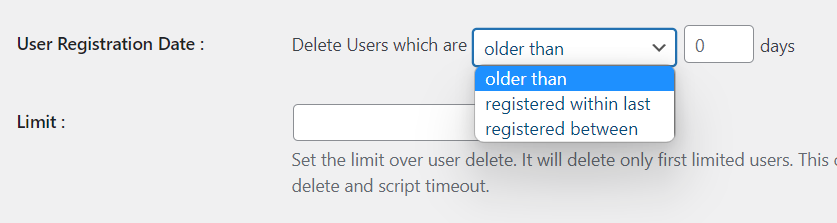
Deleting Users Based on Criteria
Likewise, if you want to Delete users based on criteria like
Delete Users older than X days
Delete Users Registered within X days
Delete Users Registered between the start date and end date
So, for this, you also have the option in the WP Bulk Delete plugin under the User Registration date.
If the user which you are deleting has some data like posts, images etc and you want to assign that data to someone. The WP Bulk Delete plugin also has this option, but this Option is in its PRO version.
Other than Users, WP Bulk Delete Plugin can delete Bulk Posts, Bulk Comments, etc.
Do you want to kick out Comment Spam from WordPress website? These comments are annoying to webmasters as well as readers. So, it it better to kick them out of your website.
Spam is the unwanted message or comments you get in your email inbox or the comment section of your website or youtube.
Everyone hates unwanted messages. So you are probably here because you are getting unwanted messages in your WordPress website comment section.
To start, let’s understand spam first.
What is Spamming?
Spam is any kind of unwanted messages sent out in bulk whether in email or comments on your website
Simply, spamming means sending unwanted bulk messages online.
What is Comment Spam?
You are here and reading this post means you are getting spam comments on your WordPress website or blog and you want to know about it and want to get the solution to combat spam in Comments.
Comment Spam is nothing but that some webmasters exploit the comment section of other websites to promote their website by posting their website links. Since these are unwanted comments and they are unrelated to the post by the Post author, these are called spam.
Sometimes these spam comments may be malware and viruses.
Why Comment Spam is Bad?
You can say, Why Comment Spam is bad? He is reading my content and commenting on my Content. These comments bring interaction to my website and blah, blah, blah.
But wait!
Let me clear you, the spammers
1. Don’t read your Content
2. They are not bringing interaction to your Post
3. They just paste the same comment which is linking to their website on all websites.
Why Comment Spamming?
One of the reasons for Spamming in the comment section of websites is those spammers want to use your website comment section to improve their website ranking by getting clicks from your website.
Is Comment Spam Harmful?
Search Engines penalize both the spammer and the website which is allowing spam comments on their website. Because, spam is the unwanted comments on your website, and they provide the link which will take the reader to the website which they won’t want to go to. It can also take you to insecure websites or viruses and malware.
In other words, if you are approving spam comments on your website then your website’s PageRank also gets affected.
So, it is better to moderate your comments and approve those comments which are genuine and related to your content.
How to Moderate comments without plugin in WordPress
There are several ways you can moderate your comment section in WordPress, the best way is by moderating comments in discussion settings.
2. Users must be registered and logged in to comment
3. Comment must be manually approved
4. Comment author must have a previously approved comment
If you enable these settings, you will cut down the speed of spammers, they have to log in before they comment. So, many of the spammers or spambots will be stopped from commenting.
But Wait! Still, you have the mastermind spammers who play with the system and use unethical ways to promote their website.
So, some spammers may log in to comment on your website, and the first 2-3 comments, may be very genuine, and after getting approved from your side. They start spamming.
So, you should be aware of this kind of spammers.
So, you should manually approve comments on your website
How to Stop Spam Comments using Plugin in WordPress
There are a lot of plugins present in the WordPress Plugin directory which fight the spammers.
One of the worst things about these plugins is that they slowed down your website.
Ultimately, increasing the load time of your website. And, this will have negative effects on your PageRank in Google or other search engines.
One of the best plugins to combat spam comments is Akismet. This plugin is developed by WordPress only. So, it won’t affect your website load time.
But you have to install the API key from their website.
Akismet is free for bloggers, and it will also come up with paid versions for businesses and e-commerce websites.
On average Akismet stop 7,500,000 spam Comments from the web Per Hour.
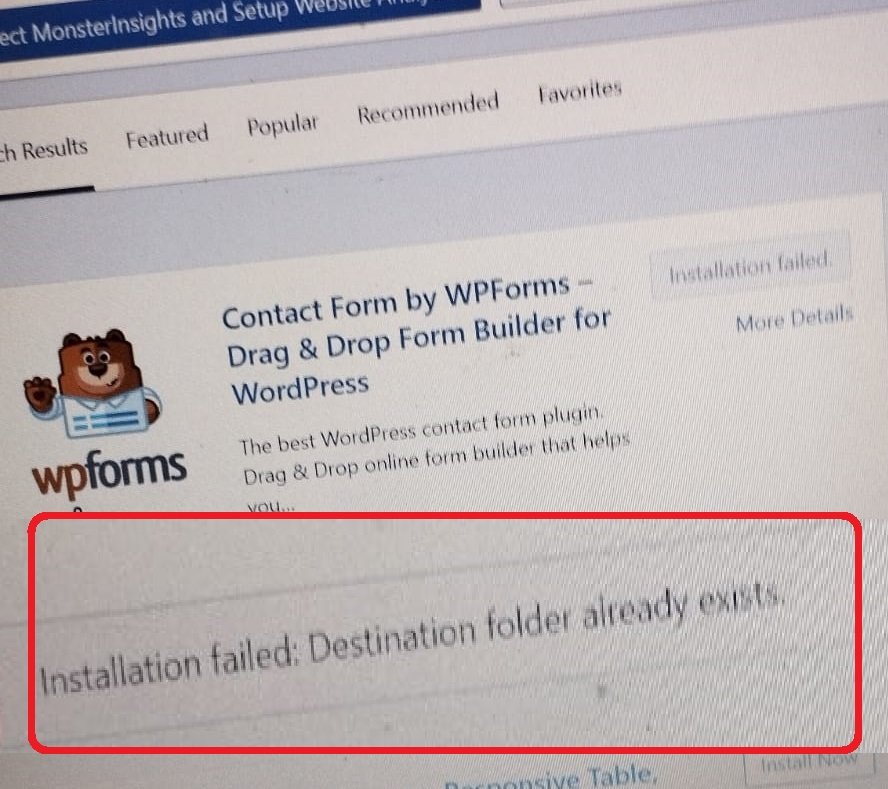
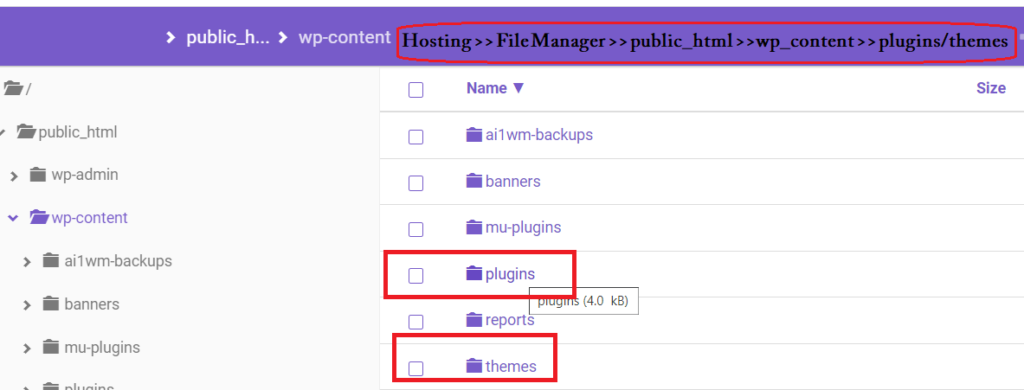
Then find the folder of the plugin or theme that you were installing while getting the “Destination Folder already exists” error, and delete that folder.
Now, go to WordPress Dashboard and install the theme or plugin. Now you can successfully install the theme/plugin.
In my case, my friend was getting this error while installing the wpforms plugin, and when I suggested him this process. He said that he was installed wpforms before. But due to some issues, the plugin has been deleted, and he was installing it again.
So, he has done all the steps I suggested here, and in the end, he successfully installed the wpforms plugin.
We hope this article helped you to solve the destination folder already exists error in WordPress. If so, share it with your Friends and subscribe to our blog.
Do your post’s featured image is not showing while sharing on WhatsApp, Facebook, LinkedIn and Twitter etc.
First of all, if you don’t know What a Featured image is and what is the importance of a Featured Image?
How to set it in WordPress, then kindly read Our Detailed Post about Featured Image
My Post Featured Image is not showing up on Social Shares
I am also getting this problem with my posts. Whenever I share my post, instead of my Featured Image or My Post images, my profile image is showing up on Social Shares.
Then I google it, but not getting a clear cut answer to my query. I am not techy, so some of the technical terms.
In one of the posts, I saw the screenshot of the AIO SEO plugin. Then, I got the hint, and I opened my WordPress Dashboard and Opened Social Shares in AIO SEO. And Clicked on Facebook, and there I found the main reason why my profile image is captured while sharing.
(Resolved)Featured Image is not Showing Up in Social Shares
The reason is, that in AIO SEO social Networks, the Default Post Image source was set to “Default Image”. Due to this, My profile image is captured on social shares.
Then I clicked on Drop-down and set it to Featured Image on Facebook, Twitter, and Pinterest tabs.
Then I checked to share the post on social media, and I was really happy that my issue has been resolved.
Summarizing the Featured Image Solution
Go to AIO SEO plugin >> Social Networks >> Facebook >> Default Image Source >> Featured Image
Go to the AIO SEO plugin and click on Social Networks, select all the social networks one by one and set Default Image Source to Featured Image.
If you are getting any errors again, mail us or comment on the post. We will be happy to help.
If this post helps you in resolving your issue, like and share it with others.
Do you want to insert an ad inside the content of your WordPress website?
You might have seen advertisements on each and every post on the website. Many beginners wonder whether these sites insert ads in each post they are writing. Or they are curious to know what is the code to insert an ad within each post of the website.
Basically, these ads are after the first paragraph or in the middle of the content or after the content.
In this article, we will show how to insert an ad within each post on your website.
Well, We have been posting ads after the second paragraph, and after the content in Bajrai Online Solutions.
How to Insert an ad inside the content without Writing a Code?
In this article, we will show you how can you insert ads within the posts and pages, and at different locations.
Inserting Ad using Plugin
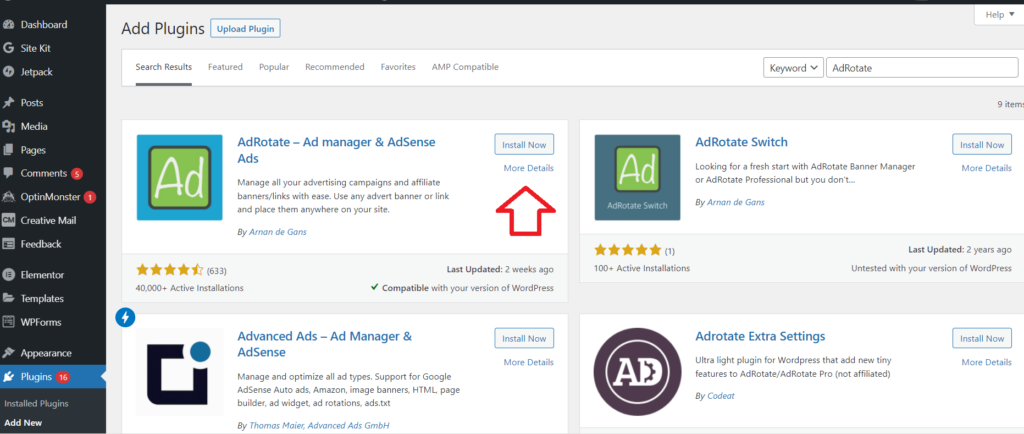
You can insert ads within your content at different places by using a Plugin called AdRotate by Arnan de Gans.
AdRotate Plugin
AdRotate plugin is simple to use but has many powerful features for both beginners and experienced users.
Simply install and activate AdRotate Plugin. If you are not familiar with the installation, here is the guide on how to install plugins in WordPress.
How to Insert Ad in between post video tutorial in Hindi and Urdu
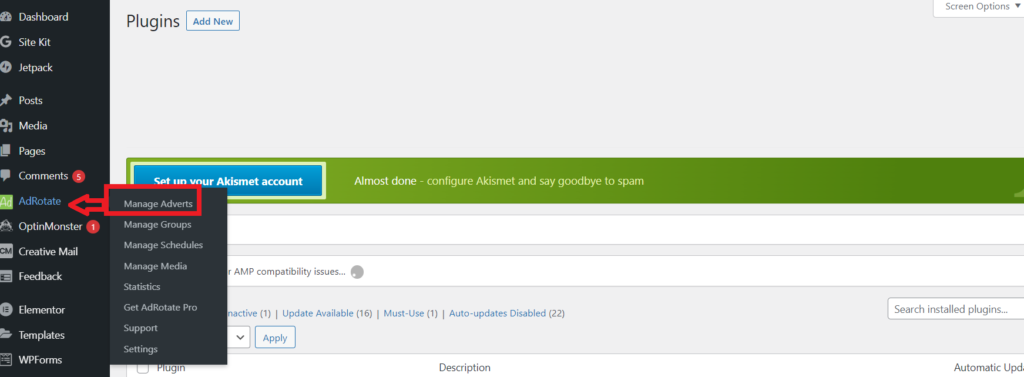
After activating AdRotate Plugin, you will have the AdRotate option in the left-hand sidebar of your WordPress dashboard.
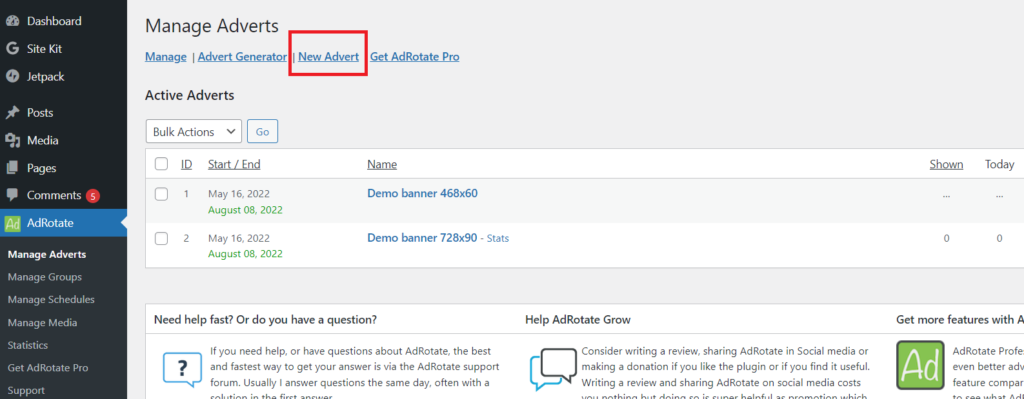
Now, just hover over AdRotate, and then click Manage Adverts.
Now You will be redirected to the Adverts page, here you will get multiple options like Manage, Advert Generator, New Advert, and Get Advert Pro.
As we want to insert Ad, click on New Advert. You will be redirected to New Advert Page.
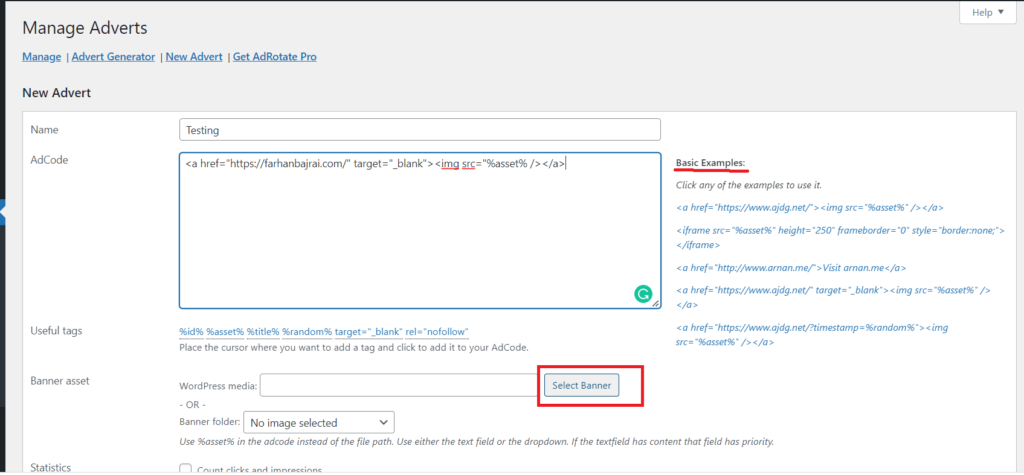
Simply give the name to the advert for identification purposes. And insert the code below.
Wondering how to insert code?
Inserting code is very easy in the AdRotate plugin. You will have sample codes on the right-hand side, just try them and select one of them, as per your requirement.
Adding Code in AdRotate Plugin
In our case, we want to insert an image inside our content after a specific paragraph, and when the user clicks on that image, he/she should be redirected to a specific link or website.
Keep the link or URL you want when users click your ad image after href=, in our case we have https://farhanbajrai.com/
“Target=”_blank” means when the user clicks the ad image, the link will be open in a new tab.
Img src=”%asset% is the code for inserting an image.
How to insert an image in AdRotate?
Now you have to insert an image in your ad copy. Just scroll down, you have Banner Asset, just click on Select Banner, and you will be redirected to your WordPress Media Library. Select or Upload the image you want to use for the specific ad.
How to Show statistics of Ad?
Besides showing advertisements on your website you also want to show statistics of the ad to your client, for this AdRotate has a statistics tab. Just click on the check box Count Clicks and impressions.
How to Schedule ads on a WordPress website?
Now the most important thing is the starting date and ending date of Your ad. How to schedule ads?
Simply, just scroll down and you will see the heading Schedule Your Advert. In this snippet, select the starting and ending date and time.
Now Save the ad by clicking save advert.
Hurray, you have successfully created the ad to show on your website.
Where is my ad showing?
Wait, but neither did we set any place to show the ad, nor the ad is showing on our website. Why?
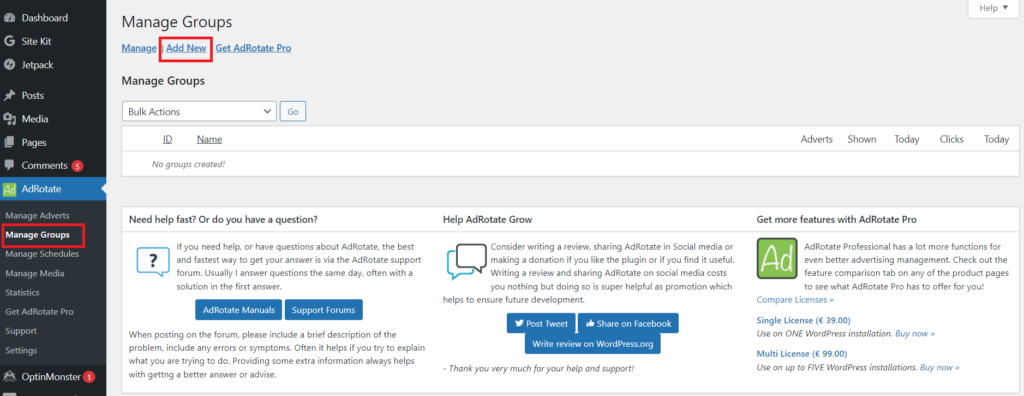
To solve this issue, you have to go to the Manage Groups in AdRotate in the WordPress dashboard.
When you click Manage Ad Groups, you will be redirected to the Ad Group page, like you were redirected to Manage Adverts.
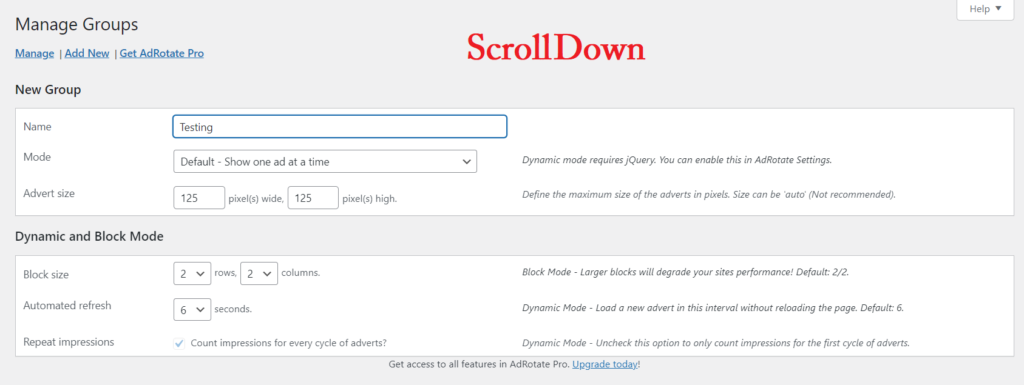
Here in Ad Group, click on Add New. Name the Ad Group for identification purposes. There are many settings, which we will discuss in our other article. Here we want to show our ad in each post. So we will discuss that only.
How can we Insert ads in each post and page of WordPress?
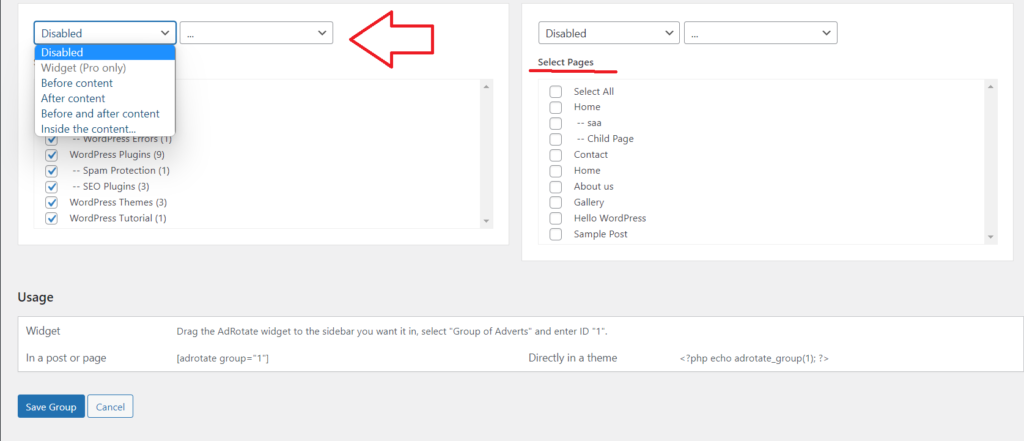
Just scroll down in your ad group. You will see a heading called Post Injection. Inside Post Injection, click on the first drop-down which displays Disabled. When you click on it you will see various options like Widget, Before Content, After Content, and Inside the Content. As we want to insert an ad within our content, then click on Inside the content.
After selecting inside the content, click on the dropdown beside it which display 3 dots ( …) and select the paragraph after which paragraph you want.
How do Insert ads in specific categories?
Now if you want to show the ad to particular categories, then Select those categories. And if you want to show to each and every category, select all.
You can also select pages if you want to show the ad on pages too.
Which Ad to Show in this group?
Now just scroll down and you will see the ads you have created in Manage Adverts. Just select the ad to show and click on Save Group to save.
Yay! You have successfully inserted ads to each and every post on your WordPress website.
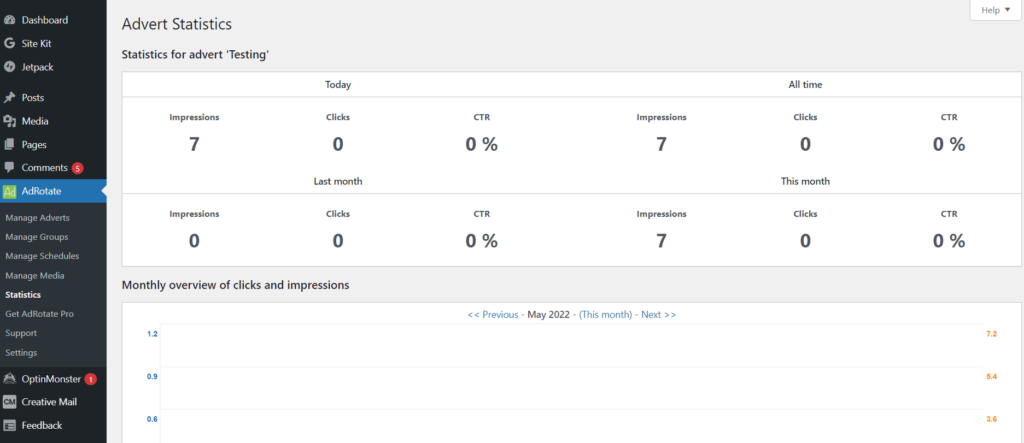
How to see the Statistics of ads in WordPress?
Now, if you want statistics on your Ad. Then again go to Manage Adverts and scroll down to active adverts, you will see stats beside your Ad Name. Click on Stats. You will see the stats like impressions, clicks of today and all-time here.
Conclusion: In this article, we learn how to create and show ads on each post on the WordPress website. Besides inserting the ad, we also learn how to see the statistics of the running ads.
If this article is helpful to you kindly subscribe to our newsletter, and like and share it with your friends. And if you have any doubt, or errors while inserting an ad kindly comment or mail us.
Farhan Bajrai is an Entrepreneur, Web Designer as well as a Teacher. He resides in Hyderabad. He is the Founder, Designer, and Director of Bajrai Online Solutions.