How to Delete a WordPress Theme

How to Delete a WordPress Theme

How to Delete a WordPress Theme

In a Facebook group, someone asked about How to Delete a WordPress Theme.

We answered them in the comment section. For our audience, we thought to write it down. So, it may help beginners to know, how to delete WordPress Theme.

Deleting unused Themes and Plugins from your WordPress website is a good practice.

Deleting or removing a Theme from WordPress is as easy as installing it.

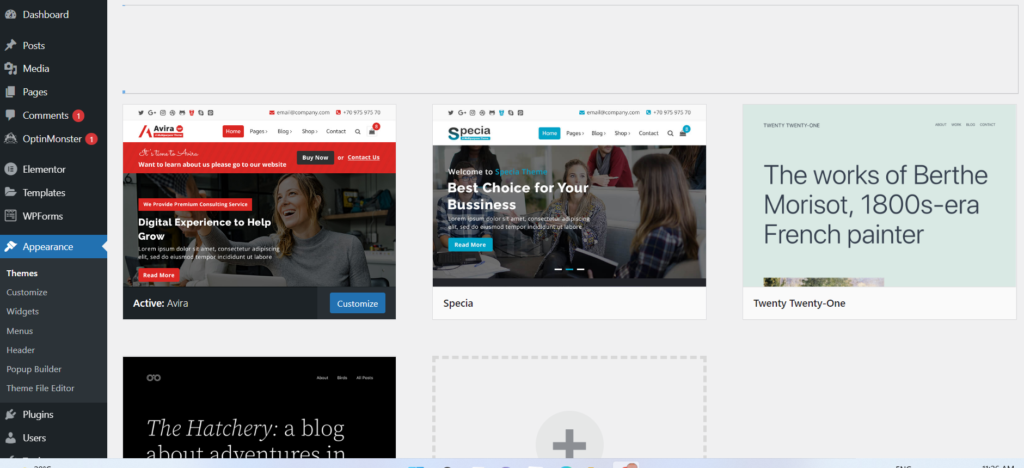
To delete the WordPress Theme, log in to your WordPress dashboard, then go to Appearance >> Themes.
How to Delete a WordPress Theme

Select the Theme you want to Delete. As shown in the figure.

When you select the theme, you will see the Delete button at the bottom right-hand side of your window. Click on the Delete button a pop-up will appear, asking whether you want to delete the theme or not.
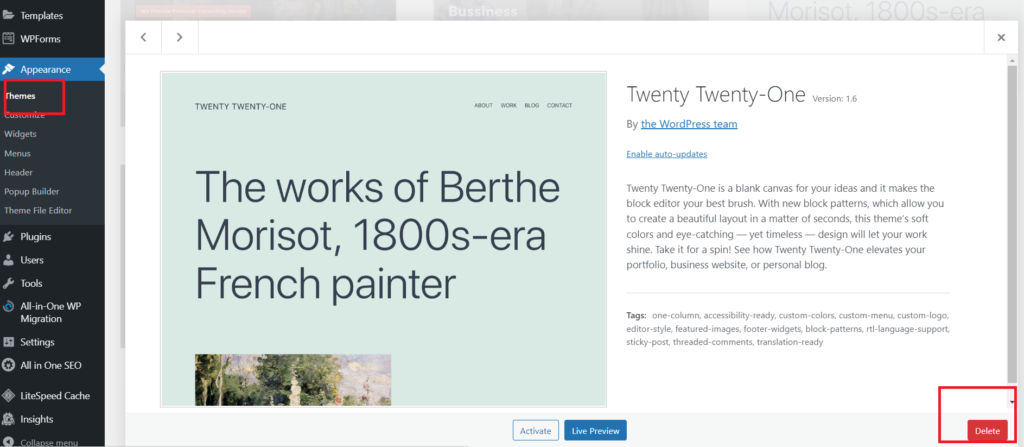
Click OK to delete the Theme. Your Theme is successfully removed from your WordPress database.

Hurray! You have successfully removed a Theme from Your WordPress database.

How to Delete a WordPress Theme from Hpanel

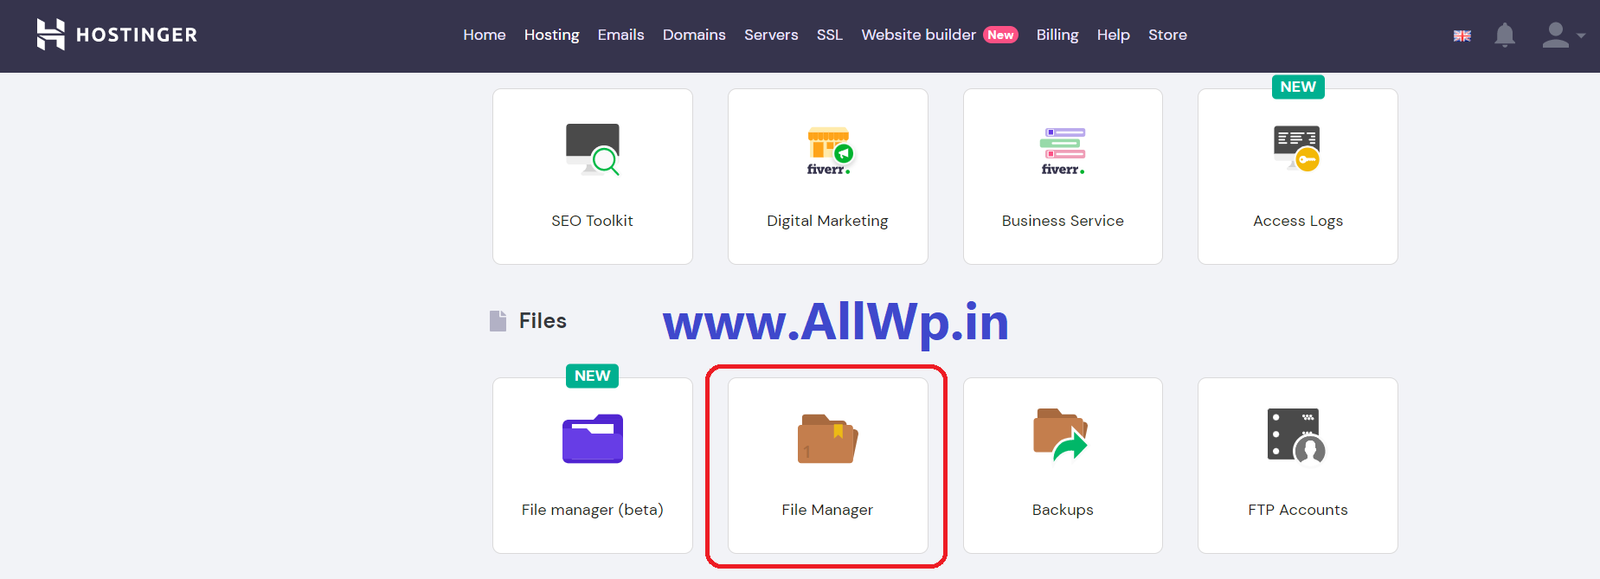
The other method to delete a Theme from WordPress is through your Hosting Account’s File Manager.

Login to Your Hosting account:

First and foremost, the thing is to log in to your hosting account. Then go to the File Manager.

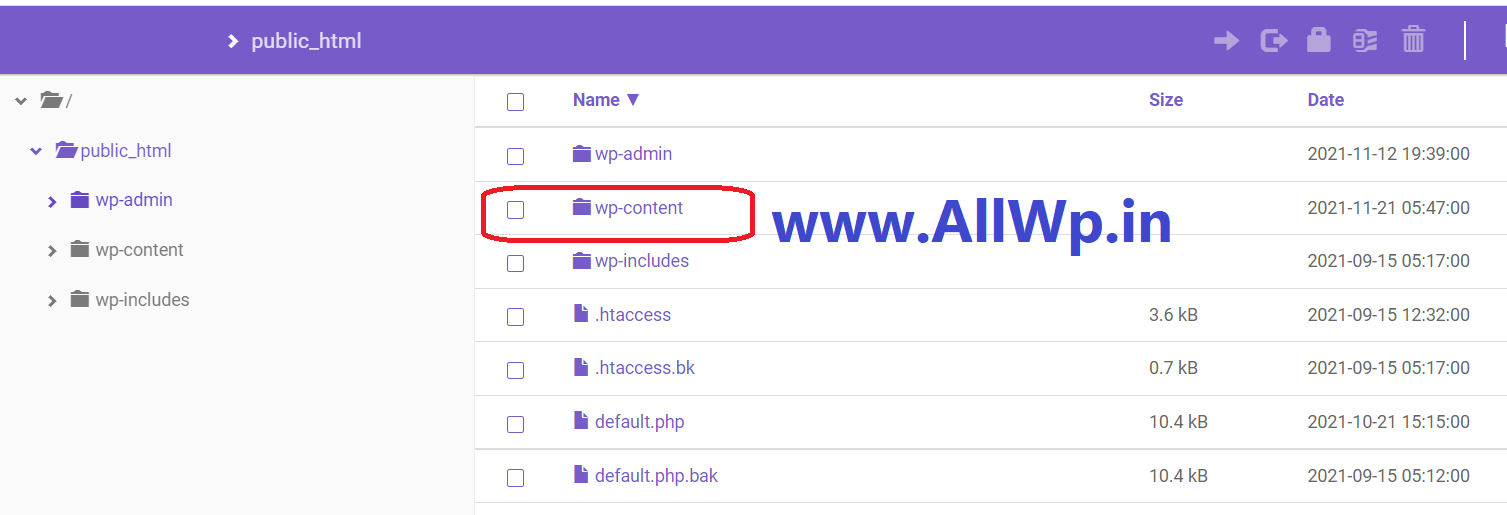
In the File Manager, then go to Public_html. After opening Public_html. Then go to wp-content. In wp-content, open the Themes folder. In the Themes folder, Select the theme You want to Delete. Click on the Delete button to delete the theme.

Now You have successfully Deleted the WordPress Theme.

Your Hosting — > File Manager — >public_html — > Wp-Content — > Themes à Select the Theme — > Delete

  • how to delete a theme in wordpress

Recommended: How to Make a First Post in WordPress

WordPress Settings Part 1

WordPress Settings Part 1

WordPress Basic Settings

Hope You are following the basic WordPress posts written by us.

We have successfully discussed How to Create Free WordPress Account then we have completed the installation of the Theme and Customizing the WordPress website in our previous posts.

Now one of the most important things is setting up our WordPress website.

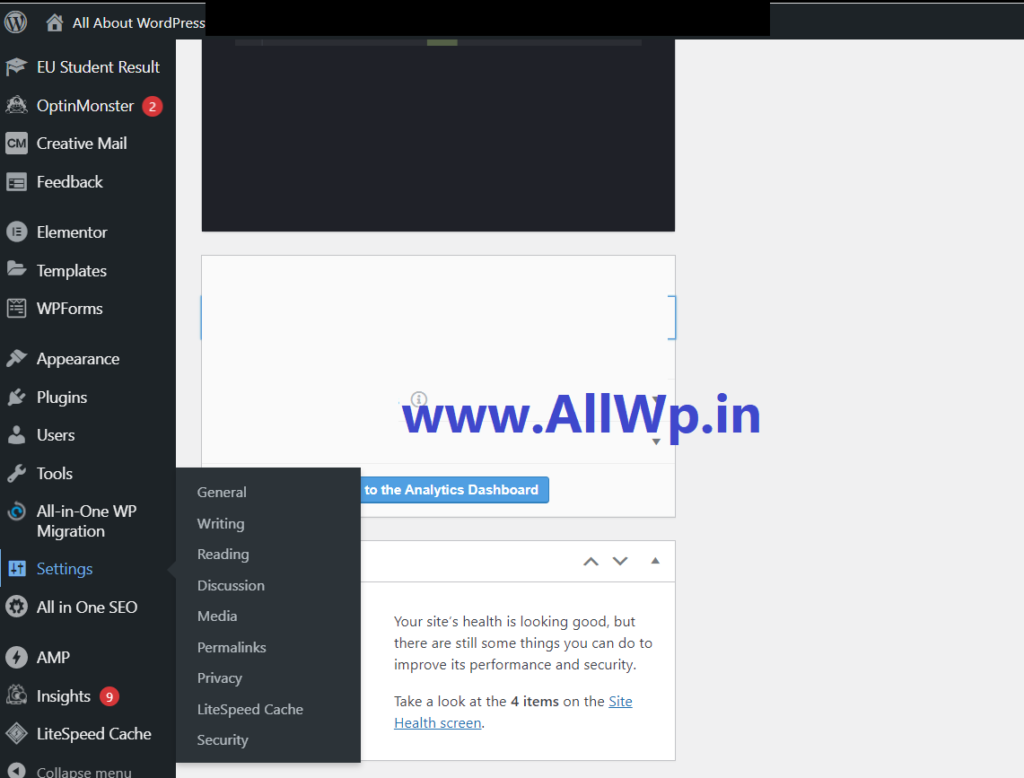
Like before, Go to Your WordPress Dashboard and You will find Settings on the Left-hand side.


WordPress General Settings

WordPress Dashboard — > Settings — > General

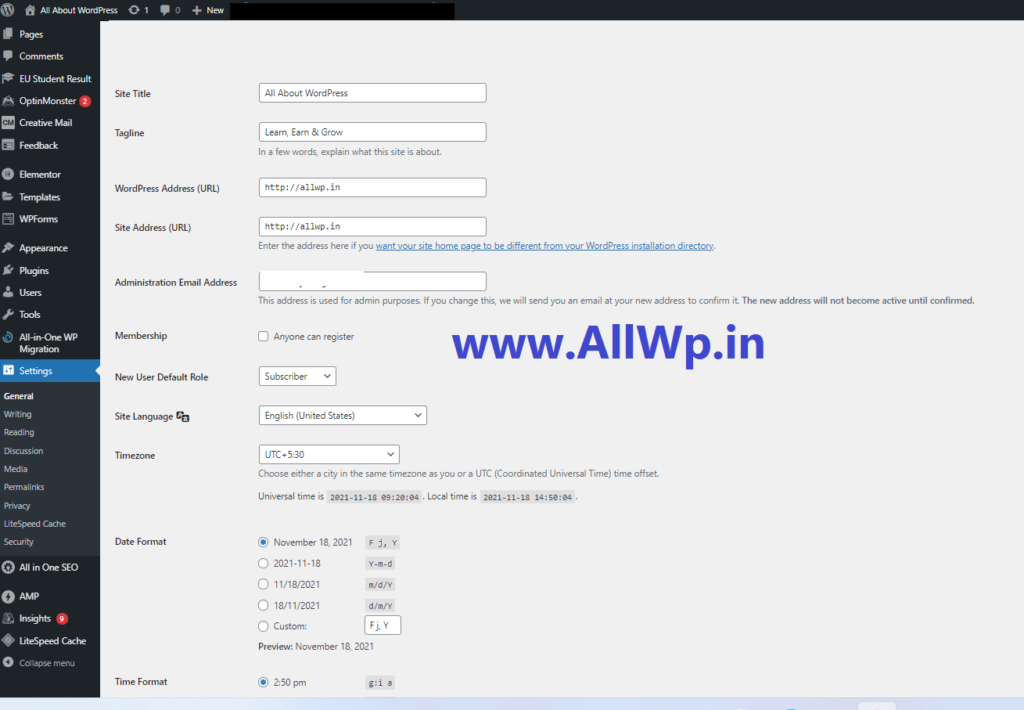
General settings are the first and basic settings in WordPress Website. Here you can change the site title, URL, Time zone, Language, date format, etc.

How to Change Time Zone in WordPress?

If You want to change the Time Zone of Your Website then You have to go to the General Settings of Your WordPress Website in the Dashboard. Here in WordPress general settings, You can change the Time Zone of Your WordPress website.

How to Change WordPress Website Language?

If Your mother tongue is other than English, or you are familiar with other languages than English, and you want to change your WordPress Dashboard Language for example, if you are an Urdu speaker and you want your complete website in the Urdu Language then You can Change Your WordPress Website Language as well as Your WordPress Dashboard language to Urdu in the General Settings of WordPress.

How to Change Date Format of WordPress Website?

There are different ways by which one writes the date. If you want to change the date format of your WordPress website then you can do it in the General Settings of the WordPress website as shown in the figure.

How to Accept Users as a Subscriber?

If you want to accept users as subscriber to your website by using Plugins then you have check Membership Check box in the WordPress General settings. We will discuss in detail this membership in our other posts.

The other General Settings are Site Title, Tagline, WordPress Address URL, Site Address URL, and Administration Email Address.

WordPress Writing Settings

WordPress Dashboard — > Settings — > Writing

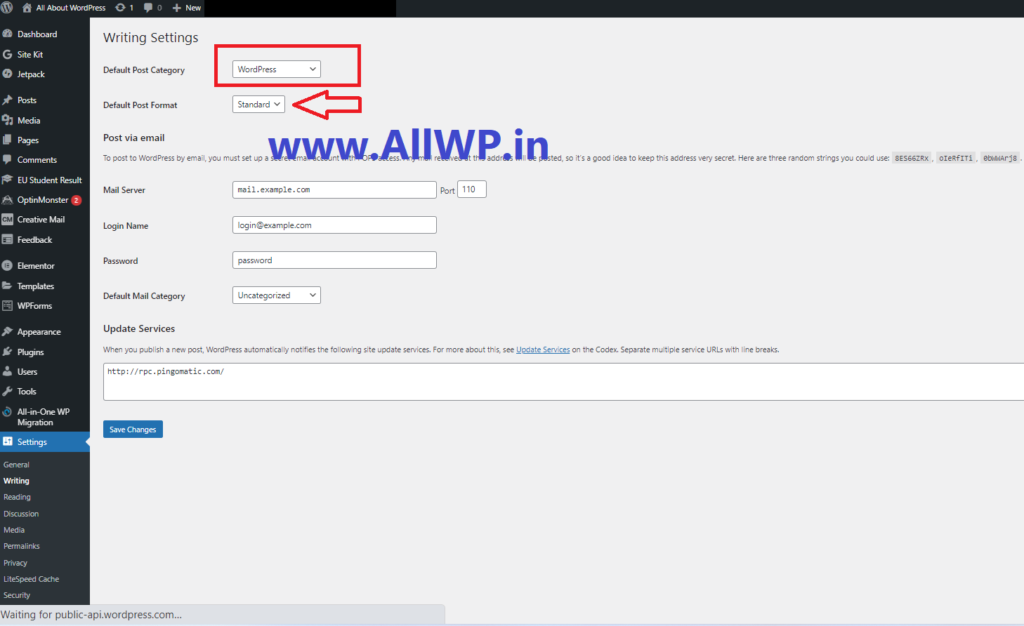
The second setting in Your WordPress website is Writing. There are not many settings in Writing, but two of them are important.

How to Change Uncategorized from Default Category?

Whenever you write a post in WordPress, it will be categorized. If you did not set any category, then by default, it is selected as Uncategorized. We have our own categories and many of us don’t want to keep Uncategorized as the default category. To change Uncategorized from the default category You have to go to Writing in settings and Select Appropriate default Post Category over there. We have selected WordPress here.

How to Change Default Post Format in WordPress?

There are many post Formats available in WordPress. WordPress covers more than 42% of the Web. As per your requirement, if You want to change your Default Post Format from standard to any other, you can do it in the Writing Settings in WordPress.

WordPress Reading Settings

WordPress Dashboard — > Settings — > Reading

After the Writing setting, you have Reading Settings in WordPress settings. Let’s discuss it in detail

How to Change WordPress Website Homepage?

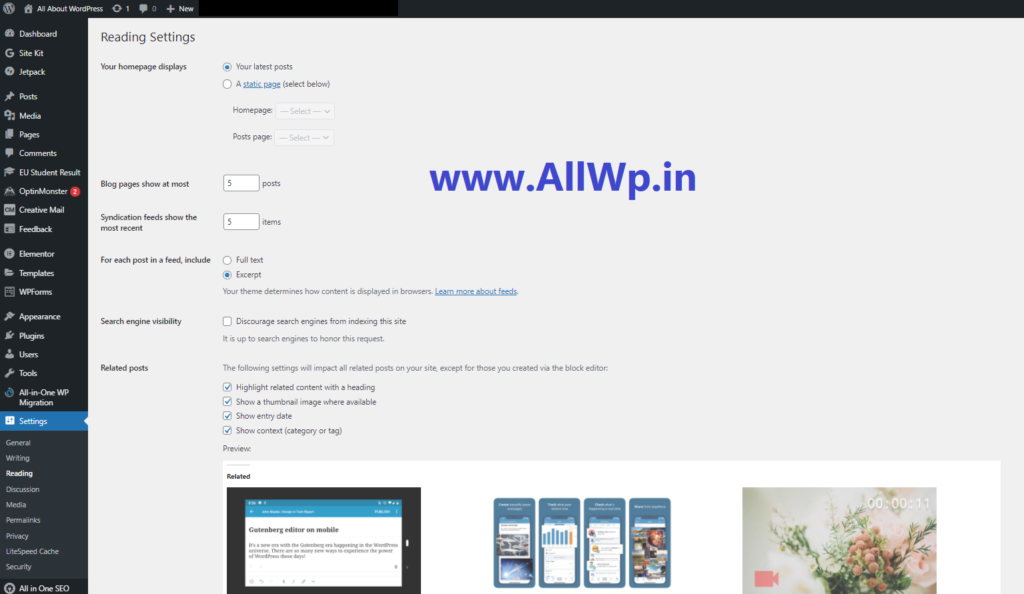
In WordPress Website, basically, we can have our Website homepage in 2 formats. One of them is Static, which means you selected a particular post/page of your WordPress Website, and whenever users visit your Website, that page is shown. On the other hand, we have a Latest Posts page, which means if you want Your Latest posts should be shown on your home page then you have to select the Latest Posts option.

To Change the Homepage, You have to go to WordPress Reading settings. Based on your requirements, you have to select either static or latest posts as your homepage.

How to Change Blog Posts Number in WordPress?

As WordPress is mostly used for Blogging, you want to keep limited posts on a web page and you want users to click on Older Posts or newer posts to visit more posts using Pagination in WordPress.

To change or set the number of Blog posts displayed you have to go to WordPress Reading settings. There you will find Blog Pages shown at most. Here we have set it to 5 posts. You may have 10 or different.

How to Show Posts Summary on Blog Page?

If you are using WordPress as a blog, then on the blog page either you can show the complete post or you can show Excerpt i.e., Summary. You can choose one of them in WordPress reading settings as shown in the figure. Set according to your preference, normally Showing Excerpt and making the user click the most to read completely is good for engaging user, and SEO purpose.

How to discourage search engines from indexing Your WordPress website?

Normally, everyone wants their website should index in Search Engines like Google, Bing, etc., but in some scenarios, we don’t want search engines to index our site. For this purpose, you can check the box of discouraging search engines from indexing this site in WordPress Reading Settings.

How to show Thumbnails in the related posts in WordPress?

After each post, WordPress shows the related posts to the viewer of your post, which increase engaging user with your website. In the Related posts, you can highlight the Heading of the post, with category, date, time, and Thumbnail of the post.

To enable Thumbnails in the related posts in WordPress just check the box in WordPress Reading settings which text “Show a Thumbnail Image where available”. It will show the Thumbnail image if you have an image in that post.

How to Show Category or Tags of Related Posts in WordPress Website?

As discussed above, in showing thumbnails in the related post. You have to just check the box “Show Context (Category or tag”) as shown in the image.

The remaining WordPress settings like discussions, media, permalinks, etc, will discuss it in our upcoming posts. If you find this helpful to you, do share it with others. And if you have some feedback then kindly let us know in the comment sections.

How to create a WordPress website for Free

How to create a WordPress website for Free

How to Make a Website for Free in WordPress?

In our last post, we discussed writing the first post in WordPress, while writing the post we mentioned the WordPress Free account. So, we thought about writing about how to create a free website in WordPress?

So, it may help our viewers to create their own free website in WordPress and they can use WordPress and become familiar with WordPress themes, WordPress Plugins, and writing posts in WordPress. Then they can purchase any hosting and make their own WordPress.

Are You New to WordPress?

Don't Know What is WordPress?

Please Click here to Know About WordPress

Note: Free WordPress websites will have the extension wordpress.com.

Step by Step Guide for making free website in WordPress

Let’s go, and make our free WordPress website.

Steps:

Step 1: Go to WordPress.com

Step 2: Create WordPress Account

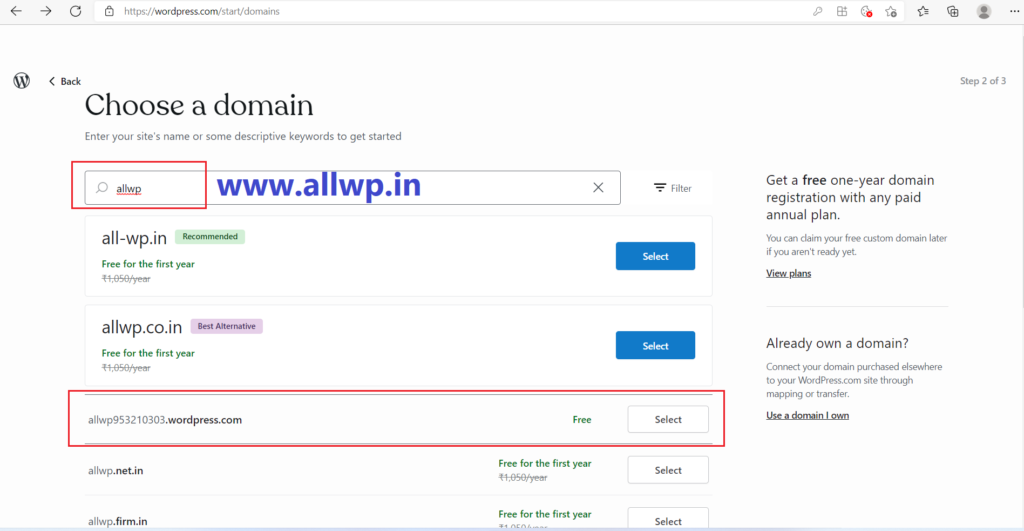
Step 3: Choose a domain

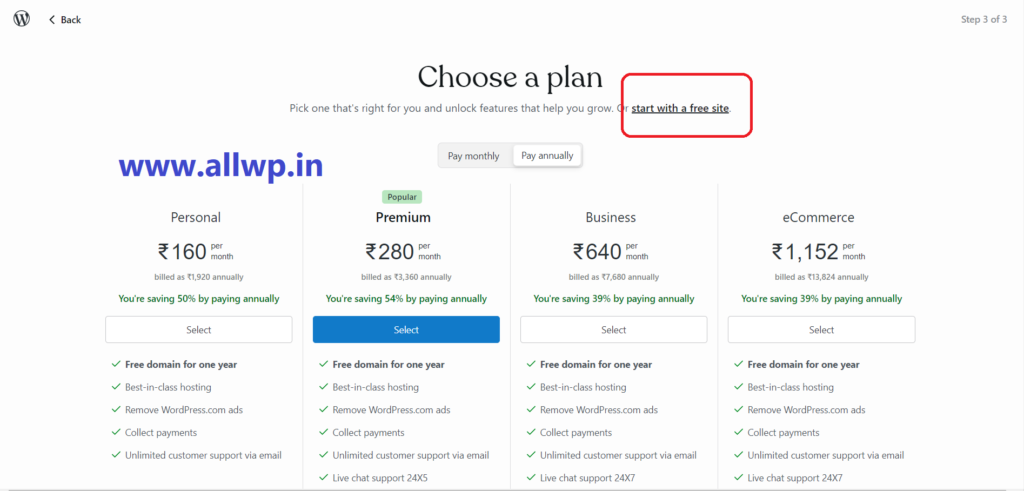
Step 4: Select Free Plan

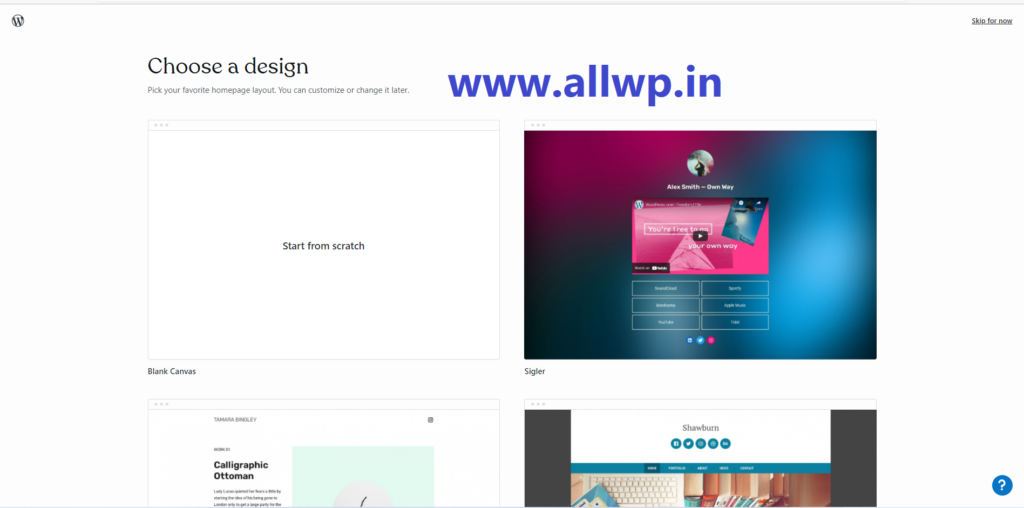
Step 5: Choose a design

Step 6: Give your site a name

Step 1:

Go to WordPress.com

First go to WordPress.com, the best platform making websites.

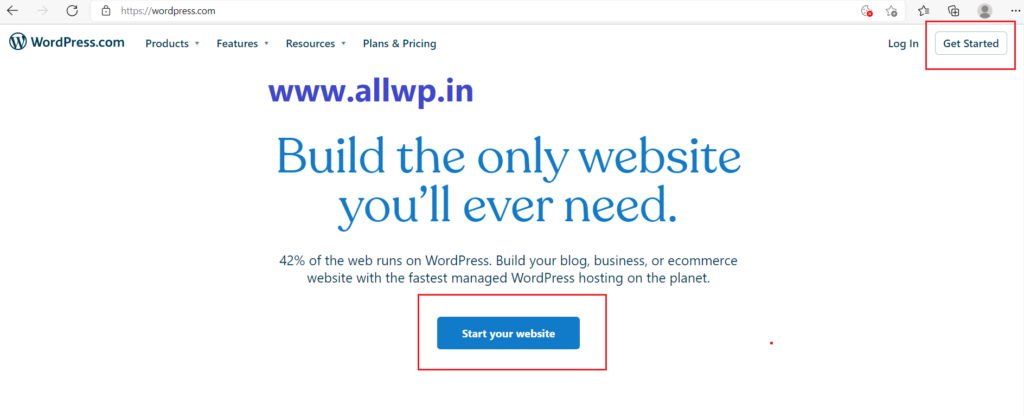
When you go to WordPress.com, then either click “GET STARTED” on the top right corner of your webpage or click Start Your Website in the middle of WordPress webpage as shown in the figure.

step 1 free wordpress website

Step 2:

Create WordPress Account

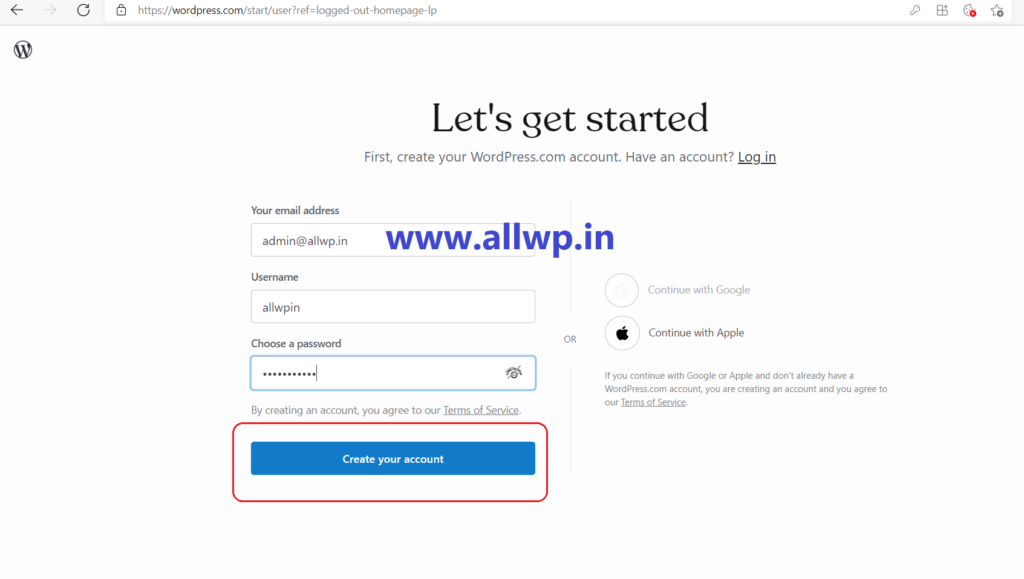
After clicking Get Started, you have to Create Your Account as you create in Gmail, yahoo mail, Facebook, etc. Creating an account in WordPress is easy. You just have to write your email address and User Name and Password and click Create Account.

Hurray! You have successfully created a WordPress account successfully.

Step 3:

Choose a domain

Now after creating a WordPress account, you have to select a domain name. Domain Name basically your WordPress website name. When you type your domain name (like allwp), WordPress will suggest the related domain (here it suggested us all-wp. in, etc) but we want a free WordPress website, so just look down we got “ .wordpress.com” extension domain and beside it, it is written free. As we are creating a free website so go for wordpress.com extension free website.

Step 4:

Select Free Plan

After Choosing wordpress.com free extension plan, WordPress will show you again “Select a Plan” but we don’t need any plan, for now, so we have to skip the plans. Just click Start with a free site as shown in the image.

Congrats! You have successfully selected a free WordPress domain for your free website.

Step 5:

Choose a design

After selecting a Free domain for a Free WordPress website, you have successfully created the free website in WordPress. Now, you have to design your Free WordPress website. No issues, WordPress comes with thousands of free Themes. The themes are nothing but the layout and design of our website.

You can select the best one for your WordPress Website or meanwhile you can click on Blank Canvas for starting from scratch.

You can Design your website with Themes afterward also.

Hurray, You have successfully created a Free Website in WordPress.

Step 6:

Give Your Site a Name

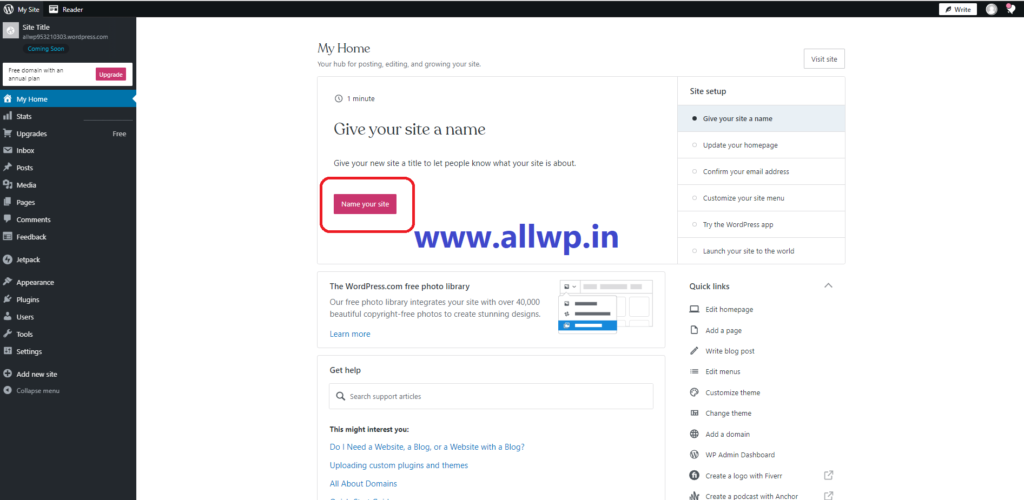
Now you have to give your Site a name i.e., Site Title, Site Icon, and a Tag line for your Site. For this click on Name Your Site as shown in the figure.

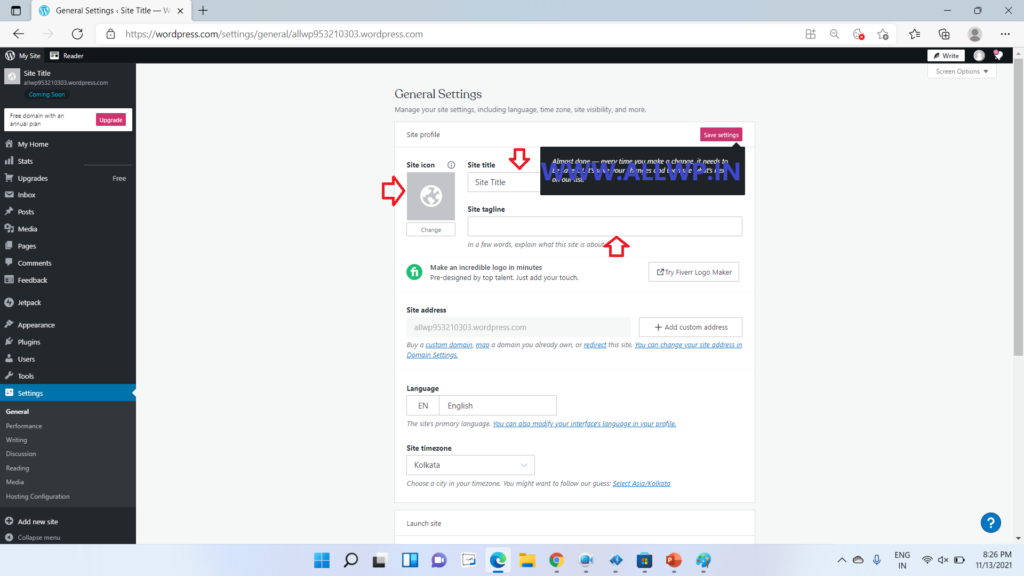
You will be taken to general settings, where you can give a title to your site, icon, and the tag line for your WordPress website. Click on Save to save your settings.

Here You have successfully created your Free WordPress website.

Now Write a Post and see how it is looking. Worrying how to write the first post in WordPress? Don’t worry.

We have it for you, just click here for writing the first post in WordPress.

If the article is helpful to you do share it with your friends. If you have any suggestions and feedback, then please do comment with your precious feedbacks.

How to Create First Post in WordPress
How to Create First Post in WordPress
How to create first post in wordpress for beginners

How to Create Post in WordPress?

Are you a Beginner? Want to become a blogger? And unable to use WordPress.

Don’t panic, you are at the Write Place. WordPress is the best platform for bloggers, and it is very easy to use too. WordPress is very user-friendly. Just You need to Create Your Free Account on WordPress or Just You have to purchase some hosting and install WordPress there.

We are assuming that, you have your WordPress account and now you want to write your first ever post.

Step by Step Guide for Writing WordPress Post


First and foremost, thing is from Your WordPress Dashboard, Click on New Post which is at the top of your WordPress Dashboard, as shown in the figure.

Title:

After clicking New Post, then you will have the WordPress are where you have to type your blog post.

First thing you will come across is your post Title. Title is very important thing in your Blog post. Title covers the main topic of Your blog post. So Choose the Title wisely.

Body of the Blog:


After writing title of your post, there comes the Body of the Blog post. Body is the content area which contains Paragraphs, headings, images, videos, addresses , gallery, etc.

Block inserter:

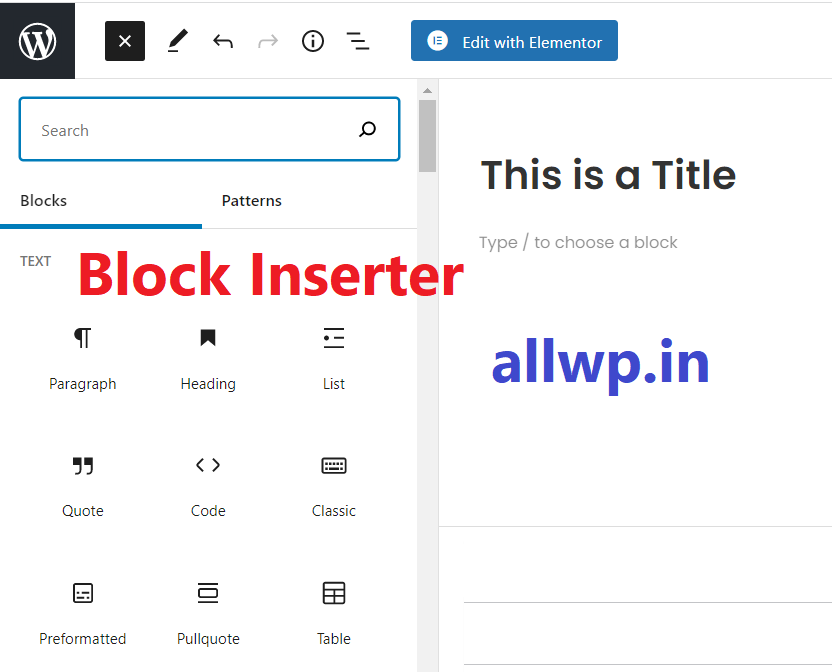
On the top left-hand side of your WordPress, You see a + icon which is a Block inserter.

WordPress has all its content in Block forms like paragraphs, media, etc. So if you want to add anything you have to click the block inserter. 

How to Insert Heading in WordPress Post?

The first thing we need in Content is Heading. Select Heading from the Block inserter.

Headings are from H1 to H6. The best practice is you should use H2, don’t use H1.

Headings are from H1 to H6. The best practice is you should use H2, don’t use H1.

How to insert a Paragraph in WordPress Post?

After heading the most important thing and most used thing in WordPress post is a paragraph. To insert a paragraph in WordPress you have to again click Block inserter (+ sign) and then select a paragraph from it.

Note: If you press Enter after writing, then you have a new paragraph for you.

How to insert Media in WordPress?

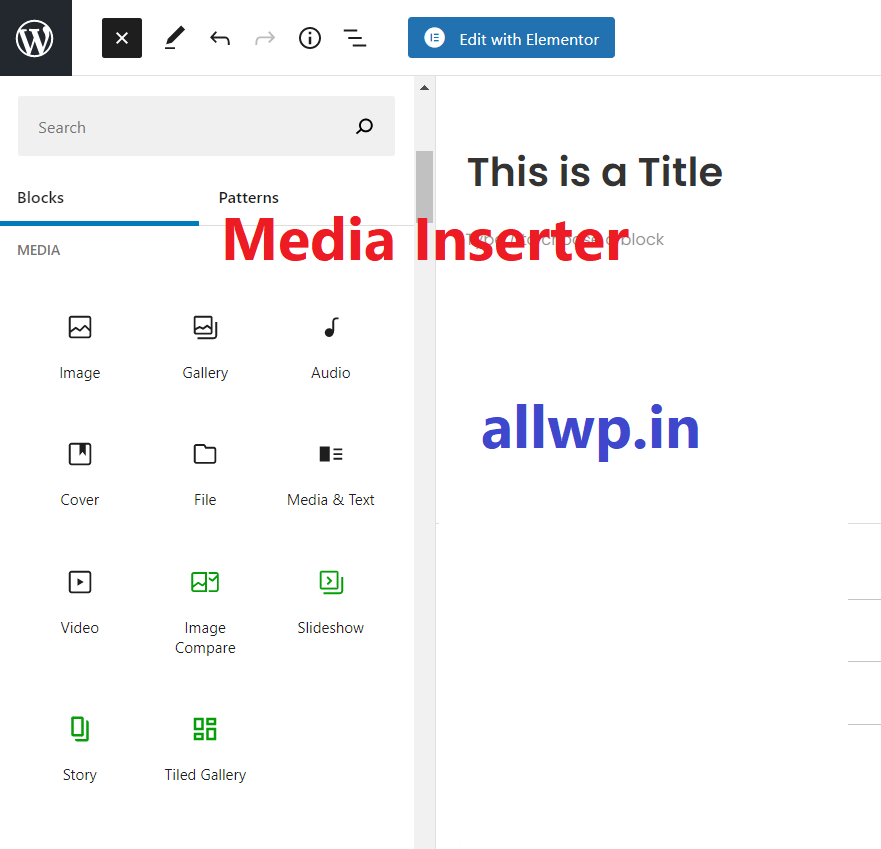
To insert media like Images, galleries, Videos, etc, again You have to use a Block inserter.

How to insert Image/ Gallery in WordPress?

To insert an Image either you can scroll down the block inserter or just type the image in block inserter, and click on the image.

Now you get options of inserting images, either you can insert image from your Media Library or You can upload the image from your Laptop, Computer or Mobile phone.

Hurray! You have successfully uploaded or inserted images in your WordPress Blog Post.

Note: Media Library is your WordPress Media Library where you will have the already uploaded images.

How to Insert Videos in WordPress?

Now, If you want to Insert video then also you have to take same procedure as of inserting Images, just you have to type Video in the search box inside the Block inserter as shown in figure and video.

Now, there are two ways to upload video. One of them is you want to upload your video in your website only then you have to follow the steps of Image Upload in video section.

The other one is you had uploaded your video on Youtube, Facebook, Dailymotion, etc and you just want to show that video on your WordPress website. In this case, Just you have to paste the Url of Your Youtube Video in the Url option in the video blog. As shown in the Video.

Congrats! You have successfully Written your first WordPress blog post.

Now, you have to publish the post, but wait before publishing the post some important things you have to do

Write Category of your WordPress post

As a book stall owner keep the books according to the topics or authors, so that he/she can have the book fast, like that you have to keep your post category wise. Before publishing click the Setting button above just beside the publish button and Scroll down you will see Category. 

By default, the Uncategorised check-box will be checked. But You should Add New Category and write the appropriate category name related to your post as shown in the figure and video.

WordPress Tags: After selecting the category, below the Category you will see tags. Tags are very important in blogging. We will discuss it in detail in our other posts. But meanwhile, you should keep in mind that, you should write some tags related to your post (keep in mind what people will search in Search Engine to see Your Post).

Now the options are of uploading the featured images and writing excerpt of your post and then clicking the Publish Button. After clicking Publish button, you have to click it once more to publish your post.

Hurray! Your first WordPress blog post has been published and it is live now. You can click view post to view your post and copy its link to share it with your friends.

Conclusion:

In this post, we have briefly described how to write the post in WordPress. While writing WordPress posts you will learn many things. If you want to know some useful plugins, themes, or any other assistance. Do comment or Contact us through Email. At last, don’t forget to subscribe and share.

How To Display School Result in WordPress Website?

How To Display School Result in WordPress Website?
how to show result in wordpress website

How to Show School Results in WordPress Website?
Nowadays it showing results on the websites is at high peak. Due to Lockdown and Online Teachings, many Educational systems want to show their results online.

Now the question is, how to Show School Results in WordPress Website for free?
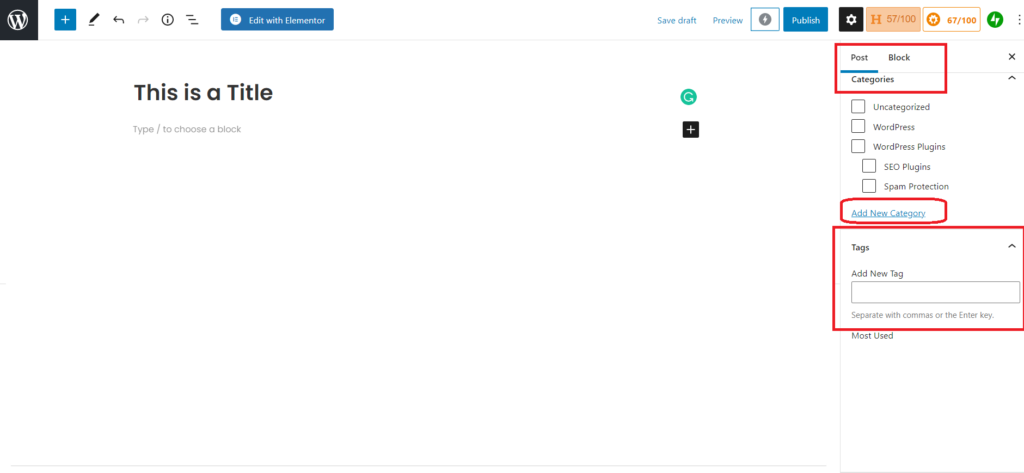
The Answer to the question is, there are many Free Plugins available in WordPress which will help you to show your School Results on Your Website. One of them is EU Student Result WordPress Plugin.

We have used this plugin in our multiple websites, compare to other WordPress plugins, till now EU Student Result WordPress Plugin is best School Results Plugin.
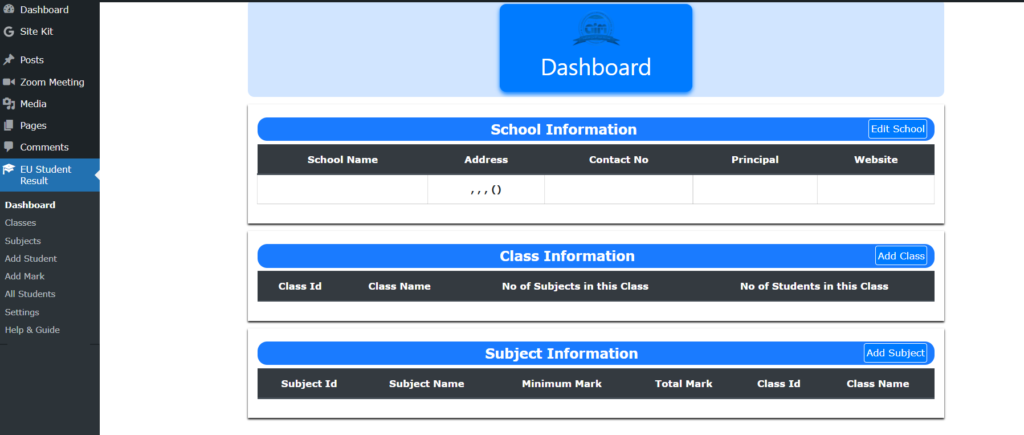
Now for adding School Result in WordPress Website, you have to download and install EU Student Result Plugin in Your WordPress Website.
After installing EU Student Result Plugin, You will have access to the Plugin in Your WordPress Dashboard.
How to Add School Information in WordPress EU Student Result Plugin?
After Installing the plugin, go to the EU Student Result Plugin Dashboard. There You can Add Your School Information as Shown in the image.


In the EU Student Result WordPress Plugin, Edit School Information and there you can fill the following details of Your School or College or other Institution. The Details are as follows
  • School Name
  • Village
  • Police Station
  • District
  • Pin code
  • State
  • Contact No
  • Principal
  • Website
  • Logo of the Institution

After entering the details, click on submit and your School has been Inserted into the database of Plugin.

Adding Class in Student Result using EU Student Result Plugin

How to Add Class in WordPress EU Student Result Plugin?

After Adding School in Result Plugin, now the next important step is adding classes. To Add a Class you can just click the Classes in the EU Student Result Plugin and from there You can Add The Classes of the School as shown in the figure.

How To Add Subjects in EU Student Result WordPress Plugin?

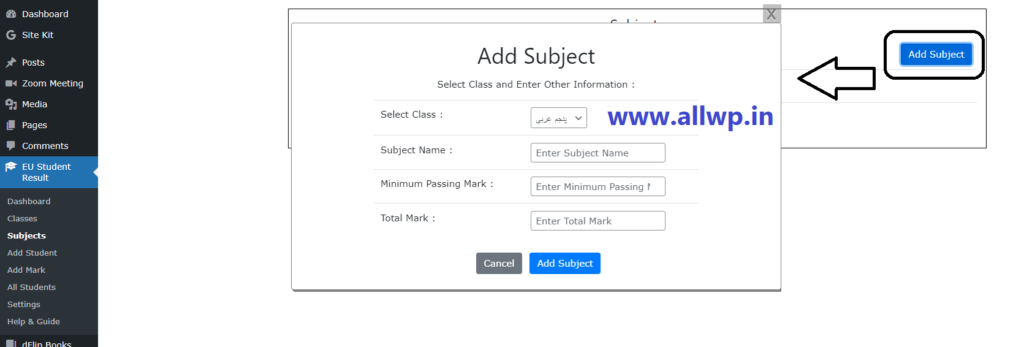
After Successfully addition of Classes in the Plugin, now comes Subjects. For Adding Subjects, just click subjects in the EU Student Result Plugin Dashboard and Add Subject.

how to add subjects in student result plugin

For Adding Subject, You have to first select the class from the drop-down menu, in which you want to add Subjects. After selecting the class, Add Subjects with their Minimum and Maximum marks. You have to add Subjects one by one in each respective class.

Congrats, You have successfully added the subjects in each class of your school. Now what? Yes, you have to add students and marks. So, here we go…

adding student in student result plugin in wordpress website

How to Add Students in EU Student Result WordPress Plugin?

After successfully addition of Classes and Subjects, now we have to add Students in the Database.

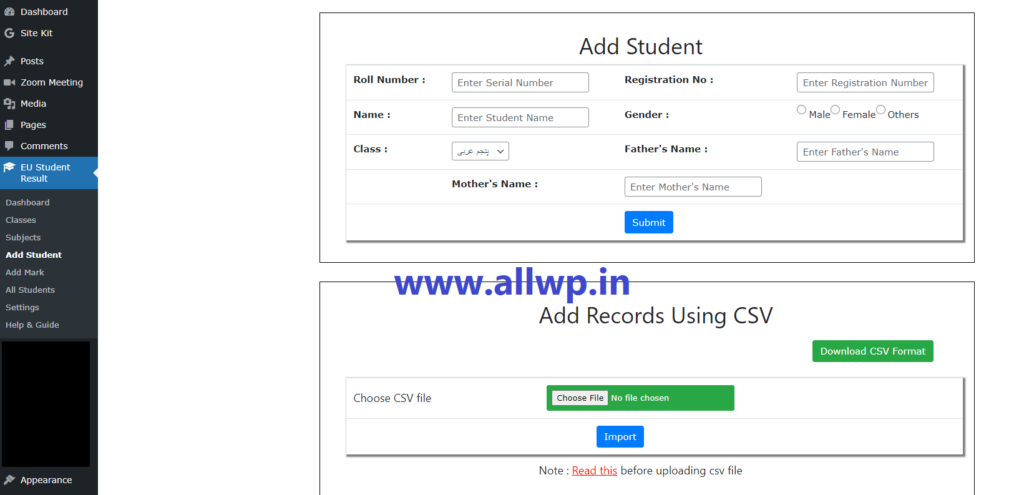
Like before, you have to add Students from the Dashboard of the EU Student Results Plugin, Click on Add Students and You will get the form to Add Students. You can add the following details in the Students

  • Student Roll Number
  • Student Registration Number
  • Student Name
  • Student Gender
  • Student’s Class
  • Father’s Name
  • Mother’s Name

After filling in the required details of the Student then click the submit button.

Hurray! you have added the Student successfully.

How to Add Marks in EU Student Result WordPress Plugin

After adding students successfully in the Plugin, now comes the most important addition in the plugins is Adding Marks.

adding marks in student result plugin wordpress

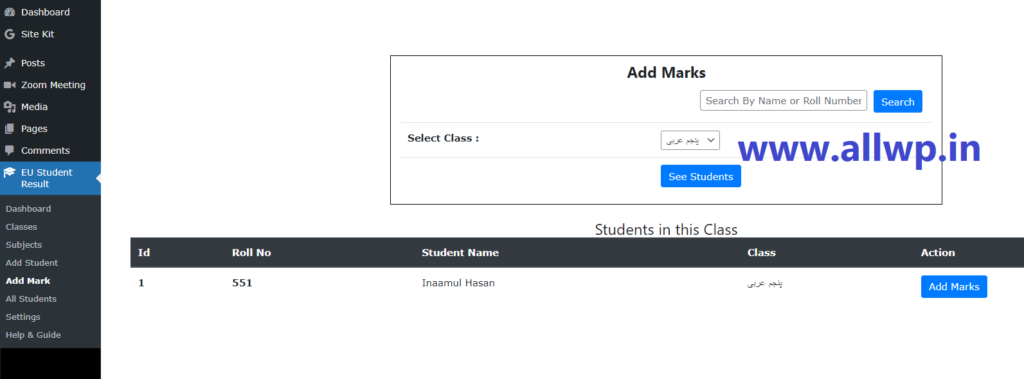
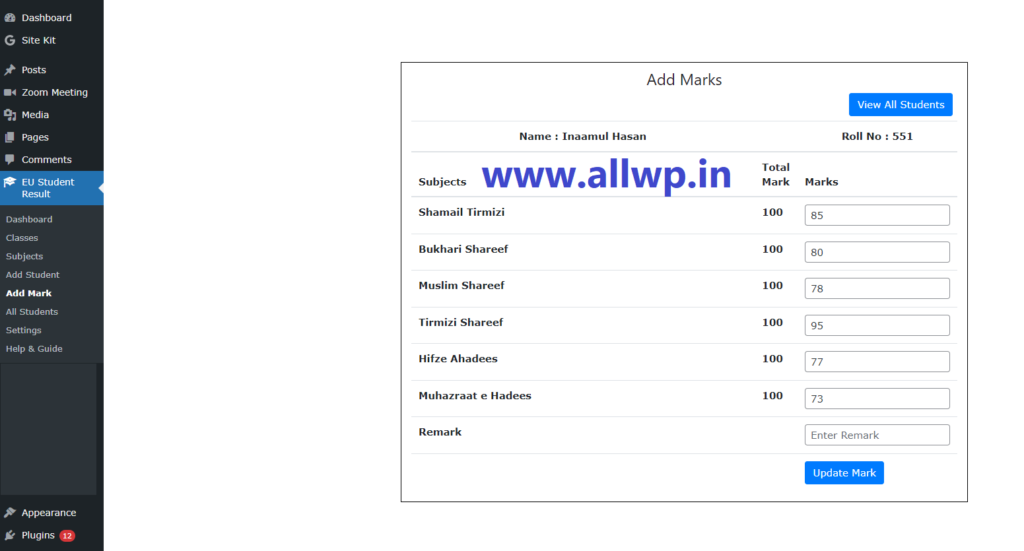
Click Add Mark from the Dashboard of EU Student Result Plugin, you will see a list of names of the students you added in the Student section with Add Marks option on the right-hand side. After clicking Add Marks, you will get the form where you have to add marks in the subjects you have added for the class of the student.


After adding marks, you have a Remark option in the last, you can write the appropriate remark of the student if required and then click Submit to Add Marks.

Congrats, now you have successfully added the marks of the student.

Here, You have successfully completed the Your School Results in Your WordPress Website.

How to Show Results on Our WordPress Website

Now, after successfully adding classes, subjects, students, and marks in the database of Your Website. Now You have to show this result to your Students and Their Parents from your website front end.

To Show, the Result in the front end, You just create a new post/page (whichever you want) write Title as “RESULTS…”. In the body section, just copy-paste this shortcode “ [eusr_show_result]

After writing the code, just publish your page.

Congrats, Your School Result has been successfully uploaded on your website.

Error: Publishing failed. The response is not a valid JSON response.

But After Publishing you will see this errorPublishing failed. The response is not a valid JSON response”.

No need to worry, Just WordPress Shows this error. Go to Your website and see the Result.

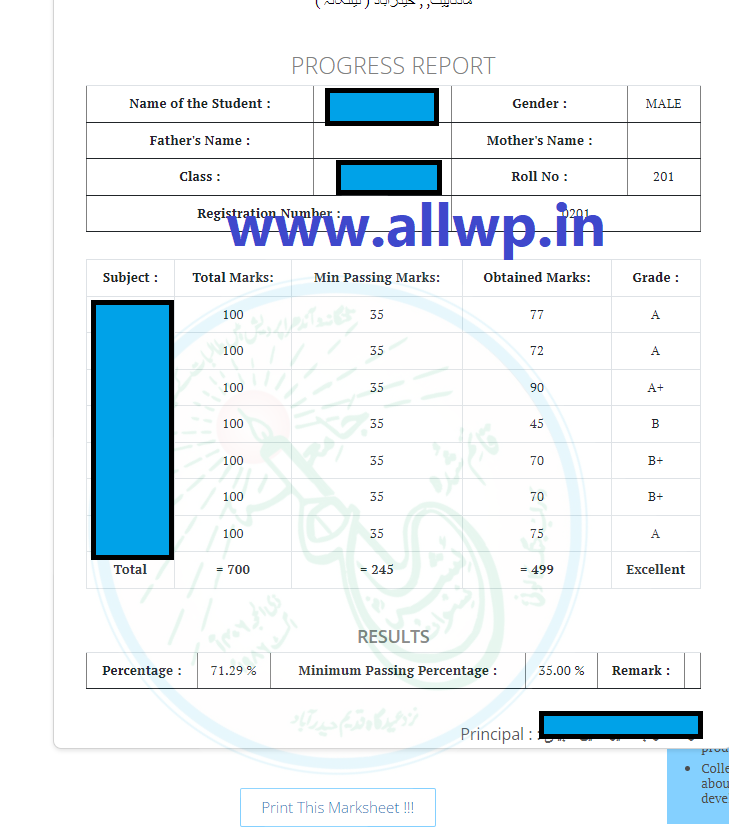
Hurray! Now the School Results are live on Your WordPress Website. Just open the post and write the Admission number, after selecting the appropriate class and clicking submit.

Here we go, the student result is showing on the WordPress Website.

How to Print School Result from WordPress website?


After viewing the result, now you must want to get the print out of your result. Not a big deal. Just below the Results you have Print this Marksheet. Just Click it to get your Result Printed.

So here we have successfully Display
the School Results in Our WordPress Websites.

We ask the users to donate to the Plugin maker so that he/they can come up with more useful plugins. You can get the donation PayPal link here in the Help and Guide Section of EU Student Result Plugin.

Do Follow us for more updates regarding WordPress Themes, Plugins, etc.