Answered: Your Most Burning Questions About WORDPRESS DISCUSSION SETTINGS
Do you want to understand WordPress Discussion Settings? In this post, we have explained everything which is there in WordPress Discussion settings.
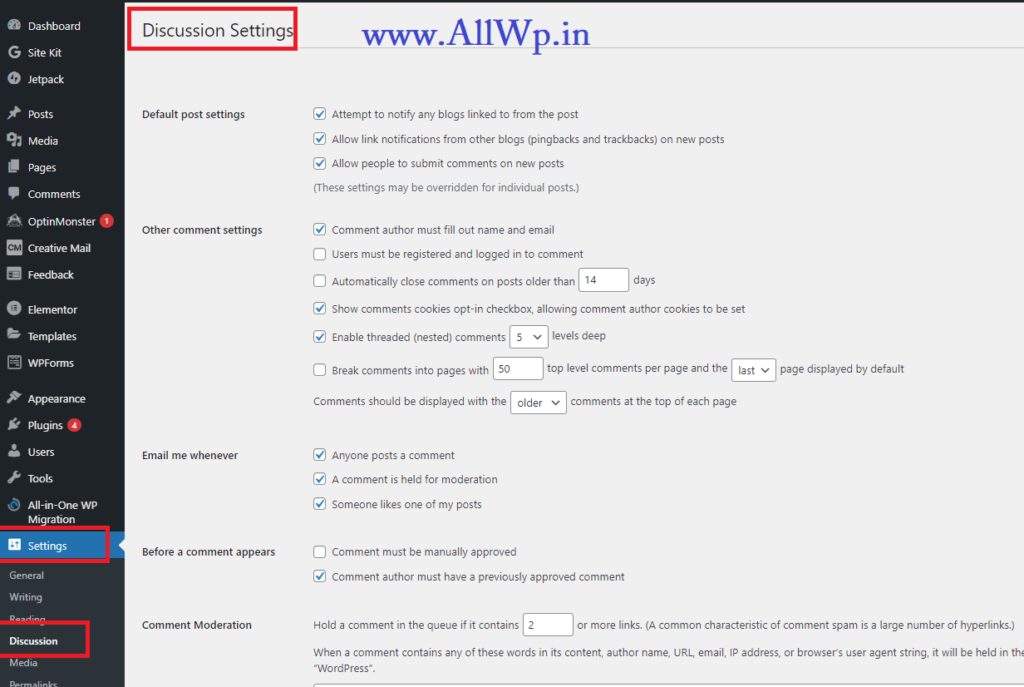
Default post settings
WordPress dashboard >> Settings >> Discussion Settings>> Default post settings
How to Enable or Disable Pingbacks and Trackbacks in WordPress?
Do you want to disable pingbacks and trackbacks on WordPress? Let us first find out what are these terms?
What is Pingback and Trackback?
Pingback and Trackback are used together most of the time but they have differences between them.
What is Trackback?
A Trackback is a notification that your website sends to another website or blog when you linked their website or any post into your post or page.
What is a Pingback?
On the other hand, pingback is an automated comment, that will be created in the comment section of the other blog post, to which you have linked in Your post.
Both Trackback and pingback work when the other website enables Pingbacks and Trackbacks.
Pingback vs Trackback
By the Definitions of pingback and Trackback, you understood that trackback is just a notification in the notification panel of the website, whereas pingbacks appear in the comment section of the website when you linked their post.
How to send out a ping to other websites?
Now the question is how can My website send out a ping to other websites?
Attempt to notify any blogs linked to the post:
The answer is very simple, go to the Discussion settings of Your WordPress and in the Default Post settings Check “Attempt to notify any blogs linked to from the post”
WordPress dashboard >> Settings >> Discussion Settings>> Default Post Settings
How to Disable Trackbacks and Pingbacks?
Do you want to disable pingbacks and trackbacks? Then just go to WordPress Discussion settings, and in the Default Post settings Uncheck “Allow link notifications from other blogs (pingbacks and trackbacks) on new posts”
WordPress dashboard >> Settings >> Discussion Settings>> Default Post Settings
If you uncheck this, WordPress will disable both trackbacks and pingbacks to your website. As many experts say, we should disable the pingbacks and trackbacks as the spammers used these as a tool to send spam.
For any reason, if you want to Enable pingbacks and trackbacks then you can check the box.
How to disable Comments from the posts?
Do you want to disable comments from your posts? If you are reading this, then you want to disable the comments from your WordPress posts.
To Disable comments from the WordPress posts, you have to go to Discussion Settings in Your WordPress dashboard, then in Default Post Settings, you will see Allow People to Submit Comments on New Posts. Uncheck the checkbox before this, then you have successfully disabled comments from new posts.
Yes, you can enable comments to the posts you want while writing or editing that post.
On the other hand, if you want to enable comments on the new posts, then check that box.
WordPress dashboard >> Settings >> Discussion Settings>> Default Post Settings
Note: In WordPress, by default, these boxes are checked.
Other Comment Settings in WordPress Discussion Settings
WordPress dashboard >> Settings >> Discussion Settings>> Other Comment Settings
Here we will discuss each and every Comment setting in WordPress so that you have an idea about them. By the way, these all are self-explaining but for beginners, this might confusing
Comment author must fill out name and e-mail: The First one is Comment author must fill our name and email. If you want that the person who is commenting on your post should fill in his name and email address then Check this box. In Practice, the name and email address won’t be verified before the comment is submitted. But Spammers can comment more easily if this field is not mandatory. If we make this field mandatory, then Spammer has to spend some time.
How to Accept Comments only from Registered Users?
Do you want, only registered users must comment on your WordPress post. Then WordPress has this option for you.
Users must be registered and logged in to comment: If you check this box, then only registered or logged-in users can comment on your WordPress posts.
How to turned off comments on old posts automatically?
Do you want to turn off comments on your old posts automatically? Then you have this feature form WordPress.
Automatically close comments on articles older than [___] days: By default, 14 days are written in the brackets, if you want to change the days you can select days after which you don’t want comments on your post.
So, if you don’t want comments on your older posts, then check this box.
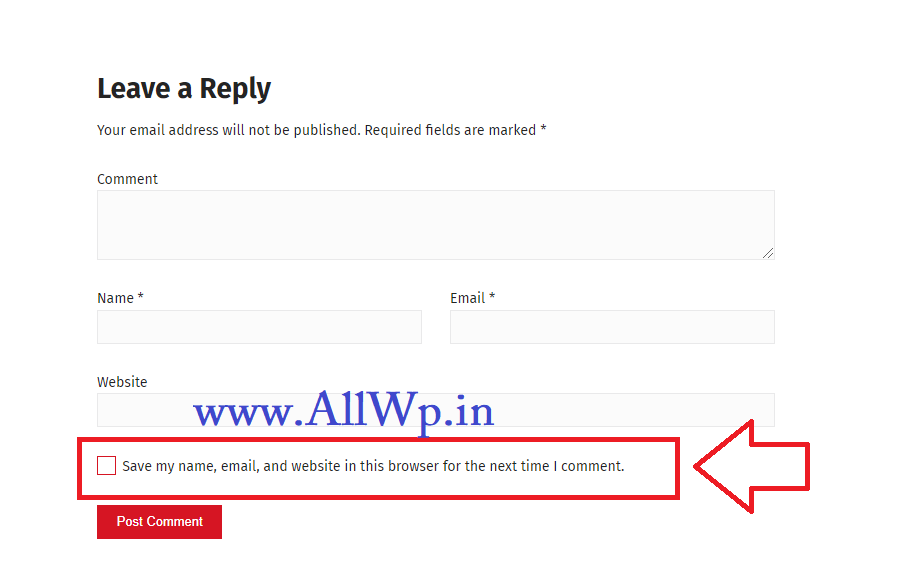
How to Add Opt-in Checkbox in Comments?
Do you want to add Opt-in Checkbox in your Comments?
Do you want to add a checkbox asking the user “save my name, email, and website in this browser for the next time I comment”? Then WordPress has this feature for you in its Discussion Settings.
Show comments cookies opt-in checkbox, allowing comment author cookies to be set:
In the Other Comment Settings of discussion settings, check this box, if you want to have saved my name, email, check the box in your Comment sections.
Show comments cookies opt-in checkbox
Else, if you uncheck this box then the Save my name, email, and website checkbox won’t be shown below a comment.
Enable threaded (nested) comments [x] levels deep: If You want to have threaded comments in Your WordPress posts. In Brief, if you want a reply option to comments, then it can be achieved by Checking this box Enable threaded (nested) comments [x] levels deep. [x] level deep means the number of maximum replies you want for comment. Put that value here.
If you don’t want the Reply option to comment then uncheck this box.
By default, WordPress has checked this box.
How to add pagination in Comments without plugins?
If you want pagination to your comments and you want only suppose 10 comments should be shown, then user has to click before or next to read the next comments, then WordPress has this option in Discussion settings.
Break comments into pages with [X] top-level comments per page and the [last/first] page displayed by default. Comments should be displayed with the [older/newer] comments at the top of each page:
Check this box if you want to add pagination to the WordPress comments and replace X with the number of comments per page.
How to sort comments first to last or last to first in WordPress?
Now, if you want to sort comments from last to first or first to last then select the appropriate option from the above last/first dropdown menu.
Email me whenever in WordPress Discussion Settings
WordPress Dashboard >> Discussion Settings >> Email me whenever
In this section, the Website Administrator or the Post author will have the option to get the notification when someone posted a comment on his post, or comment is there for moderation or when someone likes the post.
How to get Email whenever someone comment on a post?
Anyone posts a comment: Check this box if you want to get notifications whenever someone comments on your post. So, whenever a single comment is posted on your post, then an email to the author of the post will be generated.
A comment is held for moderation: If you have multiple authors on your website, and by enabling the above Anyone posts a comment setting, the authors will be receiving an email whenever someone comments on it. Now, if you as the owner of the website want to check the activity and review the comments then by Checking this box, WordPress will send an email to the owner of the website whose email address is set in General Settings of WordPress Settings.
How to get Email whenever someone like posts?
Someone likes one of my posts: Check this box if you want to receive emails whenever someone likes your posts.
Before a Comment Appears in WordPress Discussion Settings
WordPress dashboard >> Settings >> Discussion Settings>> Before a Comment Appears
This section of WordPress discussion settings provides the website owner a more control over the comments. The owner of the website will have control over the comments and he has the power to approve or reject the comments.
How to make comments manually approved?
A comment must be manually approved: Check this box if you want to manually approve the comments on your website. So before a comment is displayed on your website, it will be there in the admin comment section waiting for the admin or post author to manually approve the comment. By this, you can stop or reduce the activity of spammers.
If you want to automatically comment that should be published on the website then, uncheck this box.
Comment author must have a previously approved comment: Check this box if you want to automatically approve the comments of the comment authors whose comments are approved before by the administrator. So, if the email address of the comment author matches with the email address of the approved comment author, then it will automatically approve. Otherwise, the comments are held for moderation.
On the other hand, comments from blocked email addresses will be held for moderation.
Hold a comment in the queue if it contains [x] or more links. (A common characteristic of comment spam is a large number of hyperlinks.)
A common characteristic of spam comments is a large number of hyperlinks. In place of x write the minimum number of hyperlinks when you want to keep the comment in a queue. By default, it is 2.
When a comment contains any of these words in its content, author name, URL, email, IP address, or browser’s user agent string, it will be held in the moderation queue. One word or IP address per line. It will match inside words, so “press” will match “WordPress”.
In the box provided write the content type, or author name, or URL or email address or IP address or other things . Be careful while writing the names or Ip addresses.
These are self-explaining so we are just keeping what WordPress will have written on their settings. If you want the details do comment.
An avatar is an image that follows you from weblog to weblog appearing beside your name when you comment on avatar-enabled sites. Here you can enable the display of avatars for people who comment on your site.
Avatar Display: Check this box if you want to Show Avatars. Else, Avatars won’t be shown.
For users without a custom avatar of their own, you can either display a generic logo or a generated one based on their email address.
Mystery Person
Blank
Gravatar Logo
Identicon (Generated)
Wavatar (Generated)
MonsterID (Generated)
Retro (Generated)
Save Changes:
Make sure to click the save changes buttons to save the changes you have made to your website database. Once you clicked the button you will get a confirmation text that your settings saved successfully.
You can have a look at the discussion settings article at WordPress.Org
Do like the post if it is helpful to you. Else, Comment for giving feedback.
WordPress Error: Social Media Icons Not Showing Up in Avril Theme
Are you getting this error in Avril Theme that Social Media Icons Not Showing up?
I am getting this error too. So, I contacted the support team of Avril Theme, and it resolved my issue. So, read on to get the solution.
Avril Theme is one of the best flexible, super-fast, lightweight multi-purpose themes.
The landing page of the Avril Theme is very attractive. It has Social Media icons and email addresses, customer support numbers, and office addresses above the header in an attractive way.
Avril Theme is developed by the Nayra Themes. It is one of the themes developed by Nayra Themes.
One of the best things about Avril Theme is its customer support.
Whenever I wrote for any support to them, they replied fast, and their customer support executive solved the problem completely.
Social Media Icons Not Showing?
Do You get this WordPress Error: Social Media Icons Not Showing?
Above, is an example of social media icons not showing up on the Hyderabad Rishte India website.
If you are using Elementor– The #1-page builder for WordPress, then on the landing page you might not see your social media icons, instead, you will see the red-coloured circles for each icon.
This is because, when using Elementor, Font Awesome 4 support loading will be off.
And the social media icons will be shown using font awesome only.
So, you have to load font-awesome on your website.
How to Turn on Loading Font Awesome 4 Support?
If you are getting the error that Social Media Icons on the landing page not showing, then follow these steps
1. Go to WordPress Admin Dashboard
2. Go to Elementor Settings
3. Go to Advanced Settings
4. Select Yes to Load Font Awesome 4 Support
As usual, you have to log in to your WordPress Admin Dashboard, then you have to go to ElementorSettings. And Navigate to Advanced Settings as shown in the figure. In Advanced Settings, you will see Load Font Awesome 4 Support in the end. While Seeing, it will be NO, just change it to Yes.
And save the changes you made.
Now go to your website, or refresh the website page, you will see your Social Media Icons displaying nicely.
The Nayra Themes, the support team helped us to solve this issue. For the convenience of our visitors, we write it on our Blog.
If you find it useful, then like and share it. If you have any feedback, then do comment. So that, we can improve.
Do You want to moderate Comment in WordPress? Let’s first understand what comment is?
Comments allow the visitors to give feedback or ask questions regarding your Post or Page. By this, the visitor can have a discussion with the Post Author.
Comments are one of the most important aspects by which you can engage visitors on your website.
What are Comments in WordPress?
Comments allow visitors to write anything about your WordPress post. At the end of each post, you have a section in which a user can write something about your WordPress post. This section is called the Comment section.
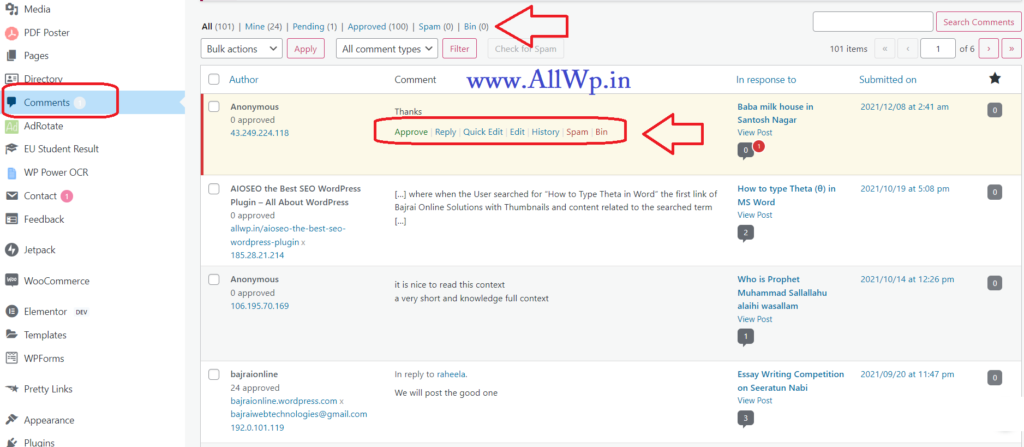
Understanding WordPress Comments Admin Panel
As a WordPress developer, you need to know about WordPress Comments. Let dig deep into the Comments topic.
In the Comment section of the WordPress Admin Panel,
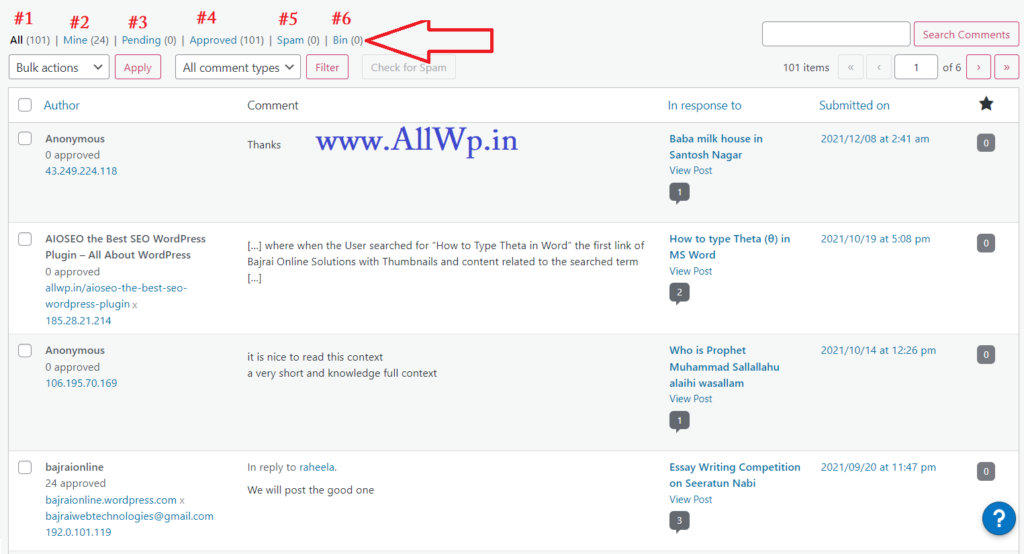
On the right-hand side, you will see
1. All: All means, all the comments and pingbacks you get on your website
2. Mine: Mine means, all the comments or replies you have given on your website, i.e., your comments on your website.
3. Pending: Pending means, the visitors commented on your Website, and yet you haven’t approved it. It is pending approval.
4. Approved: This section has the comments on your website that you have approved.
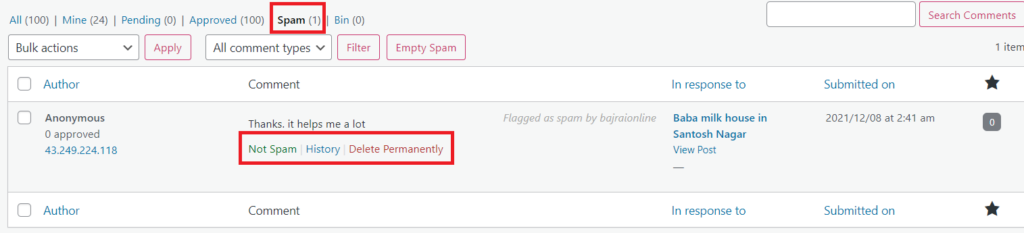
5. Spam: Spam is the unwanted comments, this section contains the comments those are marked as spam by you. In WordPress, Akismet Plugin filters all the spam comments and saves your website from malicious comments/links.
In the Spam section, you can Delete permanently the comment from your website, you can see the History of the Comment and You can also move back it to the comments by clicking on No Spam as shown in the screenshot.
6. Bin: As we have dustbin for waste materials in our houses. Likewise, the deleted comments by the admin will be in Bin in the WordPress website.
In the Bin Section, You have the following options
You can mark the deleted Comment as Spam here, you can Delete Permanently the comment or you can restore it back to comments.
7. Search Comments: As we have a search option on our WordPress website, so that users can search the website, likewise, in the comment section we have search comments option on the top right-hand side, by which administrators can search the comments.
Comment Moderation in WordPress
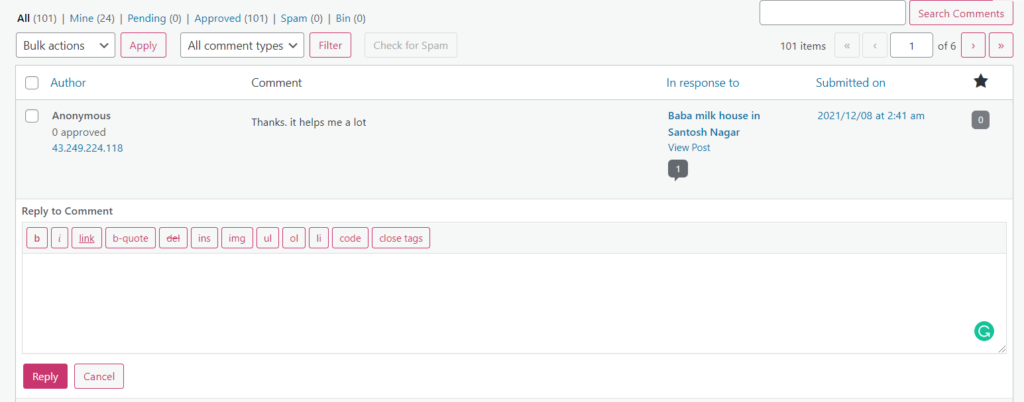
When you hover on any comment you will see the following options
How to Approve a Comment in WordPress?
Approve/Un approve: As shown in the figure, the first option is to Approve if the comment is pending and you haven’t approved it till now.
Then Approve option will be highlighted. If you click on the Approve, the comment will be approved and it can be displayed on your website.
How to Unapprove a Comment in WordPress?
After approving the comment, when you hover on the section below comment, you will see the unapprove option highlighted. If you want to change the status of the comment to pending, then click on Unapprove.
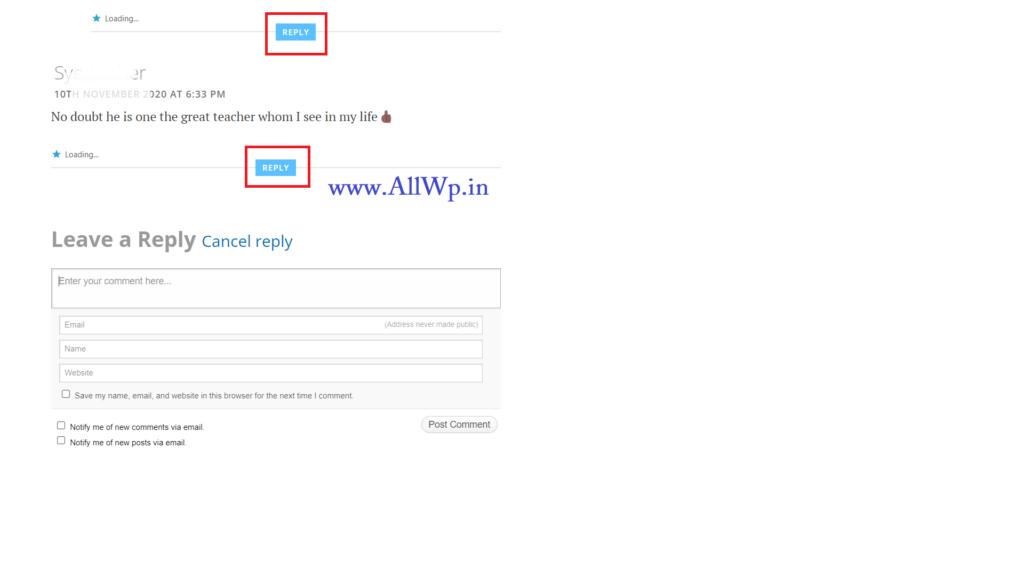
How to Reply a Comment from WordPress Admin panel?
Reply: If You want to reply to a particular comment through the admin panel, then click on the Reply button. Then You will get the text area with the heading reply to comment. Here you can reply to a particular comment, same like you write a WordPress post. After writing, click on the reply button to post it.
Can I Edit a Comment in WordPress Admin Panel?
Yes, you can edit the comment in the WordPress admin panel. We have two methods for Editing Comments
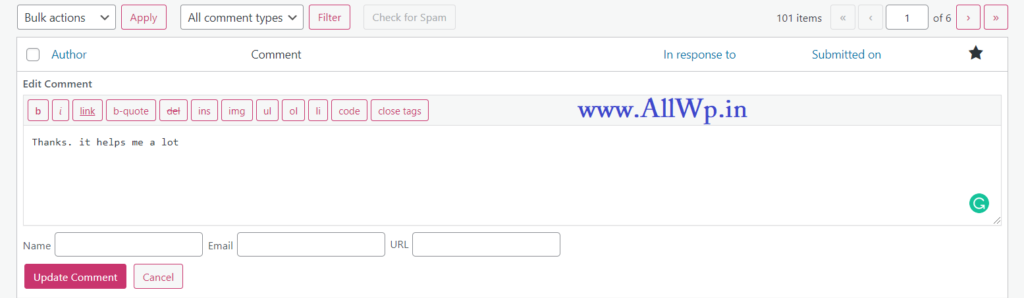
1. Quick Edit: The next option is Quick Edit, In WordPress, You can Edit comments in two ways: Like You Edit Posts and Pages in WordPress.
In Quick Edit, you (the administrator) can Edit the comment text of the commentor. You can also write the name of the author with his/her email address and URL to a website if the author has a website.
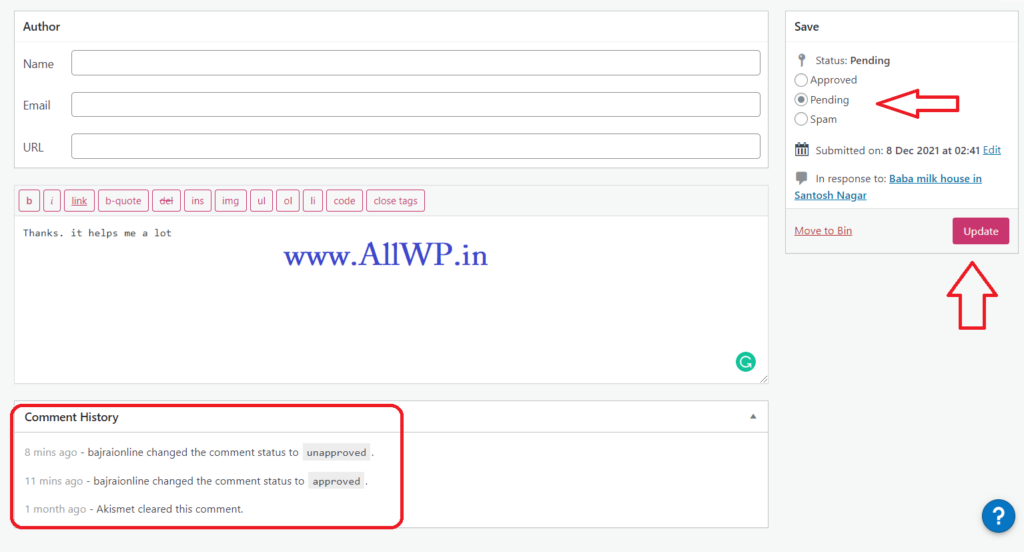
2. Edit: The other Option for editing comments is Edit, Edit is advanced version of Quick Edit.
In the Edit option, besides editing the comment text & author details, you can see the History of Comment. Here, you can also see the status of the comment whether it is approved or pending. And, you can approve it or make it spam from the edit option.
You can also delete the comment, by clicking the move to bin option as shown in the figure.
How to check history of Comment in WordPress?
History of comment means when it got approved or any editing was done to it.
If you have the Akismet Anti-Spam plugin, then you will see in the history of the comment, Akismet cleared this comment. That means Akismet checked whether the comment is spam or not. If it is not spam, then Akismet will clear the comment. Else, it will automatically reject the spam.
Then, it will show when the administrator approved that comment.
How to Spam a comment in WordPress?
If you think the comment is spam, then you can click on Spam. The Comment will be moved to the spam folder.
If you realize that the comment is spammed mistakenly, then you can go to the spam folder and click on Not Spam. Here you can also delete the comment permanently from the website.
How to Delete a Comment in WordPress?
If you want to delete a comment in WordPress, just click on the option Bin beside the Spam option. When you click on Bin, then the comment will be moved to the Bin folder and can be deleted completely from the bin folder.
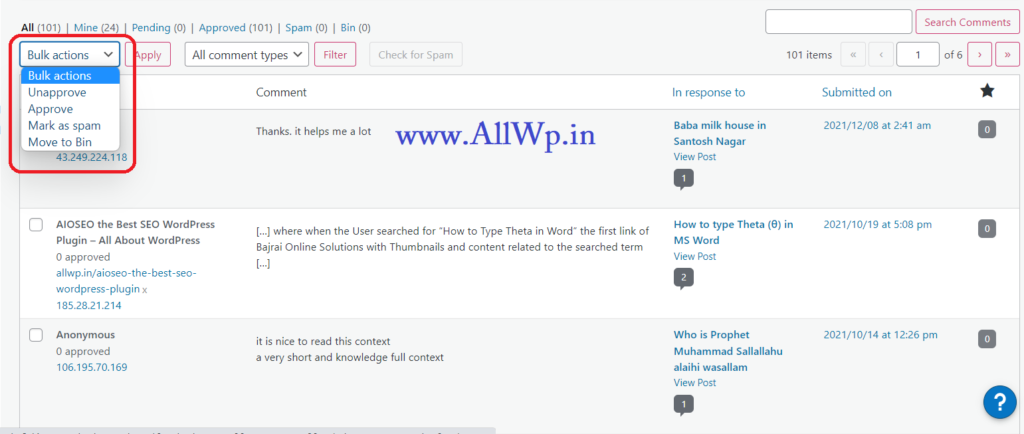
Bulk Options in WordPress Comments:
Like Post & Pages, we have Bulk Options for comments moderation also. In the Bulk Options, as shown in the figure. You have 4 options: namely
1. Un Approve,
2. Approve,
3. Mark as Spam,
4. Move to Bin
You can select the comments, and click on select one of the options above, and then click on Apply.
By this, you can Approve comments in bulk, Mark comments as spam in bulk, move comments to the bin in bulk, and un-approve comments in bulk.
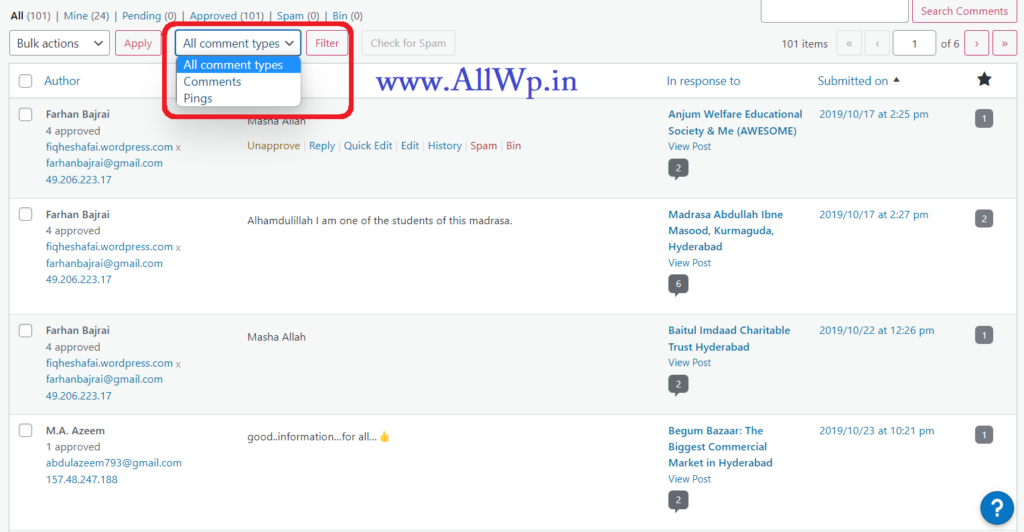
Filter Options in WordPress Comments
The other option at the top of the comments is All Comment Types.
In this drop-down, you will see two options namely:
Comments and Pings.
Comments are the feedbacks by your visitors as discussed above.
Pings are the free backlinks you get from other websites. That means the other website links your website in their post or pages. It is called Ping in your comment section.
Now, you can filter out Comments or Pings here. Just Select Ping and click on Filter you can see all the backlinks to your website.
Understanding Comment in Detail:
Now, let’s dig deep to understand the comment.
As shown in Figure we have 9 things to see in the comment.
#1 is the Comment Author name
#2 is the number of comments approved
#3 is the URL to the websites of the comment author
# 4 is the Commentor IP Address
# 5 is the Comment text
#6 is the post name, on which the commentor commented.
#7 View Post is the post link
#8 is the number of comments on the Post
#9 is the Date & Time of the comment.
The other settings of the Comments, we will discuss in our other post. Meanwhile, you can go to your WordPress Discussion settings and check the Comments Settings there.
If you find the article helpful, do like and share it. If you have any feedback feel free to comment so that we will improve.
Do you want to add a page in WordPress? Let us know what is the page in WordPress?
What is a Page in WordPress?
A Page in WordPress is just like a post, but the page is static and posts are dynamic.
You Create a Page for static information, that you don’t want to change like the About Page, Contact Page, Privacy page.
Pages have content that is non-chronological which means the content in the pages is not time dependent whereas, in Posts, the content is chronological.
Pages vs Posts in WordPress
This is one of the most common questions that comes to mind of a beginner that when should I use a Page to write content, and When Should I use a post for writing content.
Similarity between Posts and Pages in WordPress
Basically, both pages and posts are similar up to some extent like
Both Posts and Pages have Title
Both Posts and pages have Body Content with all the tools
Both Posts and pages have Featured image option
Both Posts and Pages can be published
Both posts and pages look identical to visitors
Difference between Posts vs Pages in WordPress
As they have this many of similarities, besides they have some differences also
Pages don’t have Tags and Categories whereas Posts have Tags as well as categories
Pages have non chronological content, whereas Posts have reverse chronological content
Pages are hierarchical nature whereas posts don’t have hierarchical nature.
Posts have Comment Options by default, whereas pages don’t have comment options
Pages do not have Author name, published date etc, whereas Posts have author name, published date etc.
Posts are included in RSS feed, whereas pages don’t.
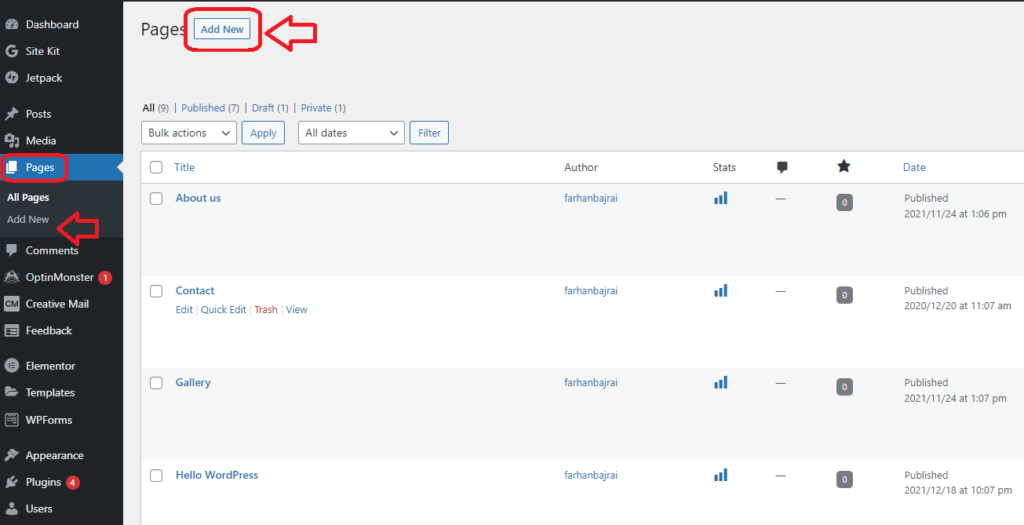
How to Create Pages in WordPress?
Follow these simple steps to create a page in WordPress.
Note: As discussed above Pages don’t have WordPress Taxonomies like Categories, and Tags.
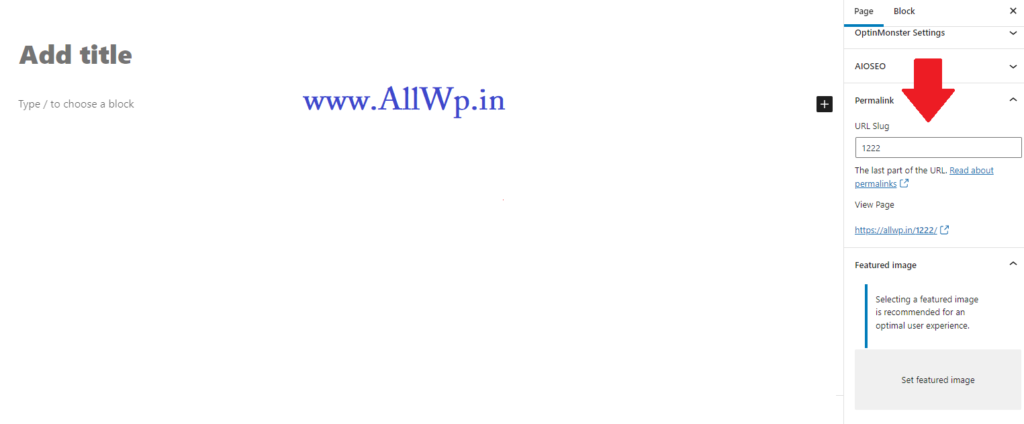
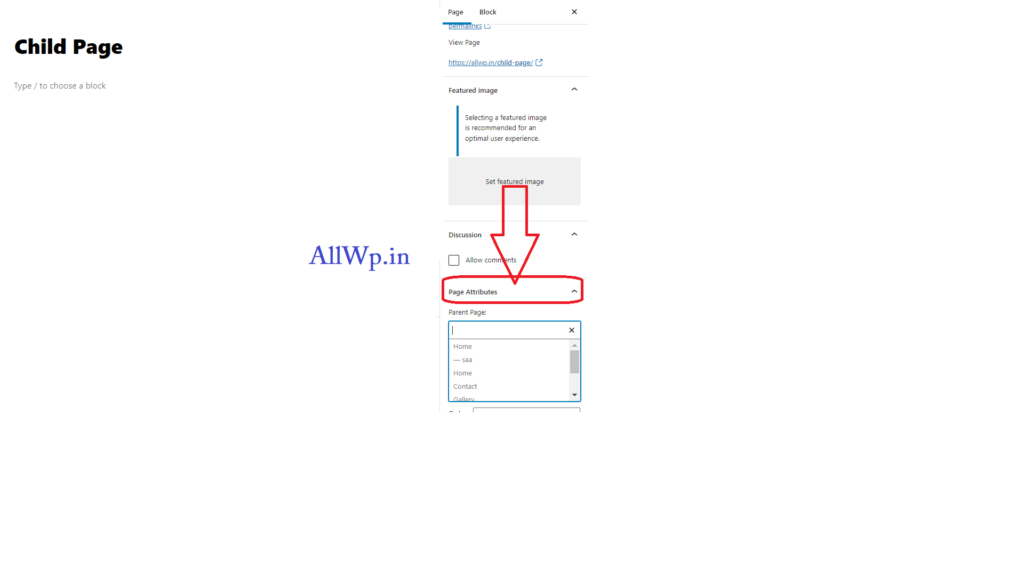
How to add Child Page in WordPress?
Unlike Posts, Pages have the hierarchy in WordPress. You can have child pages like you have Child Categories. To add Chile Page in WordPress, just after writing the content, just go to settings on the right-hand side, just scroll down to Page Attributes, and select Parent Page to your page.
This page will become a child page to your Parent page.
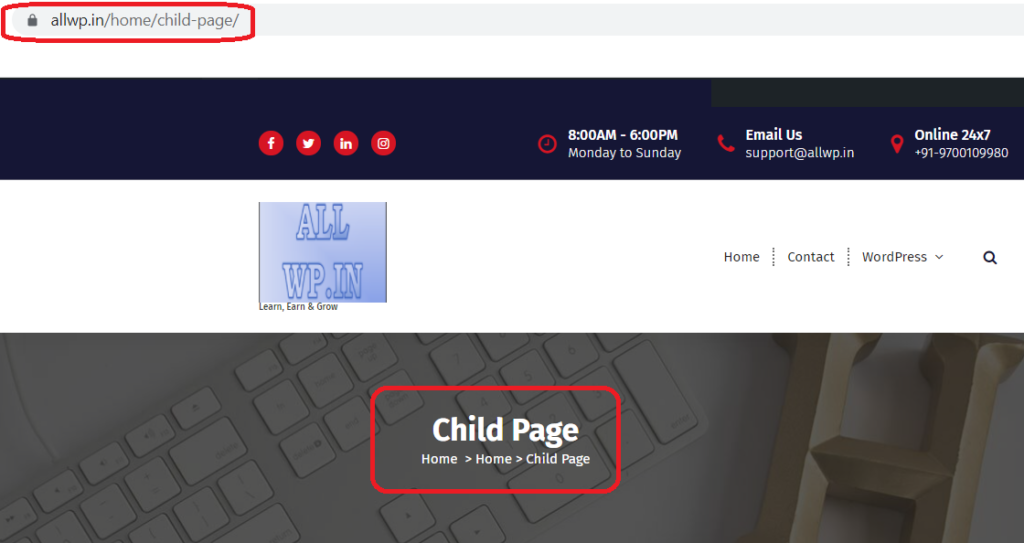
What will be the URL of Child Page?
The URL of the Child page will be like this website name, then Parent Page, then Child Page.
https://allwp.in/home/child-page/
So, here you have successfully added a Page in WordPress as well as a child page in WordPress.
For adding images to your WordPress website, first, you have to upload that image or image to WordPress Media Library. If you don’t know how to upload images to WordPress, see the how-to upload images to WordPress Website.
Now, we assume that you have successfully uploaded the required images to your WordPress by following the steps we discussed in the above-mentioned post.
How to Add images to WordPress Post?
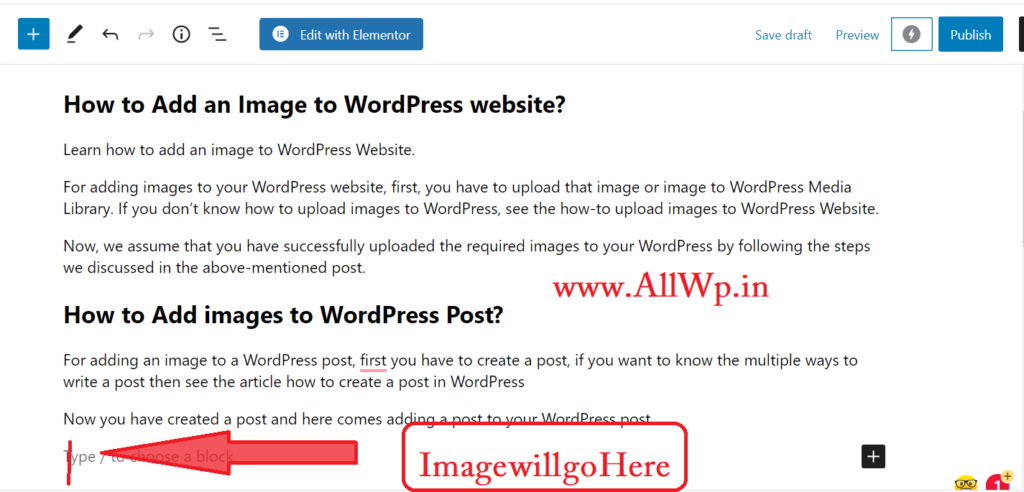
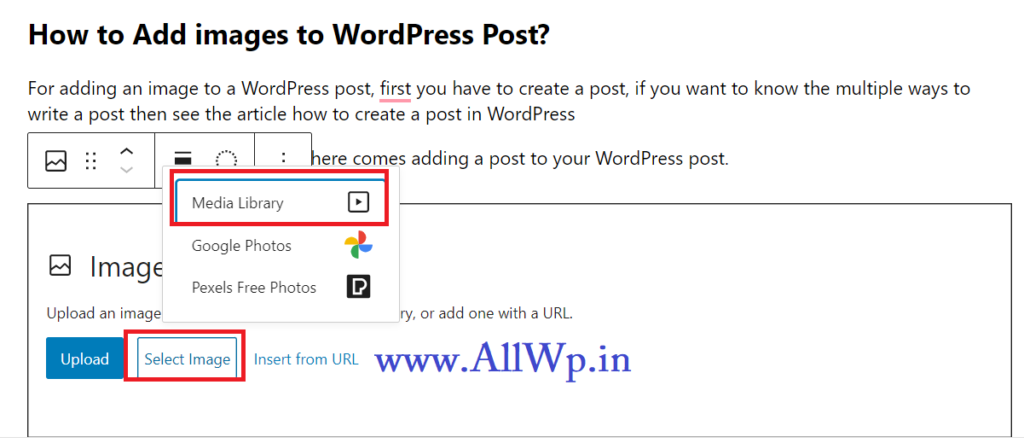
For adding an image to a WordPress post, first, you have to create a post, if you want to know the multiple ways to write a post then see the article how to create a post in WordPress
Now you have created a post and here comes adding a post to your WordPress post.
Now,
1. Position the cursor where you want to add an image.
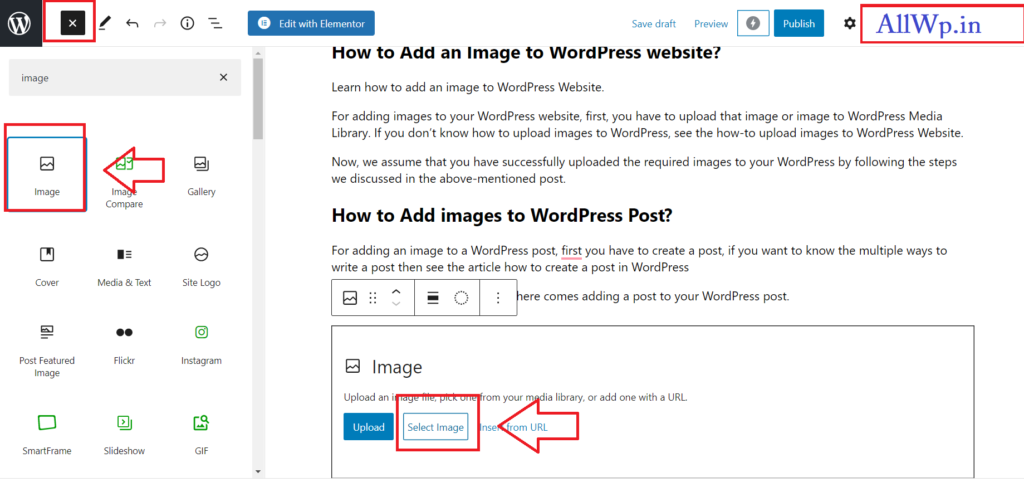
2. Click on Block Inserter and Select Image
3. Now, Click Select Image, then Click on Media Library
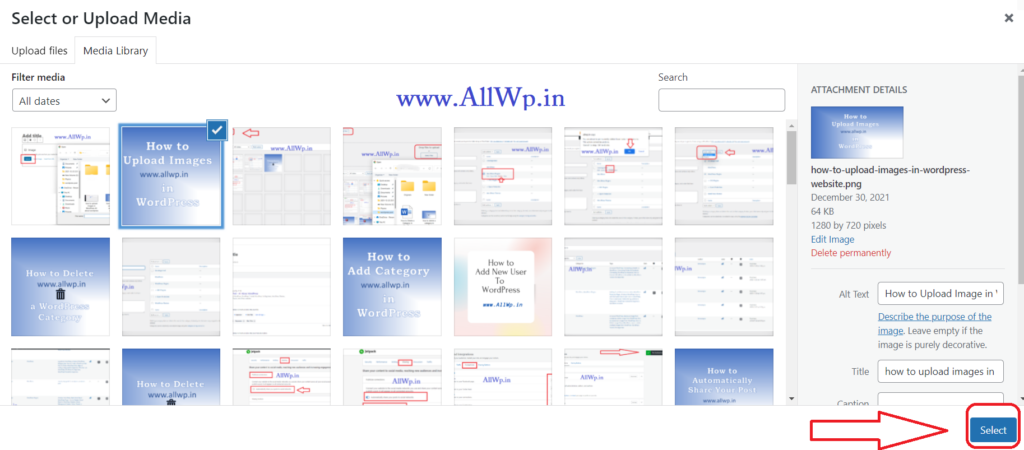
4. Then, In Media Library, select the image you want to add to your WordPress Post,
5. After selecting the Image Click on Select Button Below on the Right-hand side
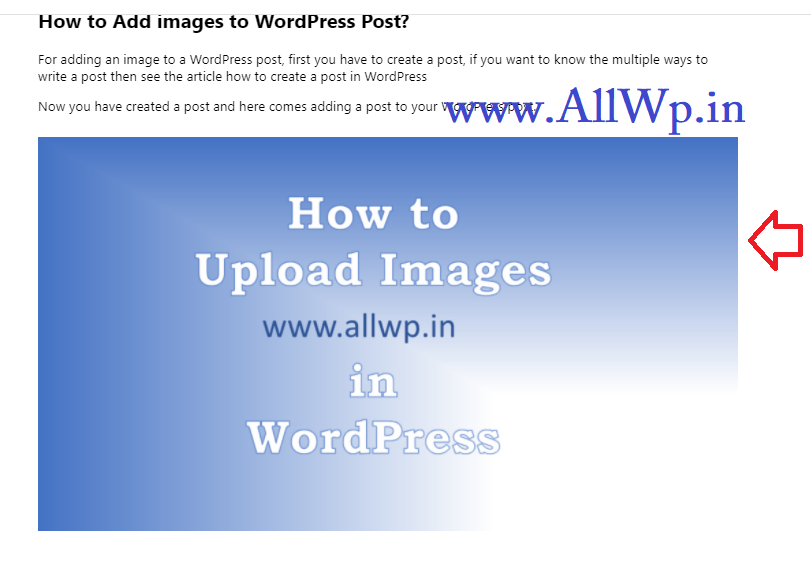
Hurray! Your Image is added to Your WordPress post Successfully.
We hope, this article was helpful to you, and you added images to your WordPress post easily. If it is helpful to you then kindly like and share it. If you have any feedback, then do comment below, so that we can improve.
Farhan Bajrai is an Entrepreneur, Web Designer as well as a Teacher. He resides in Hyderabad. He is the Founder, Designer, and Director of Bajrai Online Solutions.